Telnet is one of the popular network protocols widely used in order to manage network devices and other equipment that actually support this protocol. If you guys are a system or network administrator. I’m sure that you guys know the importance of having telnet client utility on your Windows 7, 8.1, as well as the latest Windows 10 desktop and laptop. For some really strange security reasons, the latest Windows versions do not come along with an installed telnet client. By default, you guys can’t use Windows 10 or 8.1 to connect other network devices without even installing telnet client’s utilities. In this article, we are going to talk about How Do I Turn On Telnet Server in Windows 10. Let’s begin!
If you guys search telnet in apps or then type ’telnet’ in the command prompt. It will then return an error message that says ’not recognized as an internal or external command’. Installing the telnet client from the control panel in Windows 10 and 8.1/7 will basically solve this issue easily actually.
Installation medium like CD/DVD, ISO, or any other downloads is not needed for this purpose. We can simply turn it on from the control panel as well.
Contents
How Do I Turn On Telnet Server in Windows 10
If you type in telnet in the command prompt, then you guys will get an error stating “Telnet is not recognized as an internal or external command.”. This is because the telnet client is turned off in Windows 10 by default. In order to enable Telnet, head to the start menu and type “Turn Windows features on and off“.
Now on the next pop-up, just browse to Telnet Client. Then tap on the checkbox beside it and hit Ok. Windows will then take some time in order to install Telnet and when you do it.

You can use the telnet command in CMD or you guys can fire the telnet utility from the search menu. In order to do that, just press Win+S and type Telnet.
This will now open the telnet client directly within the CMD and the window should just look like the one below.
How Do I enable Telnet Server for Windows 10?
Telnet clients basically let you connect to other Telnet Servers. You guys cannot connect to your own system and fire remote commands as well. For that, you guys need a Telnet Server and unfortunately, there is actually no native way in order to turn it on in Windows 10. You have to install third-party apps in order to start serving Telnet on port 23.
My two favorite utilities to do this are HK Telnet Server and KpyM Telnet Server. Both of them actually serve a different audience as well.
If all you guys want is just to enable the telnet server in order to fire remote commands to your machine, I would suggest you HK Telnet server. It is pretty easy in order to set up. Simply, you need to download the app and open the application. It is more of like a portable app instead of an exe. As soon, as you guys open the application, you get a floating window actually.
Here, you guys can enter the port number where you guys want Telnet in order to accept the connections. The UI is pretty simple along with minimum options. Also, you can set a user ID and password for the telnet login actually.
Further
The app does not actually provide an option to force SSL or encryption. If you guys want a bigger solution along with SSH such as custom login message and IP blocking. Then you have to get on KpyM Telnet Server. During the installation of the app, you guys will be prompted to start the server either at port 22 (SSH) or port 23 (telnet) as well. In case, you are going to run telnet, then select port 23 now as this is the only time you will be seeing GUI in this app.

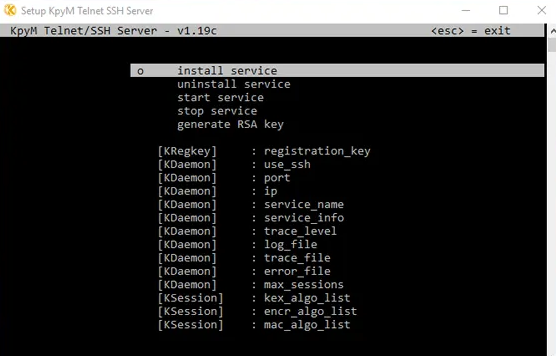
When you guys have finished installing it, you can configure it further via the KTS daemon. Head to the Start menu and then type “Setup kpyM Telnet SSH Server“. This will now open a black dialogue box where you guys can also configure settings such as use SSL, port number, login_message, password, etc. The same daemon also gives the options in order to start or stop the telnet server.
Conclusion
Alright, That was all Folks! I hope you guys like this article and also find it helpful to you. Give us your feedback on it. Also if you guys have further queries and issues related to this article. Then let us know in the comments section below. We will get back to you shortly.
Have a Great Day!
Also See: How To Fix OneDrive Sync Pending Issue On Windows 10


