Smartphone owners take plenty of videos every day. On YouTube alone, more than 300 hours of video uploaded every minute, and that is a drop in the bucket. People do everything from taking short videos of their kids or cats doing something cute or terrible. To make full-fledged motion pictures with their phones. The amount of video that YouTube will take down grows enormously every year, and this trend shows no signs of slowing down. In this article, we are going to show you how to remove audio from video.
This actually creates a problem for people intending to do something with their video, of course. A lot of the time, the audio track that accompanies our recordings is too loud or also captures sounds. We do not want to hear such as swearing or other interference. Other times, the sound we record is irrelevant to our intentions for the video. We plan to replace it with a soundtrack like music. In any event, there are many times when we want to just remove the audio component altogether.
Whether you are creating a video for your own consumption or for posting online, removing audio can be an important part of the production. It can remove ambient noise, remove loud or distracting sounds, or pave the way for you to add a soundtrack to your production. Either way, you first need to remove the original audio component of the recording. In this article, I will show you how to strip out the audio portion of your recordings.
Contents
Remove the Audio From Video on a Computer
If you have your video file on a computer. Then the easiest and most powerful way of removing the audio track is to use the supremely useful VLC media player. VLC can remove the audio track from a video on Windows PCs, Linux and also Mac. You can also use iMovie on macOS. I will show you how to use both. Both VLC and iMovie are totally free to use.
Remove Audio from Video with VLC
VLC is the king of all the media players because it plays almost any video file in any format and has a range of powerful editing and manipulation tools. For those who want to dig a little deeper.

- Open VLC and select Media from the menu.
- Select Convert or Save and then Add.
- Add the media you want to remove audio from and then select Convert from the small drop-down menu at the bottom.
- Select the spanner icon next to Profile in the next window.
- Select the Audio codec tab and uncheck the box next to Audio in the window.
- Hit Save.
- Enter a destination for the file at the bottom of the Convert window.
- Select Start to recode the media without audio.
Remember to name the file something different in Step 7 to create a copy of the file and not overwrite the original one. That way, if anything goes wrong or if you want to undo the changes, then the original remains untouched. You can always delete the original once you are sure you no longer need it.
Use IMovie to Remove Audio from Video
iMovie comes built into macOS and is pretty good for basic movie editing and managing short videos for social media. It can remove audio from a video, just like VLC. If you would like to try iMovie, you can download it from here.
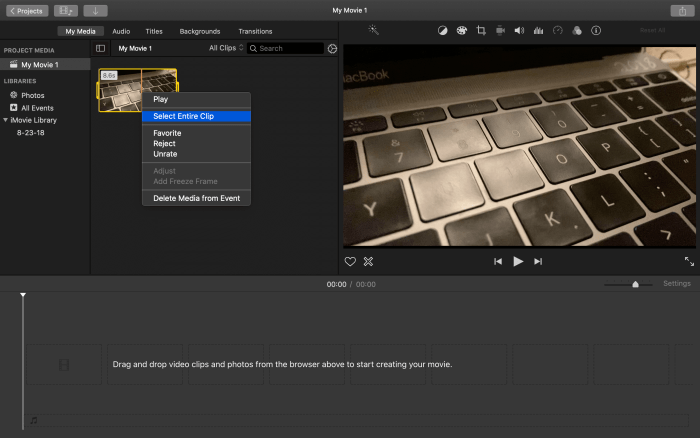
- Launch iMovie and select Import Media in the center.
- Now load your video, right-click it, and Select Entire Clip.
- Drag the video into the Timeline at the bottom of the screen to allow editing.

- Right-click on the Timeline and select Detach Audio. This splits the Timeline into pure video and pure audio.
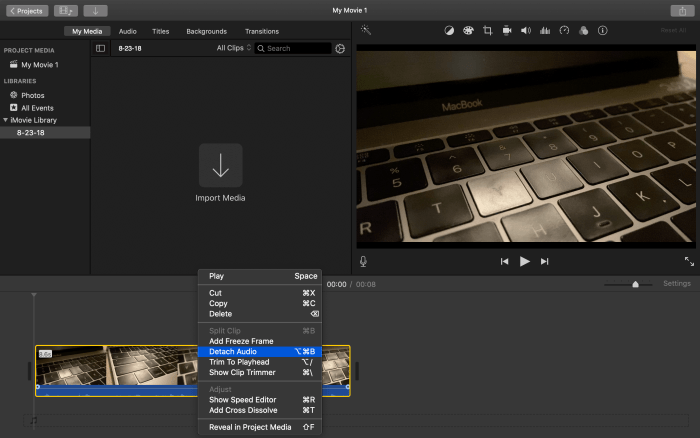
- Right-click the audio track and hit Delete.

- Select Export in the menu and save the video somewhere.
Save the media as a different file than the original to make sure you can undo or redo any changes from the original. You can also delete the original file after you have made sure the new file is what you are actually looking for.
Use Adobe Premiere Pro to Remove Audio from Video
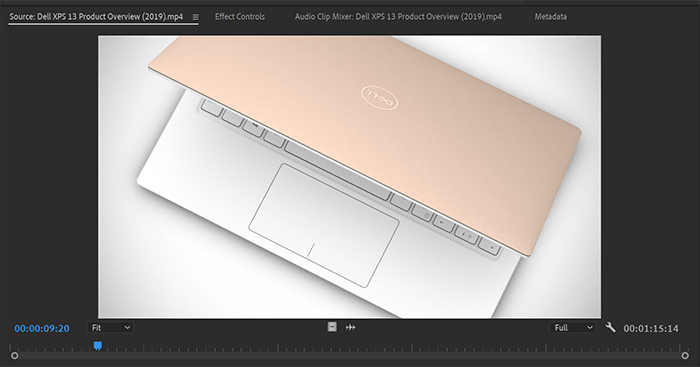
If you happen to attend a college with a video lab, or you work at a place with access to Adobe’s Creative Cloud suite of apps. Then you can use Adobe Premiere Pro to quickly remove the audio files from any video. Ensure that you have the video stored on your computer. Then open up Premiere and also create a new project.
In the normal layout for Premiere, drag and drop your video into the library in the lower-left corner of your display. Double-click this file in order to load it into your preview monitor on the upper-left portion of the screen. Then click and hold the video icon below this. Drag and drop the video icon that you are holding onto the timeline, and have Premiere set the sequence settings based on your file. Your video will now appear in the timeline with an audio file attached.
Now export your video from Premiere when you are making sure that your export is set to match your sequence settings. The resulting video file is the original video you imported into Premiere without audio attached. And it only takes about thirty seconds to do.
Remove the Audio from Video on Mobile
You might be working directly from your smartphone or tablet and do not have a chance to get back to a desktop PC. Or you may not have access to a desktop. Mobile-only solutions are less feature-laden. But if all you need to do is strip out audio. Then a single-purpose app can get the job done for you.
For Android, try Mute Video, Silent Video. It does exactly what it says on the label. It takes a video shot on your phone and remove the audio track before saving it. You can then use the video as you see fit.
For iOS, try VSilencer. It works in much the same way. And has a mini timeline where you can edit your video and save it while removing the audio track. It works really well and then enables you to save or download to another device should you wish to.
The only real downside of the smartphone-based applications is that they are significantly slower than desktop software. Mobile CPUs are not really up to the challenge of handling large video files quickly (other than to play them). And so it may take a while. If speed counts, then a desktop solution is the way to go.
Remove the Audio From Video with a Web-Based Tool
If you have a slow computer but a decent Internet connection. Then using a web-based tool to remove your audio track might be the way to go. There are many tools available, but I have had success using Kapwing Mute Video. Kapwing has other free video tools available online. But, in this case, the mute video tool does all we need. It also gives you the ability to trim off material from the beginning and/or end of the video. That might be a helpful extra tool. The resulting video does not have a watermark and the service is very fast.
Conclusion
Alright, That was all Folks! I hope you like this article and find it helpful to you. Do not forget to give us your feedback. Also if you guys have further queries and issues related to this article. Then let us know in the comments section below. We will get back to you shortly.
Have a Great Day!
Also See: How to Root Samsung Note 9 Smartphone


