On Windows 10, setting a static IP address to your device is an important configuration that may be needed in a number of scenarios. For instance, if you guys are planning to share files or a printer on a local network, or maybe when trying to configure port forwarding. In this article, we are going to talk about How to Set a Static IP on Windows 10 – Tutorial. Let’s begin!
If you guys do not assign a static IP address, then the services that your computer provides to other devices. Or that port forwarding configuration will eventually stop working as well. This is because, by default, connected devices use dynamic IP addresses assigned by the Dynamic Host Configuration Protocol (DHCP) server (mostly the router). That can change as soon as you restart your machine or after the dynamically assigned configuration expires as well.
In this guide, you will learn the steps in order to set a static IP (version 4) address your Windows 10 device. Whenever it’s giving service on the network, or you are simply configuring port forwarding to your device on the router as well. (You can also configure your router in order to assign a static IP address using the DHCP settings. You can also use these steps to set a static IP address to a FreeNAS server.)
Contents
What is IP Address
IP addresses are basically four sets of numbers that are separated by periods that allow computers in order to identify each other. Every and every computer on your network has at least one IP address. However, two computers on the same network should never have the same IP Address. If two computers end up with the same IP address then neither will be able to connect to the Internet.
Dynamic IP vs. Static IP
Your router most likely assigns dynamic IP addresses by default actually. Routers do this because having a dynamic IP address network needs no configuration on your part. You can simply plug in your computer and the network will then start to work. When IP addresses are assigned dynamically, then it is basically the router’s job to assign them. Every time a computer reboots it then asks the router for an IP address.
The router then hands the computer an IP address that has not already handed out to another computer actually. This is actually very important because when you set your computer to a static IP address, then the router does not know that a computer is already using that IP address or not. That same IP address could be handed out to another computer later on as well. This will avoid both computers from connecting to the Internet. It’s important to assign an IP address that will not be handed out to a different computer through the dynamic IP address server. The dynamic IP address server is basically referred to as the DHCP server.
Assign a Static IP on windows 10 via Command Prompt
Although using commands may be challenging for some of the users. This is one of the quickest and easiest ways in order to assign a static IP address on Windows 10.
Use these simple steps to set a static IP address on Windows 10 using Command Prompt:
- First, open Start on Windows 10.
- Then search for Command Prompt, right-click the result and choose the Run as administrator option to open the console.
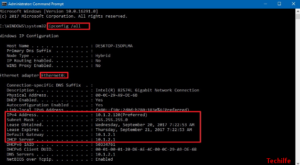
- Type the following command to see your current networking configuration and then tap Enter:
ipconfig /all
- Under the network adapter you have to note the name of the adapter as well as the following information in these fields:
- IPv4
- Subnet mask
- Default Gateway
- DNS Servers
- Type the following command to assign a static IP address and then click Enter:
netsh interface ip set address name="Ethernet0" static 10.1.2.220 255.255.255.0 10.1.2.1
In the above command make sure you change Ethernet0 for the name of your network adapter. And you guys must change 10.1.2.220 255.255.255.0 10.1.2.1 with the device IP address, subnet mask, and also default gateway address that corresponds to your network configuration as well.
Then
- Then type the following command in order to set a DNS server address and tap Enter:
netsh interface ip set dns name="Ethernet0" static 10.1.2.1
In the above command make sure to change Ethernet0 along with the name of your adapter and 10.1.2.1 with the DNS server address of your network as well.
- Type the following command in order to set an alternate DNS server address and press Enter:
netsh interface ip add dns name="Ethernet0" 8.8.8.8 index=2
In the above command make sure to change Ethernet0 along with the name of your adapter and 8.8.8.8 with an alternate DNS server address as well.
After you complete these steps, then you can test the new configuration using the ping command (such as, ping google.com) to see if the internet is working. Just like that, you can simply open your web browser and then try to navigate to a website to see if the configuration works.
Assign static IP address via Control Panel
If the Windows Console is not for you, then it’s still possible to use the Control Panel to change the IP settings of your Windows 10 computer.
Use these simple steps to assign a static IP configuration via Control Panel:
- First, open Control Panel.
- Tap on Network and Internet.
- Then tap on Network and Sharing Center.
- On the left pane, you have to click the Change adapter settings link.
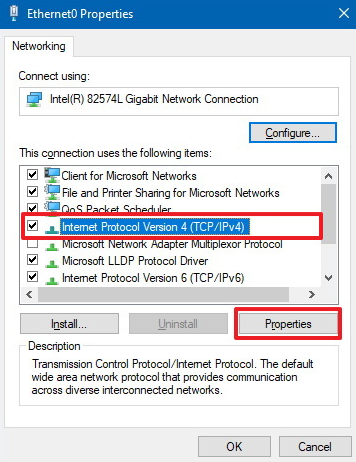
- Right-click the network adapter and then choose the Properties option.
- Choose the Internet Protocol Version 4 (TCP/IPv4) option.
- Tap the Properties button.
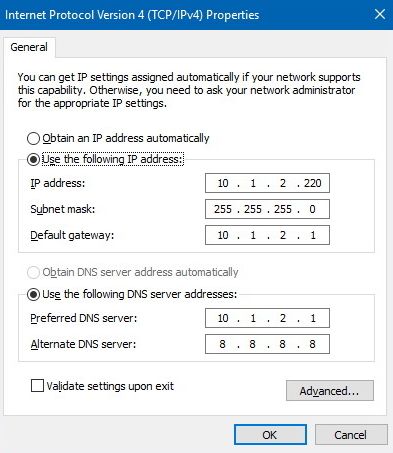
- Now choose the Use the following IP address option.
- Set the IP address (such as 10.1.2.220).
- Then set the Subnet mask. Mostly, on a home network, the subnet mask is 255.255.255.0.
- Also, set the default gateway. This address is basically your router’s IP address (such as 10.1.2.1).
- Under the “Use the following DNS server addresses set Preferred DNS server” section, set the Preferred DNS server address, which is mostly your router’s IP address. Or IP address of the server providing DNS resolutions (such as, 10.1.2.1).
- (Optional) Set the Alternative DNS server, that your computer will use if it can’t reach the preferred server.
- Tap on the OK button.
- Then click the Close button again.
When you complete these steps, then you can open your web browser and try to load a website to see if the configuration works.
Assign a static IP address using PowerShell
- First, open Start.
- Search for PowerShell, right-tap the result, and choose the Run as administrator option to open the console.
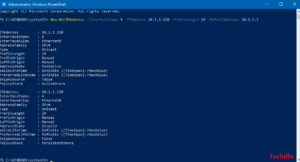
- Then type the following command to view your current network configuration and press Enter:
Get-NetIPConfiguration
After running the command, you have to note the following information:
- InterfaceIndex
- IPv4Address
- IPv4DefaultGateway
- DNSServer
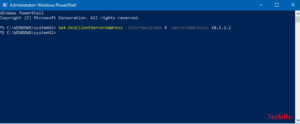
- Type the following command in order to set a static IP address and press Enter:
New-NetIPAddress -InterfaceIndex 4 -IPAddress 10.1.2.220 -PrefixLength 24 -DefaultGateway 10.1.2.1
In the above command make sure to change the InterfaceIndex number along with the one corresponding to your adapter. Change IPAddress with the IP address that you want to assign to your device. Only if important, change PrefixLength (subnet mask) with the correct bit number. Normally on a home network, the setting is 24.
Also, change the default gateway option along with the default gateway address of your network.
- Type the following command in order to assign a DNS server address and tap Enter:
Set-DnsClientServerAddress -InterfaceIndex 4 -ServerAddresses 10.1.2.1
If you guys need to set a secondary DNS server address, then you can use the same command, and to add another address simply use a comma.
Set-DnsClientServerAddress -InterfaceIndex 4 -ServerAddresses 10.1.2.1, 8.8.8.8
In the above command make sure to change the InterfaceIndex number with the one corresponding to your adapter as well. Also, change ServerAddresses with the DNS IP address.
How to assign a static IP address via Settings
On Windows 10, you can also change the IP address settings using the Settings app for wireless as well as wired adapters too.
Assign a static IP address for Wi-Fi adapter
- First, open Settings.
- Then click on Network & Internet.
- Tap on Ethernet.
- Tap on the current connection.
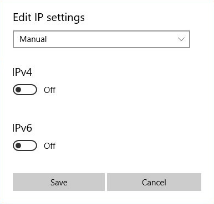
- Under “IP settings,” you need to click the Edit button.
- Using the drop-down menu, choose the Manual option.
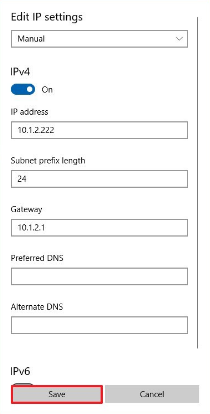
- Now turn on the IPv4 toggle switch.
- Then you have to set the static IP address.
- Also, set the Subnet prefix length (subnet mask). If your subnet mask is 255.255.255.0, then the subnet prefix length in bits is 24 actually.
- Then set the Default Gateway address.
- Set the Preferred DNS address as well.
- Now set the Alternate DNS address (if applicable).
- Tap on the Save button.
After you complete the steps, then you can test your settings using your web browser to try to open a website.
Anyhow, whatever the method you use, it’s recommended to assign an IP address within the network range and outside of the DHCP server scope. In order to allow proper connectivity and avoid address conflicts. Because if two devices share the same IP address then neither of them will be able to connect to the internet.
Although we are focusing this guide on Windows 10, you can also use the Command Prompt and Control Panel methods on Windows 8.1 and Windows 7.
Note:
If your DNS Servers listed the same IP address just like your Default Gateway. The DNS server (Domain Name System) server can get kind of complicated. Some of the router’s act as an intermediary between for the actual DNS servers and your computer as well. If this is the case then your Default Gateway will list the same IP address as the DNS Servers entry. We actually need to have the correct DNS Server IP addresses not the Default Gateway. You will not be able to use the Internet if you do not find out what your actual DNS servers are. There are a couple of different ways in order to find these.
The first way is to log into your router’s web interface and then look at your router’s status page. On that page, you should see an entry for DNS Servers or Name Servers as well. You need to write down the IP addresses of these DNS Servers. There is another way to find out what the correct DNS Servers to use is to call your local Internet Service Provider or ISP. They should actually know the IP addresses of your DNS Servers right away.
If they ask you why you need them, then simply tell them you are trying to set up a static IP address on your computer. If in case, they try to sell you a static external IP address, then do not buy it. That’s actually an entirely different thing than what you are trying to set up here.
Conclusion
Alright, That was all Folks! I hope you guys like this article and also find it helpful to you. Give us your feedback on it. Also if you guys have further queries and issues related to this article. Then let us know in the comments section below. We will get back to you shortly.
Have a Great Day!
Also See: How To Use Command Prompt To List Files


