Do you want to convert PNG and TIFF images to JPG? There are many image formats you’ll come across, but the common is JPG (JPEG). After having an image in a PNG, TIFF, or another format but want to convert it to JPG, there are some methods that you learn in this article. But before we proceed further you must know about TIFF or JPEG format:
Contents
TIFF:
TIFF stands for Tagged Image File Format. However, it is the oldest graphic image format that maintained its importance still now. It is suitable for display images and compatible print production too. TIFF format was launched into usage by Microsoft or Aldus in 1994. However, being the oldest pic format, it’s still popular as this type of image format is known for its high-quality standard.
Features:
- The file format follows a lossless compression technique hence keeping your pictures safe and complete one.
- The files have a high-quality ratio and compatible with CMYK color versions that are an amazing factor of it.
- The format suites for bitmap images and you can also edit the images such as adding layers, tags, and transparency.
JPEG:
JPEG stands for Joint Photographic Expert Group. It is one of the common formats used for saving snaps and images. However, JPEG can’t work well for solid lines or text. But it’s suites for compressing large image files without any issue. With the launch in 1986, it’s become a long time that this format is in existence and is known for its portability. Which thing makes JPEG format a popular one? The answer is quite easy and simple. However, it compresses the input file up to the original size of an input file. You can easily be mailed to your colleagues, used in creating a PDF file, and sharing it as an attachment in any resources.
Features:
- The files occupy less space and are supportive.
- JPEG files can also be used in an image processing application and are suitable in any sort of a hardware device.
- JPEG files are easy and simple to be printed in printers.
- Fast-moving images or high-resolution can also be saved in JPEG format and then limiting space in your device.
Want to save an image in another format? Come let’s take a look at how to convert images such as PNG and TIFF files to JPG on Mac.
Convert PNG and TIFF images to JPG on Mac
Step 1:
Head over to the image you want to convert with Preview on your Mac.
Step 2:
In the top left corner tap File → Duplicate
Step 3:
You can then rename the latest file or just leave the default (it just adds “copy” to the original)
Step 4:
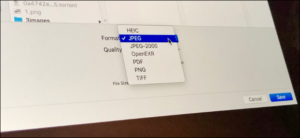
Then close the window of the copy, tap the drop-down located next to Format
Step 5:
Choose JPEG, then adjust the quality if required, tap Save
Step 6:
Now you’ve got a JPG model of your image.
Step 7:
You can also rename what will be the JPG version of the picture or leave the default. Then close the duplicate image.
Step 8:
Now tap the Format dropdown and choose JPEG.
Step 9:
Then adjust the image quality if you want too (lower image quality will result in a smaller file, the higher image quality will result in a larger file).
You can also modify the location where you want to save your JPG image if required. Then tap Save.
On the other hand, after you import an image to the Photos app and make any edits, it will be stored as a JPG. You can also check the format of any picture by tapping on it and using the keyboard shortcut command + I (or right-tap and then choose Get Info).
Another choice, if you want to change several images at once to a specific format, is to use a third-party app such as PhotoBulk.
Conclusion:
Here’s all about “Convert PNG & TIFF Images”. If you think that it is helpful then do let us know your suggestions in the comment section below. Have you found any other method that you think we can’t cover in this article? Comment us below!
Till then! Stay Safe ?
Also Read:


