
If you want to update the Kodi library then you are in the right place. The Kodi software is a robust open-source media center that you can use to show and manage your digital files such as music, videos, and pictures. Well, if you have a huge library of files, or if you wish to update that library often, then it can be very painful to manage it. So all you need is to keep your library up to date and neat without having to continuously add new files manually to your library. Or else you should perform endless library updates.
Fortunately, there are various methods that you can achieve this. In this guide, we’ll display you three different methods to manage or organize your Kodi library updates with varying levels of complexity or detail. Choose the right one for your requirements to keep your library up to date and organized. Come let’s check how to update your entire Kodi library at once.
Also See: Krypton Vs Kodi Jarvis: Why We Upgraded
Contents
Use VPN While Streaming

We always recommend using a VPN while streaming Kodi content, especially when your addon offers live sports content. This is due to some unofficial addons can enable you to access content that breaks copyright laws in some parts of the world. Also, Kodi is open-source, so users can find themselves vulnerable to malicious actors or hackers on occasion.
A virtual private network (or VPN) translates your data. It can then passes it to a private proxy server, where it is decoded and then sent back to its original destination labeled with a new IP address. Using a private connection and masked IP, no one tells about your identity.
Staying safe on the Wi-Fi is like many people are getting concerned about. While ISPs tracking and selling user information, governments notice citizens and hackers searching for any weakness they can exploit. This is also an issue when it comes to streaming videos using Kodi. The software set off red flags on all industry thanks to its many third-party add-ons that source pirated content. ISPs react by monitoring Kodi user traffic and also strangling download speeds.
The best VPN can helps to keep you safe from all the above threats. VPNs also encrypt chunks of data before they leave your device. However, making it impossible for anyone to take your identity or view what you’re installing. This base level of security is amazingly powerful for a lot of tasks. It includes breaking through censorship firewalls, accessing geo-restricted content, and making your portable devices safe on public Wi-Fi.
Different Factors While Choosing A VPN:
- If you would like to use your VPN to watch international content, then check the server it offers in various countries. When there are too many servers available for your use, you can then get around region locking after selecting a server in another country.
- You want a VPN that is reliable and fast. It’s so irritating when your Wi-Fi is slow and you should wait for ages for videos to buffer. All VPNs can slow down your speeds. Choose the best VPN whereas a bad VPN is very slow to use.
IPVanish VPN For Kodi
IPVanish knows very well what features Kodi users want most. Speed is the first priority. Also, the service delivers fast downloads to a wide network of more than 850 servers in various countries. No matter where you live, you’ll be able to log into a low-latency server for amazing speeds. Security is also key, that IPVanish addresses by locking down all data with 256-bit AES encryption. Also, it keeps your identity secure using DNS leak security and an automatic kill switch. IPVanish can make you safe and secure!
IPVanish’s includes the best features:
- It is easy-to-use apps for Windows, Linux, Mac, Android, and iOS.
- Zero-logging policy on all traffic for privacy.
- Provides full access to all of Kodi’s add-ons.
- Infinite downloads and no restrictions on speed.
IPVanish also offers a 7-day cash-back guarantee. It means you have a week to analyze it risk-free.
Also See: Why Elara App Prevents Windows 10 From Shutting Down?
How To Update Your Kodi Library Via Library Auto Update add-on
If you like to set up or use your Kodi system so that your library is updated automatically at a specific time interval. Then there’s an add-on that can do this for you. The Library Auto Update add-on is quite easy or simple to configure or install but it is a powerful way to keep your library tidy or neat.
Steps To Install Library Auto Update Add-on For Kodi
It is very simple or easy to install. Come let’s check how to update Kodi library:
-
Head over to your Kodi home screen
-
Tap on Add-ons
-
Tap on the icon that looks like an open box
-
Then tap on Install from repository
-
Move to Kodi Add-on repository
-
Navigate to Program add-ons
-
Then dive down to Library Auto Update
-
Simply tap on it and a box explaining the add-on appears. Tap install on the bottom menu
- Wait a while until you view a notification when the add-on is installed
How To Set Up Library Auto Update Add-on For Kodi
When you successfully install the add-on, you can then make a few tweaks to the settings to get it set how you want. Here’s how to use or set up the add-on:
-
Head over to your Kodi home screen
-
Then move to Add-ons
-
Move to Program add-ons
-
Check the Library Auto Update and then right-tap on it, then move to Settings
-
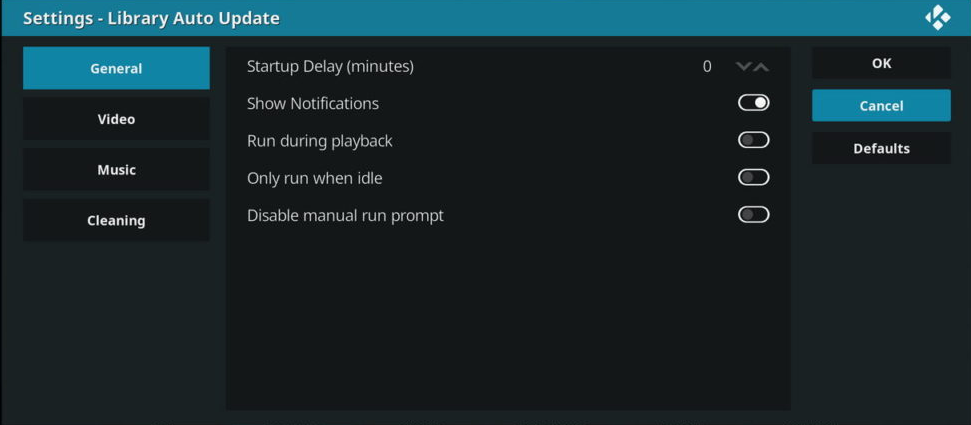
Now you’ll then view few options in the settings menu. We’ll start with the General menu located on the left-hand side
-
Here, you’ll just consider turning off the Show Notifications slider. As it creates notifications when it executes which can interrupt your work or viewing. Simply turn off this option and the updates will execute in the background without alerting you
- Then, head over to Video in the left-hand menu. Now you’ll then view an option saying Amount of time between updates (hours) where you can set how often you want the library to be updated, in hours. By default, you can set it to 4, as it works in some situations.
Further;
-
If you have ever experience Cron jobs and you would like to use this method rather than of hourly timer. You can then toggle the option of Used Advanced Timer and then a field will appear for Cron expression where you can simply input your required update schedule
-
Also, you can use the same update process on your music library. As it becomes turned off by default as people don’t want to add music to their library as frequently as they added new videos. But if you want to listen to new music, you can then enable this. Head over to Music in the left-hand menu, then toggle Update Music Library to on. From here, you can use the Amount of time between updates (hours) and Advanced Timer options similarly we did for the videos library
-
At last, there is an option located in the left-hand menu for Cleaning. This is essential if you often remove videos from your library. Or else you want the videos you deleted to be erased from your library whenever it is possible. Certainly, removed videos also appear in your library for some time, which is quite irritating. Well, the option will resolve that. Turn on the Clean Libraries slider and then use the Library to clean option to Video, Music, or Both to choose which library will be worked on. Modify the Frequency setting to either Once per day, After Update, week, or month, or use a Cron expression to be more accurate. Now your library will be cleaned and deleted files erased on the schedule you have set
- If you would like to run an update outside of your scheduled times, you can move to Add-ons, to Program add-ons. You can then tap on Library Auto Update as if you were launching the add-on. However, it brings up a dialogue saying when your last update was and asks if you like to manually run an update now. Then tap Yes to update your library
Also See: How to Fix BluRay Disk need Library for AACS Decoding
Steps To Update Your Library Manually
Maybe you don’t want a whole system for regularly updating your content. If you want to add new content to your library for few weeks, then it probably not be worth installing an add-on and then set it up to automatically update your library often. In this situation, you can just manually update your library when needed.
In theory, whenever you make changes to your folders of files of either videos or music, your library should update itself.
This process is very simple or easy, as it is a function built into Kodi. Come let’s check how to manually update the Kodi library:
-
Head over to your Kodi home page
-
Move to Settings after tapping the icon that seems like a cog
-
Then head over to Media settings
- Choose Library from the menu located on the left
- From the right-hand side, you’ll then view headings for Music Library and Video Library
-
From each heading, there is an option for Update library on startup. You should then toggle this option to yes for either your video or music library or both, relying on which you like to manually update
-
Also, you want to toggle the Hide progress of library updates to on, as it’ll hide the alerts about library updates as you don’t need to view these
-
When you have turned on these settings, every time you restart your Kodi system the library will be updated automatically for you
Alternative Way To Update Kodi Library – Watchdog
If you’re an advanced user with a huge library that you updated frequently, then you should try Watchdog. As it scans either your whole library or a particular set of folders, and whenever you find a new file in those folders then it adds automatically to your library. A sit becomes quite handy if you have downloads set up to a particular folder, for instance, if you have an automatic download setup, where new TV show episodes are downloaded automatically and added to a particular folder. You can also set Watchdog to watch the folder, then whenever your complete file is added there, you can view it on your library.
Steps To Install Watchdog Add-on For Kodi
Follow the steps to install Watchdog and update Kodi library:
-
Head over to your Kodi home screen
-
Tap on Add-ons
-
Then tap on the icon that seems like an open box
-
Tap on the ‘Install from repository’ tab
-
Head over to Kodi Add-on repository
-
Then move to Services
-
Dive down to the bottom and look for Watchdog
-
Tap to open the information panel. Now tap on Install from the menu at the bottom
- Wait a while until the installation is complete
Set Up Watchdog Add-on For Kodi
Whenever you install the Watchdog add-on it will be activated. Also, it’ll start adding new files to your library whenever you want to add them to your source folder. Also, you might want to adjust some settings to optimize everything you want. Come let’s check how to set up watchdog to update Kodi library:
-
Head over to your Kodi home screen
-
Move to Add-ons
-
Then head over to My add-ons
-
Move to All
-
Look for Watchdog and then right-tap it, then select Settings
-
Some essential options in the General tab are erased from the library when files are deleted. It’s good to automatically remove files that you no longer want, and Clean on startup and Scan on startup that will automatically update your library whenever you start Kodi. Also, you might want to turn on Pause during playback, especially if you have a lower-spec device so that your watching can’t be interrupted by library updates
-
Watchdog scans your whole library and all sources to update whenever your changes are made. But as we said earlier, it takes lots of system resources. You probably want to use it to only scan particular folders where you daily add files rather than scanning the whole library. To do this, head over to Video source in the left-hand menu of the settings. If you turn off Auto-detect video sources, you can then add the paths to the particular folders to be watched rather than the whole library. You can do the same thing with your music library after turning off Auto detect music sources in the Music sources settings menu.
Further;
-
At last, you can tweak few options in the Advanced menu. Here you’ll view an option for Polling Interval for network shares, where you can use or set how often the add-on can check for new content in a few seconds. Also, there is an option for Startup delay where you can select to wait a few seconds before initiating the service when you initially start up Kodi. This is essential if you have many other add-ons that update on startup, so Watchdog can’t conflict with them. At last, you might want to turn on the Update entire library on changes option to automatically update your whole library if you make any changes.
Conclusion
Here we discuss three different methods to successfully update your Kodi library, depending on your requirements and level. For those with small libraries of content, just modifying the default options in Kodi to simply update your library on startup should be enough to keep your library up to date.
Which method did you use to update the Kodi library? Let us know below!
Also Read:


