Do you want to set GPU for apps on Windows 10? In Windows 10 Version 1803 Microsoft launched a new menu or section in the Settings app through which users get to select the GPU a game or app uses.
We have to suppose that you know the graphics control in apps such as the NVIDIA Control Panel or AMD Catalyst Control Center. They both provided those programs for users with devices equipped with their products to manage the performance of graphics preference for games and other apps.
However, the newly launched setting takes precedence over the configuration in those graphics management apps.
Some preferences are assumed to deliver good app performance while others should converse battery life. But on some PCs, the integrated GPU supposed to be the power-saving GPU. However, the discrete or external GPU is considered a high-performance GPU. In case, if you have both an external GPU or discrete GPU on your PC, then you have to suppose that the external GPU is the high-performance GPU.
Set Your Required GPU For apps Via Settings
Follow the instructions to set your preferred GPU for apps in Windows:
Step 1:
Initially, head over to the setting then open the Settings program:
Step 2:
Tap on the Windows Start icon located under-left corner of your PC’s screen. From the programs or options that display up, you should then view the Settings icon. Tap on it.
When the Settings icon is missing from the Windows Start screen. Then you have to type Settings into the text field, then wait a while until it emerges as the main item on the results list. You can then tap on it.
Step 3:
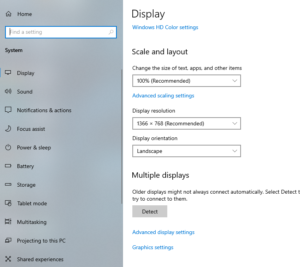
Head over to the options on the Settings main menu screen and tap on System. On the following screen, look at the items close to the left pane area and tap on Display.
Step 4:
Move down a bit, then check for the Graphics settings link and tap on it.
Now windows will display the list of apps whose graphics configuration you are allowed to change.
Step 5:
Then select the app whose settings you want to work on (by tapping on it).
Step 6:
If you wish to choose a game or a legacy desktop app (that has the .exe extension). You can then tap on the drop-down menu at the bottom of ‘Choose an app’ to set the preference to view the given options and choose the Classic app.
In this situation, you have to move on to tap on the Browse button. Then move through the required directories in the File Explorer window that displays up to locate the program .exe file on your PC (and choose it).
On your PC disk, the program files folder hosts some apps’ .exe files. You need to check its subdirectories for the executable you want.
Step 7:
Alternatively, if you like to choose a Universal app. Then you have to select the Universal App in the drop-down menu or box containing the options for Choose an app to set the required preference. You can then move to the drop-down menu below to choose the app.
Keep in mind that Universal apps can’t come with .exe files. They are just installed from the Microsoft Store. They also referred to as (UWP) Universal Windows Platform apps.
Step 8:
After you add an app successfully, it will display up on the Graphics Settings page. There, you have to tap on the app to highlight it, and then tap on the Options button (that recently appeared).
Step 9:
You are now at the stage where you get to choose the particular GPU device with which you want Windows to run the app. A complete description is in order here.
- System default reacts to the default GPU that is used for all apps. After using this option, Windows is forced to plan the best GPU for your app.
- Power saving equals the low power GPU or integrated graphics card that is close to your processor such as Intel Graphics.
- High performance, as you probably have come to expect. However, it refers to the high power GPU — for instance, an external or discrete graphics card from NVIDIA or AMD.
Well, if your PC is equipped with one GPU you’ll then view the same GPU name appearing under both the high-performance or Power saving GPU options. In this situation, there is not much point while specifying a GPU as there is only one parameter there. Your PC has to use a GPU and it will always use that GPU to execute games and apps.
Step 10:
Just tap on the radio button for High-performance (to choose this GPU option). Hopefully, your discrete GPU displayed up perfectly rather than the High-performance option.
Step 11:
Tap on the Save button. Now Windows will take note of the new GPU configuration for the selected app.
The modification is unlikely to take effect quickly if the app in view is currently running. In this situation, just close it first (and make sure that all its services and processes have been terminated) and then reopen it.
When your PC continues to execute the app with the incorrect GPU, then you have to restart Windows. When the recommended reboot, you can then check if the GPU configuration modifies for the apps to become effective.
Force App To Use Dedicated GPU -> How-To

In-app settings decide the GPU Windows gets to use to execute your apps. Also, they override all other configurations or settings applied in the Windows OS environment.
When there is a menu or graphics screen in the game or apps whose GPU preference you are trying to configure, you want to choose your high-performance GPU as the chip it must execute with it. Whenever you manage to do the right thing there. Then you don’t have to bother with other settings or menus (besides what they might be).
When the options that enable you to select the GPU are absent in the app’s settings. Then you have to specify your graphics card choice for the application in the operating system Settings.
Anyway, you still control your GPU preferences for apps through the programs given by your graphics chip manufacturer. Simply come to terms with the fact that the choices you make there can’t override the configurations in the ultimate in-app or Settings app equivalents.
Check GPU Used By An App When It Is Running – HowTo
Also with the right choices or selections, you might found yourself unsure of whether Windows is executing your game or apps with the high-performance unit or power-saving GPU. Simply launch the program or game first and then head over to these steps to confirm things:
Step 1:
Head over the Task Manager app then opens it.
You can quickly perform this task after right-tapping on your taskbar to view some programs and options and then choose Task Manager.
On the other hand, you can use the Ctrl + Shift + Esc keyboard shortcut to do the job.
Step 3:
Tap on More details (if you view this option).
Step 4:
Suppose the full Task Manager app window is now visible. You need to right-tap on Name to view an important list.
Step 5:
Then tap on GPU. You can also do the same thing for the GPU engine option on the list.
Step 6:
Now, you have to locate the GPU engine column. It is the tabs in the Task Manager app window, so you might have to move leftwards to view it.
Step 7:
After you find the GPU engine column, just tap on it.
Now Windows will sort the list and display which app is using your system GPU the most. The GPU number used by the program or game in view should be visible now. You have to take proper note of it.
Your PC will display whether the game or application is using the 3D engine or the video decode engine.
Step 8:
Now you can move on to the Performance tab (after tapping on it) and check which GPU is linked with the number you saw earlier.
Note: In the Task Manager window, you can also view the apps GPU usage rate or view what percentage of your PC resources it is consuming. However, Windows is configured to display the highest usage the app has across all engines at the bottom of the GPU column.
TIP:
Make sure that Windows is configured to run your apps or games with your dedicated GPU. Also, you are likely to enjoy using Auslogics BoostSpeed. Through the features or options in this program, you can perform essential optimization, repairs, and tweaks so that your PC ends up being programmed to function in an efficient way as it can.
Conclusion:
To conclude, this article has introduced the best methods to set GPU for apps. If you are facing the problems, try these methods to help out. If you know any other method or trick to fix the issue then let us know below. Now you know how to set GPU for apps in Windows 10. If you have any questions or queries let us know below!


