
Installing Windows on your PC can actually be a stressful process, especially if you guys don’t really know where to start. Fortunately, Microsoft recognized the plight of the users and also released the Media Creation Tool. A software that lets you download the latest version of Windows and install it onto your system as well. However, the tool works just seamlessly most of the time, there have been reported instances where the users were unable to download the Windows installation files. Because of a certain error in the Creation Tool. In this article, we are going to talk about How to Fix Media Creation Tool Error Code 0x80042405. Let’s begin!
How to Fix Media Creation Tool Error Code 0x80042405
The Media Creation Tool works in two different ways actually. It either upgrades your PC directly or it also lets you create a bootable installation media. Through saving the Windows setup into a USB flash drive, a CD, or as an ISO file as well. The 0x80042405-0xa001a error is mostly caused whenever you try to save the installation files on a USB drive. That does not really support the NTFS file system as well as lacks the space to install Windows. Luckily, many workarounds will let you fix error code 0x80042405-0xa001a in the Media Creation Tool as well.
Change USB File System to NTFS
The Media Creation Tool is also known to run best when the USB flash drive actually supports the NTFS file system. To achieve this, you guys will have to format your external drive. This will make sure that you have enough space on your flash drive i order to save the Windows installation setup.
- You need to Back up all files from your USB drive, as the conversion process will actually format all the data.
- You have to open ‘This PC’ and right-click on your USB drive. From the options that appear, choose ‘Format.’
- In the format window, change the file system to NTFS and click on ‘Start.’
- When the format process is complete, run the Media Creation Tool again and then see if the 0x80042405-0xa001a error is resolved or not.
Convert USB Drive to MBR
MBR stands for Master Boot Record and is actually an important prerequisite if you guys want to install Windows through a bootable USB drive. With the command prompt in your PC, you can also convert your USB drive from GPT to MBR and then fix the Creation Tool error.
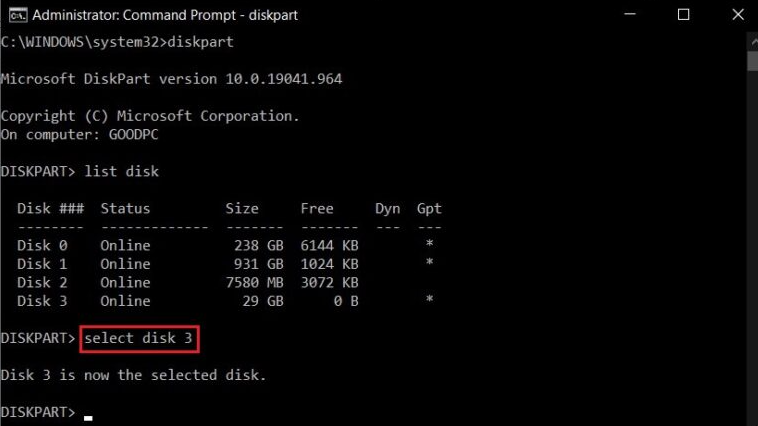
- First of all, right-click on the Start Menu button and choose the ‘Command Prompt (Admin)’
- Then in the command window first type in disk part and click on Enter. Any command you type hereafter will also use in order to manipulate the disk partitions on your PC.
- Then just enter the list disk code in order to view all your drives.
- Now from the list, identify the USB flash drive that you guys will convert into the installation media. Enter select disk *x* to choose your drive. Make sure that rather than *x*, you guys put in the drive number of your USB device.
- Then in the command window, type clean and click on Enter to wipe the USB drive.
- When you can the drive, enter convert MBR and then run the code.
- Open the Media Creation tool again and see if the 0x80042405-0xa001a error is resolved or not.
Run the Setup through your USB | Error Code 0x80042405
One of the simplest fixes for the issue is basically to run the Media Creation Tool directly from the USB drive. Normally, the Creation Tool will also be downloaded in the C drive of your PC. You have to copy the installation file and paste it into your USB drive. Now run the Tool normally and then also create an installation media in your external hardware. By moving it, you guys will make it easier for the creation tool in order to identify the USB drive and install Windows onto it.
Download Installation File in Hard Drive
Another way you guys can fix the Creation Tool error is via downloading the installation file to your hard drive and then moving it to your USB.
- First, open the Media Creation Tool and then click on ‘Create Installation Media.’
- Then on the Media Selection page, tap on ‘ISO file’ in order to download the installation files.
- When you download the ISO file, right-click on it and then select mount. The file will now display as a virtual CD in ‘This PC.’
- You need to open the virtual drive and look for a file titled ‘Autorun.inf.’ Right-tap on it and using the rename option, just change its name to ‘Autorun.txt.’
- Just copy all the files within the ISO disk and paste them onto your USB flash drive. Rename the ‘Autorun’ file via its original .inf extension.
- Just restart the Windows installation process and the 0x80042405-0xa001a error should be resolved now.
Disable USB Selective Suspending Setting
To make sure long battery life on your PC, Windows tends to suspend USB services. That makes it difficult for the Creation Tool in order to locate your external flash drive. By changing a few settings from the Power Options on your PC, you guys can fix Media Creation Tool Error 0x80042405-0xa001a:
- First, on your PC, open the Control Panel.
- Here, you need to choose the ‘Hardware and Sound’
- Now under the ‘Power Option’ section, just tap on ‘Change when the computer sleeps.’
- Then in the ‘Edit Plan Settings window, tap on ‘Change advanced power settings.’
- This will basically open all the Power Options. Scroll down and find ‘USB Settings.’ Then expand the option and then tap on the plus button next to ‘USB selective suspend settings.’
- Turn off both the options under the category and tap on Apply in order to save the changes.

- Then try running the Media Creation Tool again and also see if the issue is resolved.
Use Rufus to Create Installation Media | Error Code 0x80042405
Rufus is a really famous application that converts ISO files into bootable installation media with just a single click. Before you guys proceed, make sure that you have downloaded the ISO file for the installation process.
- So, from the official website of Rufus, download the latest version of the application.
- You need to open the Rufus application and make sure that your USB drive is visible under the ‘Device’ section. Then in the Boot Selection panel, tap on ‘Select’ and select the Windows ISO file you just downloaded.
- When you guys select the file, tap on ‘Start’, and the application will turn your USB into a bootable installation drive as well.
Conclusion
Alright, That was all Folks! I hope you guys like this article and also find it helpful to you. Give us your feedback on it. Also if you guys have further queries and issues related to this article. Then let us know in the comments section below. We will get back to you shortly.
Have a Great Day!
Also See: Will Metahero be a golden ticket to Metavelenium 3.0?


