
A really short tip for Windows XP users who have migrated to Windows 7, then the local settings folder has moved as well. In this article, we are going to talk about How to Access the Local Settings Folder in Windows 7. Let’s begin!
Well, if you guys are trying to access the Local Settings folder at the following destination:
C:\Users\<User Name>\Local Settings
then you are looking at the wrong place actually. You will also get the following error message, “Location is not available” or “Access Is Denied” as well.
In Windows 7, the Local Settings is actually a junction point, that is, actually a hidden and protected OS system file. That is not meant to be accessed via the users. Rather, it points to a user-accessible folder at the following destination:
C:\Users\<user name>\AppData\Local
If you guys are trying to find some files saved in the Local Folder, then make sure you are looking in the right place.
Update: As the reader points out below, the quickest way in order to access the Local Folders in Windows 7. It is actually to type %localappdata% in Windows Explorer and then tap on Enter. Thanks, Wander!
Contents
- 1 How to Fix “Access Denied” Documents and then Settings Folder in Windows 10/8/7
- 2 Step 1. Choose the location to scan the lost Documents folder.
- 3 Step 2. You can find and preview files in the lost Documents folder.
- 4 Step 3. Restore the lost Documents folder and then save it to a safe spot.
- 5 Solution 1. Gain file or folder read permissions
- 6 Solution 2. Cancel the encryption protection
- 7 Conclusion
How to Fix “Access Denied” Documents and then Settings Folder in Windows 10/8/7
Whenever you guys try to access or work along with the Documents and Settings folder in Windows 10. You guys can experience one or more of the following issues:
1: You can also receive an “Access Denied” error message or the same message.
2: You cannot access, change, save, or remove the Documents and also Settings folder.
3: You cannot actually open the file or folder after you install a new version of Windows as well.
In order to solve these issues, we have these solutions. Before you guys take any action, restore data from the inaccessible Documents and Settings folder first as well.
Powerful data recovery software – EaseUS Data Recovery Wizard, will also help you to restore deleted, lost or formatted data along with a few simple taps. You can also directly download and apply this software in order to retrieve data from an inaccessible hard drive, USB, or many other devices along with the steps below:
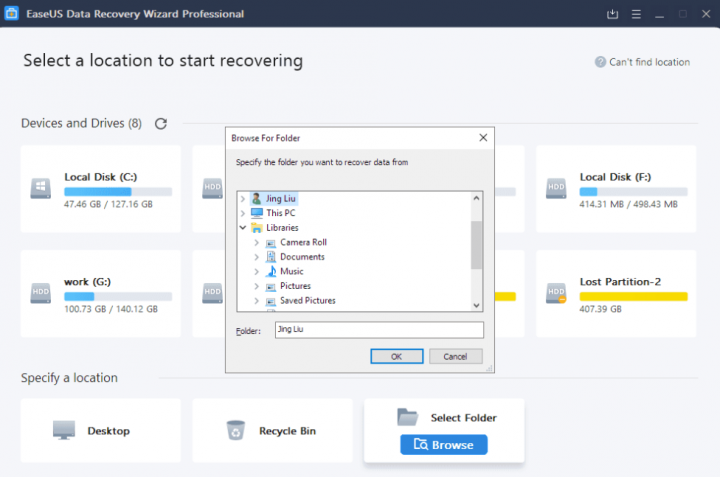
Step 1. Choose the location to scan the lost Documents folder.
You have to open EaseUS Data Recovery Wizard on your PC, under Specify a location. Tap on “Browse” on Select Folder. Then select “Libraries” where you used to save the Documents folder and tap on “OK” in order to confirm.
Step 2. You can find and preview files in the lost Documents folder.
Whenever the scanning process completes, you have to search “Documents” in the search bar to instantly find your Documents folder.
Then you have to open the Documents folder, check and double-click in order to preview the lost files.
Step 3. Restore the lost Documents folder and then save it to a safe spot.
Choose the found Documents folder and tap on “Recover” to select another new and secure location on your PC in order to save it, and tap on “OK” to confirm.
Now you guys can follow the solutions for the issue below.
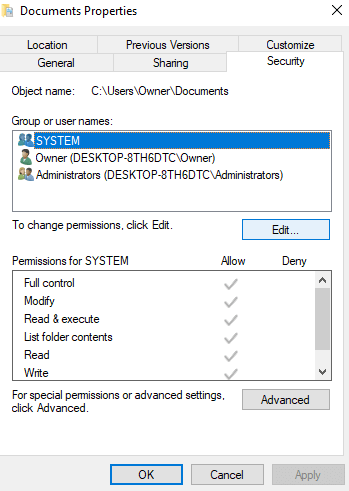
Solution 1. Gain file or folder read permissions
- Right-tap on the file or folder, and then tap on “Properties”.
- Tap on the “Security” tab.
- Under Group or user names, click your name in order to see the permissions that you guys have.
- Tap on “Edit”, click your name, choose the checkboxes for the permissions. That you guys must have, and then tap on “OK”.
Solution 2. Cancel the encryption protection
- Right-tap on the file or folder, and then click “Properties”.
- Tap on the General tab, and then click “Advanced”.
- If the Encrypted contents in order to secure data check box is selected. Then you must use the certificate in order to decrypt the file or folder to be able to open it as well.
Conclusion
Alright, That was all Folks! I hope you guys like this “local settings” article and also find it helpful to you. Give us your feedback on it. Also if you guys have further queries and issues related to this article. Then let us know in the comments section below. We will get back to you shortly.
Have a Great Day!


