Backing up your data regularly is actually an important measure in order to protect against data loss. For some things such as pictures, it can also make sense in order to back up files. Whenever you upload a new set from your camera as well. But, for important things such as work documents, and it’s key that backups happen regularly, or better, in real-time as well. A really good way to do that is basically to configure an important folder to be automatically synchronized or mirrored as well. In this article, we are going to talk about How to Perform Windows Folder Sync in Windows 10. Let’s begin!
Contents
How can you Perform Windows Folder Sync in Windows 10?
Tip: If rather than syncing your files to another hard drive, then you want to keep a copy of them in a cloud storage solution as well. We recommend services such as OneDrive, Dropbox, and Google Drive which all permit automated cloud syncing.
FreeFileSync is an absolutely free and open-source tool designed in order to manage file synchronization. It is also available for download here. In order to install, double-tap on the installer EXE after you download it. You guys may receive a “User Access Control” (UAC) prompt about permitting it in order to make changes to your PC. If so, then click “Yes” to continue. The first page of the installer is a license agreement, and the choose “I accept the agreement” then click “Next”.
The second option in the installer is actually the install location, configure where you guys want FreeFileSync to install (or leave it set to the default), then tap on “Next”. The third page permits you to select a number of components. It’s recommended that you guys keep all of them enabled as is the default, then press “Next”. Continue past the page along with the cute animal picture, then, whenever the installation has finished. Then tap on “Finish”. Making an optional donation to the developer can also get you a few extra features. And is a really good way to thank them for their work – however, it is optional.
In order to open FreeFileSync, double-tap on the icon on your desktop, or click the Windows key, type FreeFileSync, and tap on enter. Below are instructions on how you can use the different services available along with this program.
Mirror sync | windows folder sync
A mirror sync copies files in one direction only, then this is will leave the source folder unchanged and also match the destination to it.
Tip: If there are any files in the destination that are not present in the source actually. They will be removed. Just like that, if a newer version of a document is in the destination, it will be overwritten along with the older version from the source folder. So make sure you guys have things in the right place before you start.
The first step is basically to start a new configuration via pressing Control+N. Next, you have to add the folder you want to back up as the source folder on the left actually. You can also do so via tapping and dragging the folder from file explorer. Or through browsing to the folder with the left “Browse” button. You also have to add the backup folder as the destination on the right. Again, you guys can drag and drop or browse to choose which folder you want to use.
Further | window folder sync
Next, tap on the “Compare” button to see the differences between the two folders. You also have to configure the synchronization variant to be “Mirror”. In order to do so, just click on the arrow next to the green cogwheel icon and choose “Mirror” from the drop-down list.
Tap on “Synchronise” to start the process. A small popup will appear in order to confirm that you want to start the synchronization now. Press “Start” in order to continue. Whenever the process is complete, a confirmation window will then appear, click “Close” to finish.
Tip: If there are a lot of large files or also the hard drive is slow, the synchronization process may take some time actually.
Sync two folders on Windows 10
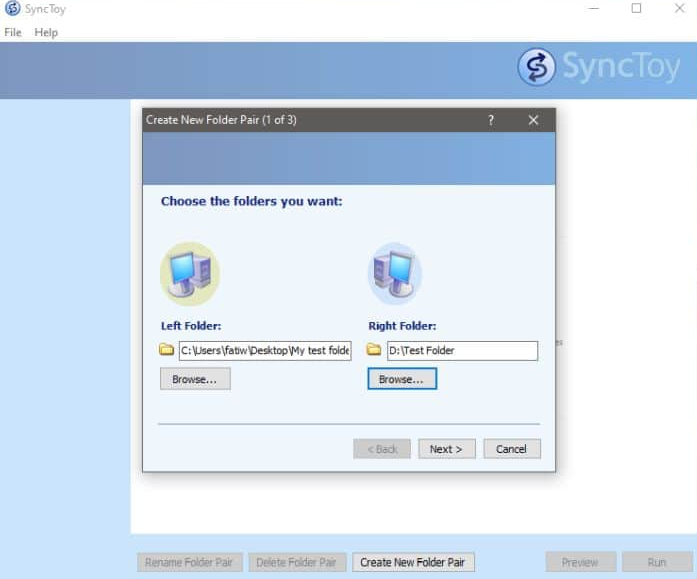
Download SyncToy from Microsoft as well. Install and then run it. Tap on the create new folder pair option.
SyncToys does not label folders as source or destination as well. It provides them much simpler names; left folder and right folder as well. Choose the two folders that you guys want to sync and then remember which one is the left folder, and which one is the right one as well.
You guys have three different sync options; Synchronize, Echo, and Contribute as well. When you guys choose each of these options, then you will see a description telling you how each sync actually works.
Option | windows folder sync
- Synchronization will sync all the files and folders between two folders. If you delete anything from either one of the folders, then it will also be deleted from the other one as well.
- Echo will copy all new files and all the updated files from the left folder to the right folder. If you remove or rename a file from the left folder, then it will be deleted and/or renamed in the right folder as well.
- Contribute will copy new and updated files and folders from the left folder to the right folder as well. You can rename files in the left folder will also be renamed in the right one. No files or folders will be deleted in either direction so if you delete a file from the left folder, then it will not be deleted from the right folder.
Finish to create the pair, and then click on Run to sync files and folders
Further | windows folder sync
The app needs to be run manually but, you guys can use a scheduled task to have it run automatically. You can use Task Scheduler in order to create a task. Set whenever you want in order to run the app under ‘Triggers’ via choosing a time schedule. On the Actions tab, add a new action in order to run an app.
Choose the SyncToy.exe file under ‘Program or script’, and in the ‘Add arguments (optional)’ field, you have to enter ‘-R’. This will actually run all the folder sync pairs that you have created. If you’d just like to run a single pair, you can use ‘-R “Folder Pair Name”‘ in the ‘Add arguments (optional) field.
Now save the task and enable it. It will run SyncToys at a regular time every day, and sync your folders as well.