Well, on Windows 10, you can configure a network adapter in order to use a static IP address manually. Or you can also use an automatically assigned configuration using the local Dynamic Host Configuration Protocol (DHCP) server as well. In this article, we are going to talk about How to Change from Static to Dynamic IP Windows 10. Let’s begin!
Although using a static IP address is recommended for all the devices that provide services to network users. Because its configuration never changes, it may come the time, when you may no longer need to maintain this configuration actually. And a dynamically assigned network configuration will be more suited as well.
If you guys are using a static IP address and you need to switch to a dynamic configuration. Then it is possible to perform this task in many ways, which includes using the Settings app, Control Panel, Command Prompt, and even PowerShell as well.
Contents
- 1 What is Static IP Address
- 2 What is Dynamic IP Address | Static to dynamic IP
- 3 Dynamic IP vs Static IP | Static to dynamic IP
- 4 Configure a dynamic IP address (DHCP) via Settings | Static to dynamic IP
- 5 Configure dynamic IP address (DHCP) via Command Prompt | Static to dynamic IP
- 6 Configure dynamic IP address (DHCP) via PowerShell | Static to dynamic IP
- 7 Configure dynamic IP address (DHCP) via Control Panel | Static to dynamic IP
- 8 Conclusion
What is Static IP Address
Pros
- Static IP address actually never changes irrespective of the device’s reboot status.
- It is really good for businesses that depend on IP addresses.
- It is easier for geolocation services in order to find the accurate location of your business actually.
- Your business will also experience less downtime as compared to a dynamic IP on the same plan as well.
Cons
- Static IP addresses pose potential security weak points because hackers will have sufficient time to attack the network.
- Static IP addresses always cost significantly more than dynamic IP addresses actually.
- Set up a static IP is mostly more complex without the intervention of manual configuration aid from the ISP.
Static IPs do not actually change. If you start your machine or reboot your router, your IP still remains the same. All static IPs cost an additional fee although ISPs are the ones who give them. The additional cost is basically the fee that the user has to pay to reserve one or more IP addresses from a pool of IPs. That would otherwise be free for dynamic assignment as well. It decreases the number of free rotating IPs the ISP has. Regular, home Internet users typically do not need a static IP.
What is Dynamic IP Address | Static to dynamic IP
Pros
- All of the dynamic IPs are more economical than static IPs.
- They need less level of maintenance as compared to static ones.
- Dynamic IPs bear decrease security implications.
Cons
- Most of the dynamic IPs experience extended downtime.
- Geolocation services might experience trouble in determining the accurate location of your business as well.
- Remote access is normally less secure.
- Businesses with dynamic IP addresses mostly prefer on-site employee access to the server network.
Most machines depend on dynamic IP addresses. Although these IP addresses are prone to be changed through your Internet service provider (ISP). They mostly remain the same for weeks, months, and also even years. The user remains unaware of this change in IP as long as it is a home machine also. It does not actually affect the daily browsing or Netflix-ing habits of a user on a private device.
Unless you guys have special configurations associated with the IP you are using, you might not even notice the difference actually. Because they are cheaper than static IPs, a majority of home users select dynamic IPs for residential use.
Dynamic IP vs Static IP | Static to dynamic IP
Your router mostly assigns dynamic IP addresses by default actually. Routers do this because having a dynamic IP address network needs no configuration on your part as well. You just have to plug in your computer and the network will then start to work. When IP addresses are assigned dynamically, then it is usually the router’s job to assign them. Each and every time a computer reboots it then asks the router for an IP address.
The router then hands the computer an IP address that has not already handed out to the other computer. This is actually very necessary because whenever you set your computer to a static IP address, the router does not even know that a computer is already using that IP address or not. That same IP address could be handed out to the other computer later on as well. This will avoid both of the computers from connecting to the Internet. It is really important to assign an IP address that will not be handed out to a different computer through the dynamic IP address server. The dynamic IP address server is usually referred to as the DHCP server.
Configure a dynamic IP address (DHCP) via Settings | Static to dynamic IP
In order to configure a network adapter to request a DHCP configuration rather than a static IP address, use these simple steps:
- First, open Settings.
- Tap on Network & Internet.
- Then click on Ethernet or Wi-Fi.
- Tap on the network connection.
- Under the “IP settings” section, you need to click the Edit button
- Use the Edit IP settings drop-down menu and then choose the Automatic (DHCP) option.
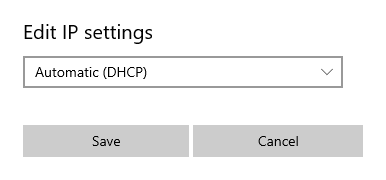
- Tap on the Save button.
When you complete these steps, then the networking stack configuration will reset and your device will request an IP address from the DHCP server (mostly your router).
Configure dynamic IP address (DHCP) via Command Prompt | Static to dynamic IP
In order to switch from a static TCP or IP configuration to a dynamically assigned configuration using DHCP with Command Prompt, use these simple steps:
- First, open Start.
- Search for Command Prompt, right-click the top result, and choose the Run as administrator option.
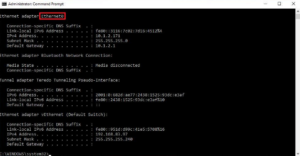
- Type the following command in order to note the name of the network adapter and tap on Enter
ipconfig
- Type the following command in order to configure the network adapter to obtain its TCP or IP configuration using DHCP and then tap Enter:
netsh interface ip set address "Ethernet0" dhcp
In the command, make sure to change “Ethernet0” for the name of the adapter that you need to configure.
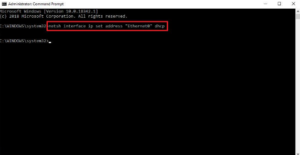
After completing these steps, the network adapter will then stop using a static IP address. And it will then obtain a configuration automatically from the DHCP server.
Configure dynamic IP address (DHCP) via PowerShell | Static to dynamic IP
In order to remove a static IP and DNS addresses to use a dynamic configuration using PowerShell. You need to follow these steps:
- First, open Start.
- Search for PowerShell, right-tap the top result, and then choose the Run as administrator option.
- Type the following command to note the “InterfaceIndex” number for the network adapter and then tap Enter:
Get-NetIPConfiguration
- Type the following command in order to enable the network adapter to obtain its TCP or IP configuration using DHCP and then tap Enter:
Get-NetAdapter -Name Ethernet0 | Set-NetIPInterface -Dhcp Enabled
In that command, make sure to change “Ethernet0” for the name of the adapter that you need to configure.
- Now type the following command to enable the network adapter. In order to obtain its DNS configuration using DHCP and click Enter:
Set-DnsClientServerAddress -InterfaceIndex 4 -ResetServerAddresses
In the command, make sure you have change “4” for the InterfaceIndex for the adapter that you need to configure.
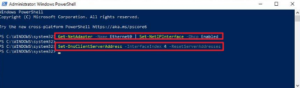
When you complete the steps, the IP and DNS addresses will be reset from the adapter. And your computer will then receive a new dynamic configuration from DHCP.
Configure dynamic IP address (DHCP) via Control Panel | Static to dynamic IP
If you want to configure a network adapter so that you can use a dynamic IP address using Control Panel. Then follow these simple steps:
- First, open Control Panel.
- Then tap on Network and Internet.
- Tap on Network and Sharing Center.
- Now on the left pane, you have to click the Change adapter settings link.
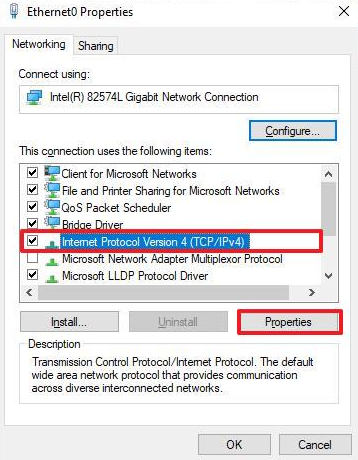
- Right-click on the network adapter and choose the Properties option.
- Choose the Internet Protocol Version 4 (TCP or IPv4) option as well.
- Tap on the Properties button.
- Choose the Obtain an IP address automatically option.
- Choose the Obtain the following DNS server address automatically option.
- Then tap the OK button.
After completing these steps, the statically assigned TCP or IP configuration will be then removed. And the device will try to request a dynamic configuration automatically from the network as well.
Conclusion
Alright, That was all Folks! I hope you guys like this article and also find it helpful to you. Give us your feedback on it. Also if you guys have further queries and issues related to this article. Then let us know in the comments section below. We will get back to you shortly.
Have a Great Day!


