Do you want to fix CPU usage in Windows 10? We’ve all been there. You enable your PC, and rather than getting straight to work, you experienced a terrific slowdown and loud-running fans. Press Ctrl + Shift + Escape, and you’ll then view that your CPU usage is 100% high.
It’s a common issue that’s, not usually too difficult to fix. Here are lots of solutions for the 100% CPU usage in Windows 10.
Contents
How To Fix 100% CPU Usage in Windows 10
If you wnat to fix the issue follow the steps carefully:
Power Supply Issue
This one’s a problem that affects both laptop or desktop Windows 10 users. If you have a damaged power supply then it can automatically begin undervolting your CPU to safe power. When undervolted, your CPU can works at only a fraction of its full power, but the possibility of this showing as 100% CPU usage on Windows 10.
If you want to fix this on a laptop is quite simple: unplug your PC or laptop from the cable, then tap the battery icon under the right corner of your Windows 10 desktop -> Battery Settings -> Power & Sleep Settings -> Additional power settings. Then choose High Performance. If the problem was with your power supply, the CPU usage come back to normal in the task manager (Ctrl + Shift + Esc).
On the desktop, things can be a little more complex, as you want to physically erase the PSU from your computer and test a different one. We suggest going through other tips mentioned below before trying this.
Turn off Superfetch to fix CPU Usage in Windows 10
Superfetch is a process by which Windows 10 knows which apps you use quite often. You can then pre-fetches them for you so they load instantly every time you use them. It’s a constant background process that can’t usually cause issues. But it can’t always play well with older devices.
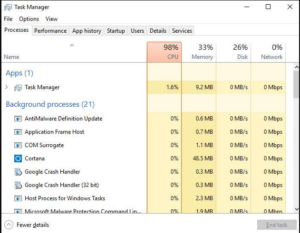
If you want to look out whether Superfetch (or another service) is controlling your CPU. Head over to the Task Manager (Ctrl + Shift + Escape). Then tap “More details,” then tap “CPU” to order processes by how much CPU they’re using.
If you view that a “Service Host” like Superfetch or something else using lots of CPU. Then you can try right-tapping it and tapping the “End Process.”
On the other hand, to turn off it permanently. Simply hit Win + R, type services, then in the Services window move down to Superfetch.
Right-tap Superfetch. Then tap Properties, then in its Properties window tap the drop-down located next to “Startup type,” then tap “Disabled, and OK.
Technically you can do this to any service that’s controlling CPU. However, some services are system-critical so you want to be careful. Another offender of high CPU usage is ‘Windows Search,’ which you can safely turn off, too.
Power Plan Resetting to fix CPU Usage in Windows 10
Turning around in Windows’ power options can have a substantial effect on your computer performance. If you’re set to “High performance” – specifically if you made tweaks to the “plan settings”. Then it’s a good way that you’re overloading your CPU.
Enter power plan into the Start search bar then tap “Choose a power plan.” If you’re on “High performance” or “Power Saver,” then move to “Balanced.”
For additional certainty, tap “Change plan settings,” then on the new screen tap “Restore default settings for this plan.”
Turn Off Third-Party Antivirus Software
This one might be a bit controversial, but our view here is that after using antivirus software on Windows 10, then you might put unwanted strain on your CPU. It doesn’t usually hurt to have additional security, but you might don’t want it.
So don’t worry to turn off your third-party antivirus software to view if it helps your CPU usage. If it does, then uninstall it.
Check Errors in Particular Processes
This one’s a little more difficult than the other solution but also has the potential to offer many fixes to your CPU woes.
If you’ve found that your issue is being caused by a Windows “Service Host” process in Task Manager. Then one solution is to take the Superfetch route as per the first solution and turn off it.
But to move deeper into the problem, hit Win + R, then open “eventvwr.” Here in the pane on the left, head over to “Applications and Service Logs -> Microsoft -> Windows -> WMI-Activity -> Operational.
Then check the center column, known as “Operational,” for errors, then at the bottom of the “General” tab below that check the “ClientProcessId” number.
Move back to Task Manager. Tap the “Details” tab. Then sort the processes by “PID.” Also, find the process with the bugs. Then right-tap it and tap “Open file location.” This will provide you an idea of what software the process is attached to and whether you can again install it, uninstall it, update its drivers, and so on.
Conclusion:
100% CPU usage on Windows 10 is a difficult problem with many fixes. These are some of the necessary solutions, but if you’ve found that something else worked well, then let us know in the comments section below!
Is this article helpful? Share your view with us. Also, for further queries and questions let us know in the comment section below!
Also Read:


