Most of the time you will see that frustrating yellow exclamation point icon over your network connection icon in Windows. The OS offers to troubleshoot it for you, but after running through the automatic tool, you guys will see this message: Windows could not automatically detect this network’s proxy settings. In this article, we are going to talk about How to Fix Networks Proxy Settings Error in Windows. Let’s begin!
Contents
- 1 How to Fix Networks Proxy Settings Error in Windows
- 1.1 1. Reboot Your Computer and Router
- 1.2 2. Review Proxy Settings in Windows
- 1.3 What is a Proxy Server? | networks proxy settings Error
- 1.4 3. Run the Network Adapter Troubleshooter
- 1.5 4. Auto-Obtain IP Address and DNS
- 1.6 5. Reset Network Configuration through the Command Prompt
- 1.7 6. Review Firewall, VPN, and also Antivirus Software
- 1.8 7. Update or Roll Back Your Network Driver
- 1.9 8. Scan for Malware | networks proxy settings Error
- 1.10 9. Utilize a Restore Point
- 1.11 10. Reset Your Network Settings
- 1.12 Conclusion
How to Fix Networks Proxy Settings Error in Windows
1. Reboot Your Computer and Router
Before you guys launch into advanced troubleshooting, it’s always a good idea to restart your equipment first. There’s also a chance that this will clear up your issue in a few moments.
Because this error is mostly related to misconfigured settings on one computer, restarting your router likely won’t have an effect on that actually. But it’s still worth a try whenever you run into network problems of any kind as well.
If you reboot your computer and router and the problem has not fixed itself, then continue on with the more detailed steps.
2. Review Proxy Settings in Windows
Because this issue is related to your Windows proxy settings, then that’s a sensible first place to check. If you want to access proxy settings in Windows 10, then open Settings, select the Network & Internet category. And then switch to the Proxy tab from the left sidebar.

Here you will see a list of options that are related to proxy servers. If you do not use a proxy (as is the case for most home users), then make sure the Use a proxy server slider is turned off. Now leave Automatically detect settings on if it is already.
For users who do connect with a proxy, like in a work or education environment, then you might want to check with your system administrator to make sure that you have the correct proxy details.
After this, try to reconnect to the network again. If you still get the error, then try turning off Automatically detect settings in the proxy options and try once more.
What is a Proxy Server? | networks proxy settings Error
We do not want to bore you with the details when you try to fix this issue. But wanted to give a brief explanation of what a proxy actually is and why Windows can run into problems with it.
Most importantly, a proxy server acts as a middleman between your computer and the internet. Rather than you connecting directly to the internet, then you connect to the server, that grabs information from the internet for you.
These are most common in business and also school use, where system administrators use them for security and efficiency as well. It’s very unlikely that you would use a proxy server on your home network until you specifically set one up. This is why you should clear any proxy settings that might exist when you run into these types of issue as well.
3. Run the Network Adapter Troubleshooter
When you right-click on the network connection icon and select to troubleshoot, then it runs the Internet Connections troubleshooter. This will result in the “Windows could not detect proxy settings” error. But, there’s another network troubleshooter that you can run that might provide more help as well.
Open Settings again and then go to Update & Security > Troubleshoot. You have to find Network Adapter in the list and walk through the troubleshooter for this. As seasoned Windows users know, that this tool does not always fix your problem, but, it’s worth a try.
4. Auto-Obtain IP Address and DNS
As it turns out, there are not many troubleshooting steps specific to proxy servers as well. We’ll share more tips below but keep that in mind that the troubleshooting looks similar to fixing the “No Internet Access” Windows error from this point on.
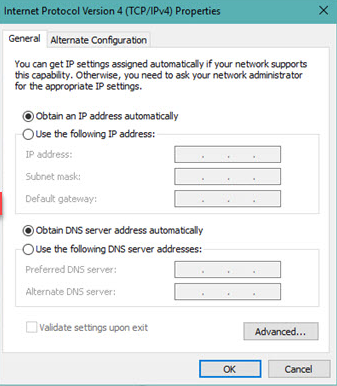
While they are not technically related to your proxy settings, misconfigured IP address or DNS settings can also cause this error too. If you want to check them, browse to Settings > Network & Internet > Status. Click the Change adapter options button in the list in order to see all your network connections. Then double-tap on the one that you are using.
Here, click the Properties button and then double-click Internet Protocol Version 4 on the list. Make sure you have both Obtain an IP address automatically and Obtain DNS server address automatically selected as well. Misconfigured settings here will avoid you from getting online.
5. Reset Network Configuration through the Command Prompt
Windows offers many network troubleshooting tools via the Command Prompt. A few instant commands can clear up your issue in moments. If you are still having trouble at this point, then right-click the Start Button again and then open a Command Prompt (or PowerShell) as Administrator.
Then actually run the following commands, one at a time. They will reset many network functions of your computer:
netsh winsock resetnetsh int ip resetipconfig /releaseipconfig /renewipconfig /flushdns6. Review Firewall, VPN, and also Antivirus Software
You should next make sure that you do not have a firewall, VPN, or security suite interfering with your network connection. Perhaps your chosen software had an update that changed some settings that you were not aware of, or you just installed a new app as well.
Try to disable your firewall, VPN, and also antivirus software one at a time, then see if the error goes away or not. If it does, then the issue lies with one of those apps. You will need to configure them to prevent interfering with regular network activity.
7. Update or Roll Back Your Network Driver
An outdated network driver may lead to connection problems as well. Just like that, perhaps you have recently installed a botched update for your network driver. In either case, replacing it might clear up the trouble you have.
Right-click on the Start Button and then select Device Manager to open this utility. Expand the Network adapters section and then double-tap on the connection you use.
On the Driver tab, you can also select Roll Back Driver to uninstall the latest update and then return to the previous one. Use this if you started experiencing this issue after updating that.
Select Update Driver and then you can check for new updates over the internet. This likely won’t find anything though, so you will need to manually download the latest driver from your machine’s manufacturer now.
8. Scan for Malware | networks proxy settings Error
Some malware has been known to continually mess with your proxy settings to avoid you from getting online. If you run into the “Windows could not detect this network’s proxy settings” message every time you reboot, then you may be a victim of this.
You should thus run a scan along with a trusted anti-malware app, like Malwarebytes. This will detect any viruses or all other malware running on your system and then get rid of them. If the scan finds any infections, take the recommended action, and then see if your connection works as normal again.
9. Utilize a Restore Point
The System Restore feature in Windows lets you return to a previous point whenever your computer was actually working normally. If your issues started recently, then you should try this to see if you can go back in time.
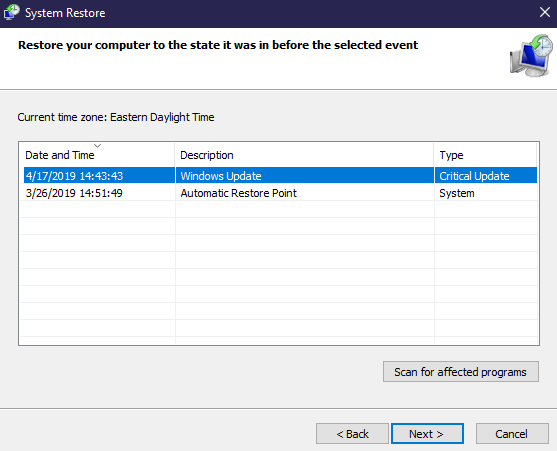
Now search for Control Panel in the Start Menu to open it. If Category is selected in the top-right, switch to Small or Large icons and then select the System entry.
Then, tap System protection on the left sidebar. In the resulting dialog box, tap System Restore to open a new window. Windows will walk you via choosing a restore point and also confirming the operation. Of course, if your computer has not created any restore points, then you can’t use this feature.
Keep that in mind that using a restore point will remove any programs and also drivers you installed since making that restore point. You can tap Scan for affected programs on a restore point to see what effect it will have. A System Restore won’t affect any of your personal information as well.
10. Reset Your Network Settings
After trying everything above, you should now resort to a full reset of your network options. You have already spent a lot of time working on this, and a reset should clear whatever persistent problem is blocking your connection as well.
Thankfully, Windows 10 also makes it easy to reset your whole configuration. Open Settings > Network & Internet. On the Status tab, find Network reset at the bottom and then tap this.
Be aware that this will remove all network information from your computer, so you will also need to reconnect to saved networks again. If you are OK with this, tap Reset now. Your computer will perform the reset, and then restart.
Conclusion
Alright, That was all Folks! I hope you guys like this network proxy settings Error windows 10 article and also find it helpful to you. Give us your feedback on it. Also if you guys have further queries and issues related to this article. Then let us know in the comments section below. We will get back to you shortly.
Have a Great Day!


