FAT32 is a versatile file system that has been around for decades now. Unfortunately, Windows 10 does not allow its users to format USB or hard disk drives larger than 32GB in FAT32. Fortunately, there are few ways around this. In this article, we are going to talk about How to Format Fat32 Windows 10 – Tutorial
Contents
What Is FAT32? | Format Fat32 Windows 10
FAT32 is actually a solid file system for external drives, so long as you do not plan to use files over 4GB in size. If you do need those larger file sizes, then you will need to stick with something like NTFS or exFAT as well. The advantage of using FAT32 is portability. Every major operating system and most devices also support it, which makes it great for drives you need to access from different systems.
Specifications put out by manufacturers on file systems because they pertain to drive size created the myth. That FAT32 can only be used in order to format drives between 2 GB and 32 GB. And that is likely that why native tools on Windows—and other systems—have that limit. The truth is that FAT32 has a theoretical volume size limit of 16 TB, along with a current practical limit of about 8 TB—plenty for most USB drives.
We are going to show you two ways to format larger USB drives along with FAT32. One method uses PowerShell (or the Command Prompt), the other is actually a free, third-party tool.
Why Is FAT32 Disabled in Windows 10?
In spite of the fact that FAT32 is so versatile, Windows 10 does not allow you to format drives in FAT32. This may seem like an odd choice; but, there is sound reasoning behind the decision as well.
Since the FAT32 file system is so old, there are actually two significant limitations. The first thing is that the FAT32 file architecture cannot be used on drives larger than 16TB. Admittedly, this is not a huge issue for most folks. But, the second drawback of FAT32 can be a bigger headache: FAT32 cannot handle individual files over 4GB in size as well.
FAT32 has replaced by the more modern exFAT (extended file allocation) file system. exFAT has actually a greater file-size limit than FAT32. The only downside to exFAT is that it was developed by Microsoft and therefore owns all the patents as well. This means that the ability to manipulate the exFAT file structure, for example, read, write, and repair capabilities must be licensed. Unfortunately, this means there can be some compatibility issues whenever using exFAT. This makes FAT32 a bit easier to work with, in spite of the file-size limitations.
Powershell (Command Line)
You can format USB drives larger than 32GB along with FAT32 through using the format command in PowerShell or Command Prompt—the command actually uses the same syntax in both tools. The downside to doing this is that it can take a long time actually. Formatting our 64GB USB drive took almost over an hour, and we have heard some people complain that it can take many hours for bigger drives as well. Apart from the length of time, you also won’t know if formatting failed or not—unlikely but possible—unless the process is done.
If you wanted to format your drive in NTFS or exFAT, then you could do this with the regular Windows 10 formatting tool. But, you won’t be able to use the formatting tool if you want to use the FAT32 file system.
Fortunately, there is also a way around this. While you can’t choose FAT32 in the regular Windows 10 formatting tool, but you can still do it without installing any third-party software.
Before you start this, connect the storage device that you want to format in FAT32 to your PC. When you connect the drive, then make note of the letter assigned to it.
Note:
before proceeding any further, make sure that your data is also backed up. Formatting will also erase all of the data currently stored on the drive as well.
In order to format your drive to FAT32 in Windows 10, then you will need to use Powershell. If you want to launch the Powershell command line, then right-click the Start button and choose “Run” from the menu. This will then open the Run command window. Alternatively, you can click Win + R to launch the Run command box. Type powershell and either tap OK or press Enter. When the Powershell window opens, then type the following command, replacing the “F” with the letter of the drive you want to format in FAT32:
format /FS:FAT32 F:
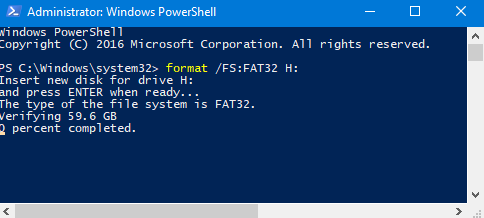
Finally, click the Enter key. You will see a prompt warning you that all of the data on the drive will be erased. It will ask you to confirm or cancel formatting by tapping the Y or N key. Click the Y key, and then the formatting process will begin. Let your computer do its thing, and before you know it, your drive will be formatted in FAT32 as well.
Third-Party Software
If you are not comfortable with the command line and prefer something with a graphical user interface. Then you can opt for third-party software. There are a number of options available, that includes (but not limited to) the ones listed below:
Conclusion
Alright, That was all Folks! I hope you guys like this format fat32 windows 10 article and also find it helpful to you. Give us your feedback on it. Also if you guys have further queries and issues related to this article. Then let us know in the comments section below. We will get back to you shortly.
Have a Great Day!
Also See: How to Format a Hard Drive in Windows 10


