How to make One Page Landscape in Word? What it actually is? I was writing a word document recently, and I came across an interesting problem. I had about 20 pages in the word doc. But I needed only one of them to be in the landscape. Even though I am using the MS word for may years and I never ran into this situation before. I start playing around with page breaks and section breaks for about an hour. And I finally figure it out. That how to make One Page Landscape in Word. I mean fix this issue.

Unfortunately, making the one-page landscape in a word document is not an intuitive task at all. And if you are not familiar with section breaks at all. Then you would never be able to figure this thing out.
In this article, I will provide you the clear instructions about how you can make One Page Landscape in your Microsoft Word 2019 or 2016 document landscape. Just follow these steps.
Steps:
- Place your cursor at the very beginning of the page that you would like to flip to the landscape. (We work with page 2 in our example)
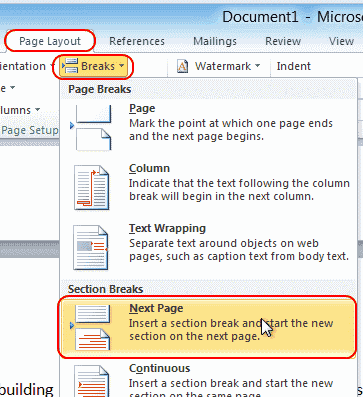
- Then select “Layout” or “Page Layout” > “Breaks” > “Next Page” to create a section
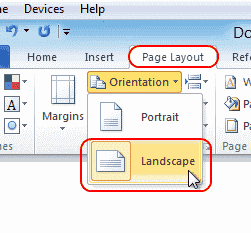
- Select the “Page Layout” tab and select “Orientation” > “Landscape“.
What this does is mark all or one page after the break you made in step 2 as the landscape in word. In our example, pages 2, 3, 4 and forward are in the landscape. Since we only want page 2 to display in the landscape, we will need to change any forward pages back to the portrait.
- Place your cursor on at the beginning of the next page (page 3 in our example) or the next page you wish to remain in portrait.
- Then select “Page Layout” > “Breaks” > “Next Page” just like in step 2 to create another section.
- Select the “Page Layout” tab and select “Orientation” > “Portrait“. This will make the rest of the document display in portrait.
There you go! Now you have successfully made a single page landscape in Microsoft Word 2016 & 2013.
Important note:
If you have a header on your first page. And you don’t want it to be on the landscape page. Then you can do this (after making the one-page landscape in word):
Steps:
- Right-click on the header on the landscape page and select “Edit Header”
- Click the “Link to Previous” button so that it is no longer highlighted.
- Delete the heading for that page. It should remain on page 1.
I hope you like this tutorial and you also get a lot of help through it. For further queries, you can comment below and let us know about it. Have a Great Day!
Also See: How to Reset and Flush DNS Cache in Windows 10


