Discord is a popular chat and communication application that is actually designed for game players. It is frequently used by gamers for its high efficiency in communication actually. Discord is actually a lightweight program that won’t take much space on computers. In this article, we are going to talk about How to Record Discord Audio – Tutorial. Let’s begin!
Discord does not offer an option to record these conversations, but, it is possible to use third-party solutions instead. Let’s see how.
Before you begin, you should be aware that, in many locations around the globe, it’s actually illegal to record other people without their permission. Please make sure that you have the permission of all parties involved in a conversation before you use any of the methods listed here.
You will also need to make sure that you’ve properly configured your microphone settings in Discord to permit you to chat with others. If you do not, you won’t be able to speak on your Discord server (or be able to record yourself chatting with other users as well).
Contents
Use the Craig Chat Bot to Record Discord Audio | how to record discord audio
If you are in charge of your own Discord server, then you can use the Craig chat bot to easily record Discord audio. This bot sits in your server, ready to invited into voice chat rooms in order to record conversations using a few text commands.
No concerns about immoral recordings, either—Craig won’t record without even a visible label to indicate when it’s recording or not. Not only does it record your conversation with others, but it also records each user as separate audio tracks. That makes it much easier to edit or cut specific speakers out, should you need to.
In order to use Craig, you’ll first need to invite the bot to your server. Go to the Craig website and click the “Invite Craig To Your Discord Server” link to begin.
This will then bring you to the Discord server authorization page. You’ll need to give Craig permission to join your server before you can even begin using it. To do this, select your server from the “Add Bot To” list and then click “Authorize” to permit the bot to join.
If the process is successful, then you should see a join message for “Craig” in your server. No further configuration is important at this point. You can also begin using Craig straight away to begin recording your audio channels. if you want to do this, enter an audio channel and then type :craig:, join to begin.
Further | how to record discord audio
Craig will then enter the channel and immediately begin recording—the bot’s username should change to reflect this. You will also hear an audio alert from the bot that says “now recording” to confirm.
If you want to stop a Craig recording, type :craig:, leave. This will force Craig to leave the channel you’re currently in and also stop recording, although recordings in other channels will continue as well.
If you want to stop Craig from all channel recordings, then type :craig:, stop to force Craig to end all the recordings.
You can also use this as an alternative to the leave command in order to end a Craig recording. If in case you are only recording in a single channel.
When you begin recording, then you’ll receive a private message from the Craig bot itself. That gives you links to download or delete your conversations.
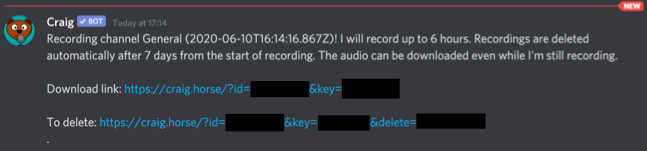
Craig will then record for up to six hours at a time. If you want to check the status of a recording, then you can download a copy of the audio, up to the point you download the file actually.
A full list of Craig commands is available at the Craig website, that you can quickly access through typing :craig:, help in a Discord channel. This will bring up a quick link to the website, where you can find out more about how the bot actually works.
Use OBS to Record Discord Audio | how to record discord audio
If you aren’t a Discord server owner or moderator, then you can record Discord audio on your own PC using Open Broadcaster Software (OBS). OBS is mostly used by streamers on Twitch and YouTube in order to stream games and other content. And is freely available for use on Windows, Linux, and Mac as well.
OBS does this through capturing many audio and visual channels. That includes your desktop audio and display, as well as your microphone. You can use this same feature to record the audio from a Discord channel (alongside your microphone input). That allows you guys to save the conversation.
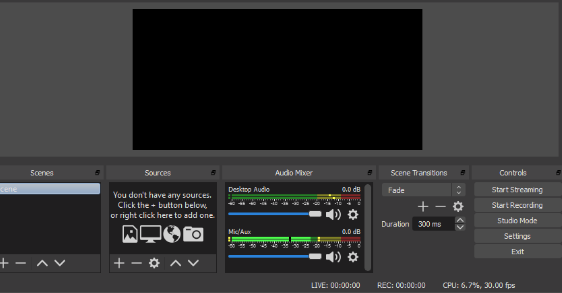
In order to record Discord audio in OBS, tap the plus icon (+) in the “Sources” area of the OBS window. From the menu, you need to select “Audio Output Capture” to select your desktop audio output for recording.
In the “Create or Select Source” window, give your desktop audio source a name and then tap“OK” to confirm. You’ll required to choose the output device (for instance, your speakers or headphones) from the “Properties” menu. Choose the appropriate device from the “Device” drop-down menu and then tap “OK” to confirm.
If you only have a single output device, then the “Default” option should be fine to use here. You can check if your audio is captured correctly through playing some audio on your PC or not. Under the “Audio Mixer” section in OBS, the audio sliders for “Audio Output Capture” should move to show the audio is picked up, now ready for recording.
Further
You can also use the blue slider underneath to lower the recording volume, should you need to do this. By default, “Mic/Aux” should be listed under the “Audio Mixer” section actually. This will make sure that your own speech is recorded along with any other chat participants.
If the option isn’t available, then click the plus icon (+) in the “Sources” are. And then choose “Audio Input Capture” in order to add your microphone input to the recording. If you’d rather stop your microphone from recorded, then select the speaker icon next to the “Mic/Aux” or “Audio Input Capture” slider.
In order to begin recording, click the “Start Recording” button under the “Controls” section in the bottom-right area of the OBS window as well.
By default, OBS will then record the audio as a blank video file in the MKV file format (unless you are recording your desktop as an additional capture stream). Each and every recording will saved with a file name that shows the time and date of the recording.
In order to see your recorded files, select File > Show Recordings from the OBS menu.
If you want to record in another file format, then tap Settings > Output and then choose an alternative to MKV from the “Recording Format” drop-down menu.
While OBS will save as video files, then you can also convert videos to MP3 using VLC. Removing the redundant video content and giving you an audio-only file that you can export and also use elsewhere.
Conclusion
Alright, That was all Folks! I hope you guys like this how to record discord audio article and also find it helpful to you. Give us your feedback on it. Also if you guys have further queries and issues related to this article. Then let us know in the comments section below. We will get back to you shortly.
Have a Great Day!
Also See: How to Enable Discord Overlay in Games


