The latest versions of Skype are bringing annoying and irritating ads that are displayed not only on the home menu. But also on the chat windows that can stressful for all of us. Because of some reason, I even heard users who are uninstalling Skype from their Windows 10, 8, and Windows 8.1 devices. Anyway, if you are tired of these ads, then you should learn how to turn off it as there is an easy method that can apply to that matter. You can perform this procedure on any Windows system, so the steps from below are also compatible with Windows 10, 8, and Windows 8.1 devices. In this article, we are going to talk about How to Remove Ads from Skype – Tutorial. Let’s begin!
Contents
How to Remove Skype Ads on PC | remove ads from skype
Use Control Panel
- First, on your Windows 10, 8 devices open Control Panel.
- You can also access Control Panel by tapping Win+R and by searching for “control”; tap on “ok”. And now run Control Panel. Also, you can just search for Control Panel through using the Windows Search feature. Just type the word “control” on the search box and then select Control Panel from the list that will be displayed.
- From Control Panel you need to select Network and Internet (Network and Sharing Center).
- From the window that will be displayed click on the “security” tab.
- Then, from the first box tap on “restricted sites”.
- Up next, click on the “sites” button.
- A dialog box that is dubbed as “restricted sites” should be now displayed.
- In a similar dialog box, you need to type https://apps.skype.com/.
- Save your changes and then close Control Panel.
- Now just restart the Skype and then enjoy the ads-free program. Rather than those annoying ads, you should now see an empty placeholder.
Further | remove ads from skype
If we talk about blocking ads, then you can also block them on your browser as well. There are many browser extensions that allow you to turn off the ads and then enjoy a smooth browsing experience. Here are some of the examples of these extensions:
Disable Skype ad placeholders | remove ads from skype
In order to get rid of ad placeholders, you need to do the following.
- First, quit Skype.
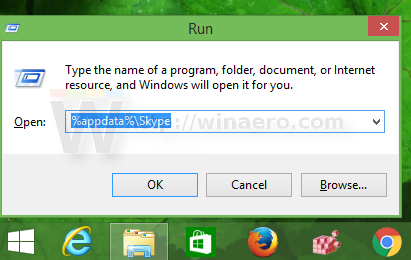
- Then open your Skype profile folder. It can access through pressing Win + R hotkeys and then type the following in the Run box:
%appdata%\skype
- Locate the folder with your profile ID. In my case it is “Sergey.Tkachenko”:
- Inside that folder, you will find a file called config.xml. Open it with Notepad:
- Find the line which contains this text:
AdvertPlaceholder
- Change its value from this:
<AdvertPlaceholder>1</AdvertPlaceholder>
to this:
<AdvertPlaceholder>0</AdvertPlaceholder>
- You are done! Now ad placeholders will disappear.
Enjoy your ad-free Skype. Note that when Skype is updated, this file might be overwritten and you may have to do this trick again. So bookmark this page for future reference.
Conclusion
Alright, That was all Folks! I hope you guys like this remove ads from the skype article and find it helpful to you. Give us your feedback on it. Also if you guys have further queries related to this article. Then let us know in the comments section below. We will get back to you shortly.
Have a Great Day!


