On Windows 10, the process to install cumulative updates can most of the time cause problems. Like, the updates could fail to install as a result of file corruption, compatibility, or unknown bugs as well. In this article, we are going to talk about How to Remove Pending Updates Windows 10. Let’s begin!
Whatever the reason it might be if you guys are having problems installing a Windows update. Or some of the users are reporting issues along with the particular patch, then you can delete the pending updates in order to download the package again or skip the update entirely as well.
You can also complete this task through removing the contents inside the SoftwareDistribution folder. That contains the files that Windows Update uses in order to apply new updates.
So, in this guide, you guys will learn the steps to delete the files for pending updates on Windows 10 actually.
How to Remove Pending Updates Windows 10
If you want to delete pending updates in order to avoid the installation. Then you have to use these simple steps:
- First, open File Explorer on Windows 10.
- Then type the following path in the address bar and tap on Enter:
C:\Windows\SoftwareDistribution\Download
- Choose all the contents (Ctrl + A or click the select all option in the “Home” tab) inside the Download folder as well.
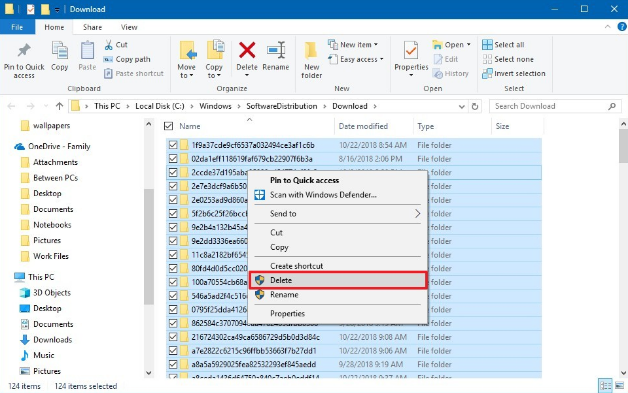
- Then tap on the Delete button from the “Home” tab
When you complete all of these steps, then the cumulative update installation files will be deleted from your device.
If you want to skip a particular update, after deleting the files, you can use the “Show or hide updates” tool to block the Windows update from trying to install again.
Although we are focusing on cumulative updates, these steps should also work to delete pending feature updates.
Delete Downloaded, Failed, Remove Pending Updates
Delete the contents of the Temporary folder
You guys can also delete all the downloaded, failed, and pending Windows 10 updatesusing the ‘Run’ command as well.
Open the ‘Run’ dialog box through tapping Win+R in combination and in the dialog box that opens, type %temp% and then tap on Enter. In the folder that opens before you choose all the files and folders within the Temp folder and then remove them.
%temp% is one of many environment variables in Windows that can actually open the folder designated by Windows as your Temporary folder. Normally located at C:\Users\[username]\AppData\Local\Temp as well.
Remove pending.xml file | Remove Pending Updates
You have to navigate to C:\Windows\WinSxS\ folder, search for a pending.xml file and then rename it. You may even remove it as well. This will allow Windows Update to delete pending tasks and also build a fresh new update check. Have a look if this helps.
Delete contents of SoftwareDistribution folder
You need to remove all the contents of the Software Distribution folder actually. The Software Distribution folder in the Windows operating system is basically a folder located in the Windows directory. It is used to temporarily save files that may be need to install Windows Update on your computer. Thus it is needed by Windows Update and maintained by WUAgent as well. It also have your Windows Update History files, and if you remove them, chances are that you will lose your Update history. Also, the next time you run Windows Update, it will then result in a longer detection time as well.
In order to delete the contents of the Software Distribution folder, in Windows 10, from the WinX Menu, then open Command Prompt (Admin). You have to type the following one after the other and click Enter:
net stop wuauserv
net stop bits
This will then stop the Windows Update Service and also the Background Intelligent Transfer Service.
Further | Remove Pending Updates
Now you need to browse to the C:\Windows\SoftwareDistribution folder and remove all the files and folders inside.
You can press Ctrl+A to Select All and then tap on Delete.
If the files are in use, and you are unable to remove some files, then restart your device. After rebooting, you need to run the above commands again. Now you will be able to remove the files from the mentioned Software Distribution folder as well.
After you have emptied this folder, you may need to restart your computer, or you may type the following commands as well. One at a time in the CMD, and then tap Enter in order to restart the Windows Update related Services.
net start wuauserv
net start bits
Now that folder has flushed; it will now get populated afresh whenever you restart your PC and then run Windows Update actually.
Reset the catroot2 folder | Remove Pending Updates
Resetting the catroot2 folder has been basically known to fix many Windows Update problems.
Catroot and catroot2 are actually the Windows operating system folders that are required for the Windows Update process. When you guys run Windows Update, then the catroot2 folder stores the signatures of the Windows Update package and also helps in its installation. The Cryptographic service actually makes use of the %windir%\System32\catroot2\edb.log file for the updating process. The updates are stored in the SoftwareDistribution folder which is then used by Automatic Updates in order to carry out the updating process.
Please do not remove or rename the Catroot folder. The Catroot2 folder is automatically recreated by Windows. However, the Catroot folder is not recreate if the Catroot folder is rename.
Conclusion
Alright, That was all Folks! I hope you guys like this “Remove Pending Updates article and also find it helpful to you. Give us your feedback on it. Also if you guys have further queries and issues related to this article. Then let us know in the comments section below. We will get back to you shortly.
Have a Great Day!
Also See: 5400 vs 7200 RPM Hard Drives – All You Need To Know


You’ve missed out the instructions for how to reset catroot2 folder.However you can find it here.