Windows 10 version 1803 (April 2018 Update) will be rolling out automatically as a free update on the compatible desktops, laptops, and also tablets in April 2018. But, the deployment of a new feature update mostly never goes without a glitch as a result of bugs or some sort of compatibility issues as well. In this article, we are going to talk about How to Uninstall Windows 10 1803 Update – Tutorial. Let’s begin!
During the first few months, it is also expected that a small number of devices will encounter these problems, and for that reason. Windows 10 includes an option that allows anyone to uninstall the April 2018 Update to head back to the previous version. You can also use this option if in case, you are having problems. Or if you are not ready for the update, and you want to wait a little longer.
In the case your computer has been upgraded to version 1803 via Windows Update, Update Assistant. Or also via the Media Creation Tool (in-place upgrade), during the first ten days since the upgrade was installed, you can instantly uninstall the update via the recovery options as well.
So, in this guide, you guys will learn the steps to remove the latest upgrade and also head back to the previous version of Windows 10.
If you guys no longer have the option to roll back, then you can use this guide to configure your device to keep the previous installation for a longer period. So you have more time to uninstall an upgrade of Windows 10 the next time around as well.
Contents
How to Uninstall Windows 10 1803 – Tutorial
The process in order to rollback to the previous version after installing the Windows 10 April 2018 Update from your PC is actually straightforward. However, you should always consider checking for new updates first, because there could be already a fix for the problem that you are having.
If you are dealing with a specific issue, then research online first, as the problem could have an easy fix. When nothing seems to fix the problem, then you guys can use the steps below in order to roll back and get rid of the Windows 10 version 1803 as well. Let’s see how:
- First, you have to open Settings.
- Tap on Update & Security.
- Then tap on Recovery.
- Now under “Go back to the previous version of Windows 10,” press the Get started button.

- Choose an answer to why you’re going back.
- Press the Next button.
- Then press the No, thanks button.
- Now check out what’s going to happen when you uninstall the Windows 10 April 2018 Update from your PC and then click the Next button.
- Then press the Next button.
- Click Go back to earlier build in order to begin the rollback.
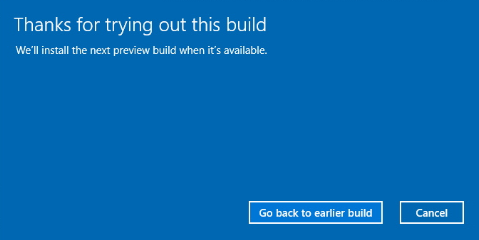
When you have completed the steps, the setup will take over and then roll back your PC to the previous version of Windows 10.
‘Go back to the previous version of Windows 10’ option not available
If in case, you guys do not see the option to go back to a previous version of Windows 10. Then a few things may be happening to you PC.
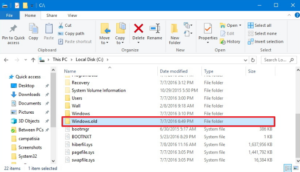
Windows 10 actually automatically saves a copy of the previous version on the C:\ drive, on a folder that is called Windows.old. And maybe on every upgrade in case the installation fails and also roll back is necessary.
If the installation completes successfully, then the Windows.old folder will stay on your device. And you guys can use the above instructions to manually uninstall Windows 10 version 1803 from your computer.
If you do not have Windows.old folder, then you won’t be able to uninstall the update using the steps mentioned above.
There’s also a chance that you may be trying to uninstall the Windows 10 April 2018 Update after the 10 days of the original installation. The Windows.old folder takes a lot of space on your device, and to free up space for more important files, Windows automatically deletes the previous version files folder after 10 days of the installation. If this is your case, you won’t be able to go back to a previous version.
If you have Windows.old folder, however, you do not see the option to head back to a previous version. Then there’s something else going on in your device, and you will need to downgrade using a clean install of Windows 10 via an ISO file. That contains the older version you want to use actually.
Remove update via System Restore
The easiest way in order to uninstall the May 8 Patch Tuesday is to use System Restore available in the Windows 10 Advanced options.
- First, tap the See advanced repair options button.
- Tap on Troubleshoot.
- Tap on Advanced options.
- Then tap on System Restore.
- Tap on your account name.
- Now type your account password, and then press the Continue button.
- Press the Next button.
- Then choose the restore point created before the update was installed.
- Press the Next button.
- At last, press the Finish button.
When you have completed the steps, then the update KB4103721 will be removed. And your computer should start normally again as well.
Remove update via Safe mode
If you do not see a restore point, then you can boot your device in Safe Mode. In order to remove update KB4103721 manually via Command Prompt.
- First, click the See advanced repair options button.
- Tap on Troubleshoot.
- Then click on Advanced options.
- Press the Startup settings option.
- Press the Restart button.
- Upon restart, you need to select Safe Mode with Networking, that you can choose hitting F5.
- Then open Start.
- Search for Command Prompt, you have to right-click the top result, and choose Run as administrator.
- Type the following command in order to remove the update and tap Enter:
wusa /uninstall /kb:4103721
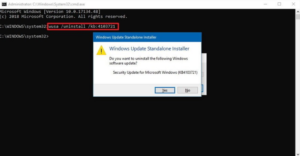
- Press the Yes button.
- Now press the Restart button to reboot and then exit from Safe Mode.
After completing all the steps, update KB4103721 will be removed, and then your device should once again start normally.
Block update KB4103721 from installing again
The last thing left to do is to prevent Windows 10 from installing the same update again using these steps:
- First, download the Show or hide updates troubleshooter from the Microsoft support.
- Double-click the .diagcab file to open the tool.
- Then tap Next.
- Tap Hide updates to continue.
- Now the tool will check online and list the available updates currently not installed on your PC. Choose the KB4103721 update, and then click Next.
- Press the Close button.
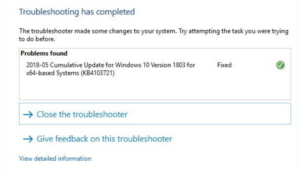
After you uninstall and hide update KB4103721, now your Windows 10 device won’t try to download and reinstall it again. Until there is a new update that replaces the old version actually.
At any time, you guys can always show the update again using the same instructions mentioned above. However, on step 4, you have to use the Show hidden updates option actually. Then use Windows Update in order to download the patch again.
Conclusion
Alright, That was all Folks! I hope you guys like this uninstall windows 10 1803 article and also find it helpful to you. Give us your feedback on it. Also if you guys have further queries and issues related to this article. Then let us know in the comments section below. We will get back to you shortly.
Have a Great Day!


