
Well, this error in Windows is not really common, and if you guys are facing this error. Then there are two main reasons as to why you guys are seeing this error. One is Bluetooth drivers and the other is your wireless adapter actually. In this article, we are going to talk about How to Fix Kernel Auto Boost Invalid Lock Release. Let’s begin!
Kernel Auto Boost Lock Acquisition error in Windows 10 is actually a blue screen of death (BSOD) error. That is pretty frustrating for the end users because there is no definitive guide in order to fix this kind of error. Well, out there you guys might be lost but here at troubleshooter.Xyz we have solutions to all your problems actually. So without wasting any further time let’s get straight to troubleshooting steps now.
Contents
- 1 How to Fix Kernel Auto Boost Invalid Lock Release
- 1.1 Disable your wireless adapter
- 1.2 Run Check Disk | Kernel Auto Boost
- 1.3 Disconnect your Bluetooth devices
- 1.4 Go back to the previous build | Kernel Auto Boost
- 1.5 Remove NDAS device from your system
- 1.6 Check your disk for errors
- 1.7 Disconnect your external hard drive | Kernel Auto Boost
- 1.8 Update the BIOS
- 1.9 Conclusion
How to Fix Kernel Auto Boost Invalid Lock Release
If you guys can access your PC good if not then enable the Advanced legacy boot menu and choose safe mode. You can perform all the below steps in safe mode if you can’t access your Windows normally.
Disable your wireless adapter
- Just head to Device Manager. You can do this by pressing Windows Key + X and selecting Device Manager from the menu.
- In Device Manager locate your wireless adapter, and then right-click it and disable it.
- Try and now see if the issue is resolved.
If this actually works for you, then you might have to use the Ethernet connection rather than wireless. In addition, you guys might want to remove your wireless adapter if you know how you can do it. And if your computer isn’t under warranty, as well as temporarily use a different wireless adapter.
This isn’t important, disabling the adapter should do the trick. As far as we all know Atheros AR928X Wireless network adaptor is actually causing the issues, however, many other models might have an issue as well. Some users also advise uninstalling your Wireless adapter drivers and allowing Windows 10 in order to find them on its own. To uninstall drivers just choose to Uninstall rather than Disable.
You have to check to Delete the driver software for this device and tap on OK. After you guys restart your computer Windows 10 should install the default drivers on its own as well.
Run Check Disk | Kernel Auto Boost
- Click on Windows Key + X and then choose Command Prompt (Admin).
- Then in the cmd type the following command and click on enter:
chkdsk /f C:
- You have to reboot your PC.
Disconnect your Bluetooth devices
- Trn off all the Bluetooth devices you have.
- Click on Windows Key + R then type devmgmt.msc and click on enter to open device manager.
- Tap on Bluetooth in order to expand and right-click on each one and then choose Uninstall.
- Now just reboot your PC to apply changes.
Go back to the previous build | Kernel Auto Boost
- You have to open Settings and select Update and Security.
- Choose Recovery and click Get started that is under Go back to an earlier build.
- Now follow on-screen instructions and Restart your PC.
Remove NDAS device from your system
According to users, Ximeta won’t really develop new drivers so your best solution is just to remove the NDAS device from your system. After doing that the BSOD error should really go away.
As you guys can see, this issue is annoying, however, we expect Microsoft to fix it with the latest Windows 10 patch. So just make sure that you keep your Windows 10 up to date along with the latest patches.
Check your disk for errors
- Head to Start, launch Command Prompt as administrator
- Then type the chkdsk C: /f command and then click on Enter. Replace C with the letter of your hard drive partition actually.
- You have to keep in mind that if you do not use the /f parameter, chkdsk displays a message. Those files need to be fixed, however, it does not fix any errors.
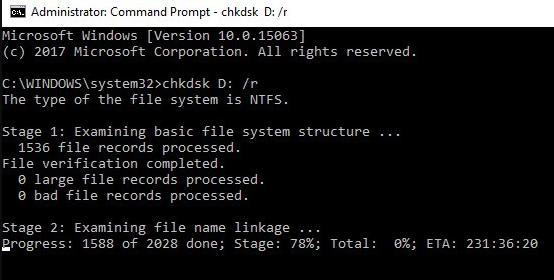
The quickest way in order to check your disk for errors on Windows 10 is using Command Prompt. The chkdsk D: /f command detects as well as repairs logical issues affecting your drive as well.
Disconnect your external hard drive | Kernel Auto Boost
If you guys use an external hard drive, try disconnecting it from your computer as this simple action may also fix the problem for you. External devices can most of the time cause several issues, also including BSoD errors, because of corruption or incompatibility with your system. You can also try to connect it to another PC and then check if the error persists.
If yes, then copy the content you need and format the external hard drive. You can also try to head to a computer service with your HDD if the errors persist.
Update the BIOS
Some users also confirmed that they fixed this ugly BSOD error via updating their BIOS. This is a really powerful solution that can actually fix compatibility issues, boost your system’s performance, and much more.
But, it can also make your computer completely unusable if you guys do it the wrong way, so proceed carefully. If you guys don’t feel conformable doing this, it’s best to simply head to the next solution or ask for a specialist’s help. For more information on how you can update BIOS, just head to your computer manufacturer’s website.
Conclusion
Alright, That was all Folks! I hope you guys like this article and also find it helpful to you. Give us your feedback on it. Also if you guys have further queries and issues related to this article. Then let us know in the comments section below. We will get back to you shortly.
Have a Great Day!
Also See: Best Open Source PDF Editors You Can Use


