
Microsoft Teams, apart from permitting the standard group chat, video, and voice call options, also bundles in a number of other interesting features as well. The list also includes the ability to share files and collaborate on documents, also integrate third-party addons (to prevent minimizing Teams whenever their need arises), etc. Microsoft has also replaced the Skype add-in found in Outlook along with Teams add-in. And hence, Teams also has become the go-to communication app for companies that relied on Skype for Business previously. In this article, we are going to talk about How to Fix Microsoft Teams Microphone Not Working. Let’s begin!
Well, impressive, Teams do experience some problems every now and then right. One of the more frequently encountered issues via users is the Microphone not working on a team’s video as well as a voice call. The issue stems from the misconfiguration of application settings or also Windows settings and can be easily fixed in a couple of minutes. Below are six different solutions that you can try to get your Microphone working in the Teams application as well.
Contents
- 1 How to Fix Microsoft Teams Microphone Not Working
- 1.1 Check App & Microphone Permissions
- 1.2 Make sure the correct Microphone is selected
- 1.3 Verify if the Microphone is enabled in PC settings
- 1.4 Update Audio Drivers | Microphone Not Working
- 1.5 Run the Microphone Troubleshooter
- 1.6 Reinstall or Update Microsoft Teams | Microphone Not Working
- 1.7 Conclusion
How to Fix Microsoft Teams Microphone Not Working
There are multiple reasons that might also be prompting your Microphone in order to misbehave on a team’s call. Firstly, you have to make sure that the Microphone is functional. To do this, just connect the Microphone to another device (your mobile phone works as well) and try calling someone. If they are able to hear you loud and clear, the Microphone does also works, and you guys can rest assured of no new expenses. You can also try using any other application that needs input from the Microphone. Such as Discord or a different video calling program, and then check if it works there.
Also, did you try simply restarting the application as well as plugging the Microphone out and back in again? We know you did, however, it doesn’t really hurt to confirm. PC users may also try plugging the Microphone into another port (the one present on the CPU). If there is actually a mute button on the Microphone. Just check if it is pressed and confirm that you haven’t accidentally muted yourself on the application call as well. Many times, Teams may also fail to detect your Microphone if you guys connect it while in the middle of a call. In order to connect the Microphone first and then place or join a call.
When you guys have established that the Microphone works just fine and have tried the above quick fixes. Then we can move to the software side of things and make sure everything is properly configured.
Check App & Microphone Permissions
Whenever executing the above method, a few users might not be able to find their Microphone in the drop-down selection list as well. This occurs if the application does not really have permission to use the connected device. To give Teams the important permissions:
- Tap on your profile icon present at the Teams window’s top-right corner and choose Settings from the ensuing list.
- Then hop over to the Permission page.
- There, just check if the application is allow access to your media devices (Camera, Microphone, and speaker). Tap on the toggle switch to enable access.
You will also have to check your computer microphone settings and verify if third-party applications can use it. Some users also disable microphone access out of concern for their privacy, however, they forget to re-enable it when required.
- Tap on the Windows key to bring up the Start menu and click on the cogwheel icon in order to launch Windows Settings.
- Tap on Privacy.
- Now under App Permission in the navigation list, tap on the Microphone.
- At last, make sure the toggle switch for Allow apps to access your Microphone is all set to On.
- Now scroll down further on the right panel, locate Teams, and then check if it can use the Microphone. You also have to enable ‘Allow desktop apps to access your microphone.
Make sure the correct Microphone is selected
If you guys have multiple microphones connected to your PC. It is also possible for the application to select the wrong one mistakenly. So whenever you are speaking at the top of your lungs in a microphone, the application is also looking for input on another microphone. To make sure the correct Microphone is selected:
- Open Microsoft Teams and place a video call to a colleague as well as a friend.
- Tap on the three horizontal dots present on the video call toolbar and choose Show device settings.
- Now in the following sidebar, check if the correct Microphone is set as the input device. If it isn’t, then just expand the Microphone drop-down list and choose the desired Microphone.
When you select the desired Microphone, speak into it, and just check if the dashed blue bar below the drop-down menu moves. If it does, then you can close this tab and (sadly) get back to your work call as the Microphone is no longer dead in Teams actually.
Verify if the Microphone is enabled in PC settings
Continuing with the checklist, just verify if the Microphone is enable. If it isn’t, how are you guys going to use it? We will also have to make sure the desired Microphone is all set as the default input device if there are multiple microphones connected actually.
- Just open Windows Settings (Windows key + I) and then tap on System.
- With the navigation menu on the left, move to the Sound settings page.
Note: You guys can also access Sound Settings via right-clicking on the Speaker icon on the taskbar and then choosing Open Sound Settings.
- Now, on the right panel, tap on Manage Sound Devices under Input.
- Now under the Input Devices section, you need to check the status of your Microphone.
- If it’s disabled, then tap on the Microphone to expand sub-options and activate it via clicking on the Enable button.
- Now, go back to the main Sound settings page and locate the Test your Microphone meter. Speak something directly into the Microphone and then check if the meter lights up.
Update Audio Drivers | Microphone Not Working
We also have heard this time, and again that corrupted and outdated drivers can actually cause a connected device to malfunction. Drivers are software files that external hardware devices use in order to communicate along with the operating system. If you guys ever face any issues with a hardware device, then your first instinct should be to update the associated drivers. So just update the audio drivers and check if the microphone issue gets resolved.
- Tap on Windows key + R in order to launch the Run command box, type devmgmt.msc, and tap on Ok to open Device Manager.
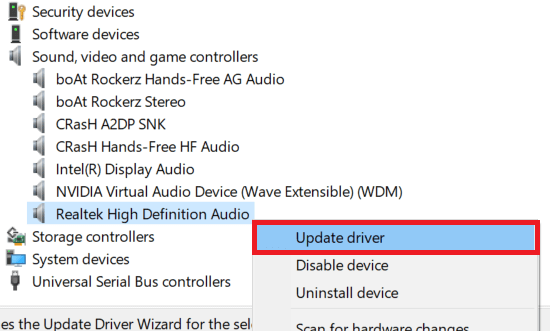
- First of all, expand Audio inputs and outputs via clicking on the arrow to its right. Right-click on Microphone and just choose Update Driver.
- In the following window, you have to choose Search Automatically for drivers.
- Also, expand Sound, video, and also game controllers and then update your audio card drivers.
Just restart your PC and see if you’re able to fix the Microphone not working on the Microsoft Teams issue.
Run the Microphone Troubleshooter
Those were all the settings you guys could have checked and corrected in order to get the Microphone to work in Teams. If the Microphone still refuses to operate, then you can try running the built-in microphone troubleshooter. The troubleshooter will automatically diagnose as well as fix any issues.
To run the microphone troubleshooter – just go back to Sound settings (Windows Settings > System > Sound). Now scroll down on the right panel in order to find the Troubleshoot button, and tap on it. Make sure you guys tap on the Troubleshoot button under the Input section. Since there is actually a separate troubleshooter available for output devices (speaker & headsets) as well.
If the troubleshooter does find any issues, it will also inform you about the same with its status (fixed or unfixed). Just close the troubleshooting window and then check if you’re able to resolve the Microsoft Teams Microphone not working issue as well.
Reinstall or Update Microsoft Teams | Microphone Not Working
At last, if the microphone not working issue wasn’t fix via any of the above methods. You should try reinstalling Microsoft Teams altogether as well. It is entirely possible that the issue is caused because of an inherent bug, and the developers have already fixed it in the latest release as well. Reinstalling will also help correct any Teams associated files that may also have gone corrupt.
- Open Control Panel via typing control or control panel in either the Run command box as well as the start menu search bar.
- Tap on Programs & Features.
- In the following window, you have to find Microsoft Teams (tap on the Name column header to sort things alphabetically and make looking for a program easier). Just right-tap on it, and select Uninstall.
- A pop-up requesting confirmation on the action will now arrive. Tap on Uninstall again in order to remove Microsoft Teams.
- Just fire up your preferred web browser, you have to visit Microsoft Teams, and download the installation file for desktop.
- When downloaded, click on the .exe file in order to open the installation wizard, now follow all the on-screen instructions to re-install Teams.
Conclusion
Alright, That was all Folks! I hope you guys like this article and also find it helpful to you. Give us your feedback on it. Also if you guys have further queries and issues related to this article. Then let us know in the comments section below. We will get back to you shortly.
Have a Great Day!
Also See: How to Fix MMS Download Problems


