On Windows 10, the Remote Desktop feature gives you permission to access a computer remotely. In order to help other users or manage services without even having to physically be present at the location. In this article, we are going to talk about Powershell enable remote desktop in Windows 10. Let’s begin!
While you can manage this feature via the Settings app, you can also enable or disable Remote Desktop on Windows 10 using PowerShell as well. You may want to use this method in order to create a script that you can use to instantly configure Remote Desktop on multiple devices, or send the script to a user. That they can just simply double-click to set up the feature automatically without even additional steps.
So, in this guide, you guys will learn these simple steps to use PowerShell to enable or disable Remote Desktop on Windows 10. And the steps to open the required firewall ports for a successful connection as well.
Contents
Remote Desktop
If you guys want to remotely enable Remote Desktop (RDP) on the remote host (server or computer). However, you have not accessed the local device console, then we will show you how to do it through using PowerShell. In order to do this, the WinRM service (Windows Remote Management) must be enabled on the remote computer. The WinRM service is turned on by default in all versions of Windows Server starting with Windows Server 2012. (But, WinRM is disabled by default in client operating systems, for example, Windows 10). Thus, to enable RD remotely through the PowerShell, the remote computer must meet the following requirements:
- The WinRM service should start actually
- You must have administrator permissions on the remote device as well
- Windows Firewall must be turned off or the rules that allow remote access via PowerShell Remoting should be enabled.
Powershell Enable Remote Desktop in Windows 10
You have to use these simple steps to enable the remote desktop protocol via PowerShell:
- First, open Start on Windows 10.
- Then search for PowerShell, right-click the top result and choose the Run as administrator option.
- Now type the following command in order to enable the remote desktop protocol and then tap Enter:
Set-ItemProperty -Path 'HKLM:\System\CurrentControlSet\Control\Terminal Server' -name "fDenyTSConnections" -value 0
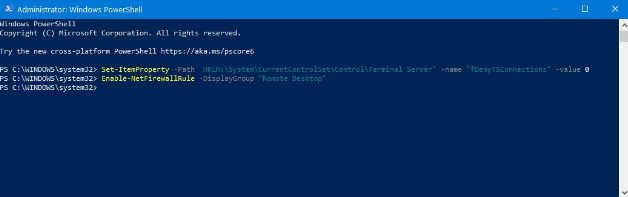
- (Optional) Type the following command to turn on remote desktop via the Windows Firewall and tap Enter:
Enable-NetFirewallRule -DisplayGroup "Remote Desktop"
When you complete the steps, then you will be able to use the Remote Desktop modern app or the old Remote Desktop Connection app. In order to access your computer remotely even with the firewall enabled as well.
How can you disable Remote Desktop via PowerShell
Use these steps to disable the remote desktop protocol with PowerShell:
- First, you need to open Start.
- Now search for PowerShell, right-click the top result, and choose the Run as administrator option.
- Then type the following command in order to disable the remote desktop protocol and tap Enter:
Set-ItemProperty -Path 'HKLM:\System\CurrentControlSet\Control\Terminal Server' -name "fDenyTSConnections" -value 1
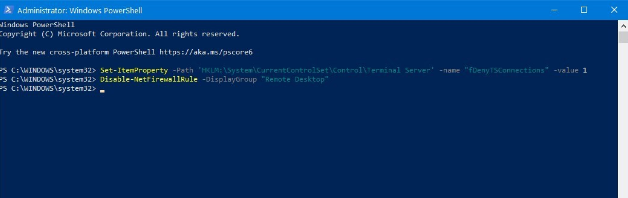
- (Optional) You need to type the following command in order to disable remote desktop via the Windows Firewall and then tap Enter:
Disable-NetFirewallRule -DisplayGroup "Remote Desktop"
When you complete all of these steps, then the Remote Desktop feature will turn off and the firewall port will close as well.
How can you Enable Remote Desktop via WMI?
If you guys want to enable RDP on a remote computer where WInRM is disabled. (such as, on a regular computer along with Windows 10), then you can use the WMI PowerShell command.
In order to check if RDP access is enabled on the remote computer 192.168.1.90. Then run the command (have a look at the value of the AllowTSConnections property):
Get-WmiObject -Class Win32_TerminalServiceSetting -Namespace root\CIMV2\TerminalServices -Computer 192.168.1.90 -Authentication 6
In order to enable RDP and add a Windows Firewall exception rule, then you have to run the following command:
(Get-WmiObject -Class Win32_TerminalServiceSetting -Namespace root\CIMV2\TerminalServices -Computer 192.168.1.90 -Authentication 6).SetAllowTSConnections(1,1)
Conclusion
Alright, That was all Folks! I hope you guys like this article and also find it helpful to you. Give us your feedback on it. Also if you guys have further queries and issues related to this article. Then let us know in the comments section below. We will get back to you shortly.
Have a Great Day!
Also See: Different Ways To Resolve Language Or Edition Not Supported On Windows 10


