On Windows 10, it can instantly get irritating having to constantly adjust the sound of your speakers whenever watching videos or playing music. If you ever tried to catch up on a TV show online, then you probably noticed that commercials are played awfully louder than the show that you are watching. The same is true along with your music collection, that depends on how you got those songs on your computer. Some of the albums may play at different sound volume levels. In this article, we are going to talk about Set up loudness equalization in windows 10. Let’s begin!
Fortunately, you can instantly normalize the audio on Windows 10 to have a consistent sound volume level across applications and web browsers whenever watching shows online or listening to music as well.
In this tutorial, you guys will learn the steps in order to enable “Loudness Equalization” to normalize the output sound on Windows 10.
Contents
What Is Loudness Equalization In Windows 10 PC?
Have you guys ever watched a TV show online from your Windows 10 Computer? If yes, then you have maybe observed, that the commercials have louder sound than the actual show actually. Do the same things happen with your playlist along with separate albums, correct?
Loudness Equalization successfully discards this awful situation through normalizing the sound of your PC. It turns the louder and quieter sound to a normal loudness by leveling the audio output as well.
In that case, you can use only one application to play all kinds of media, adjusting the settings can help. But, a few sound cards also offer volume management features as well. However, you must try to enable “Loudness Equalization” first.
Set up loudness equalization in windows 10
You have to use these steps to change the sound settings in order to normalize the volume on Windows 10:
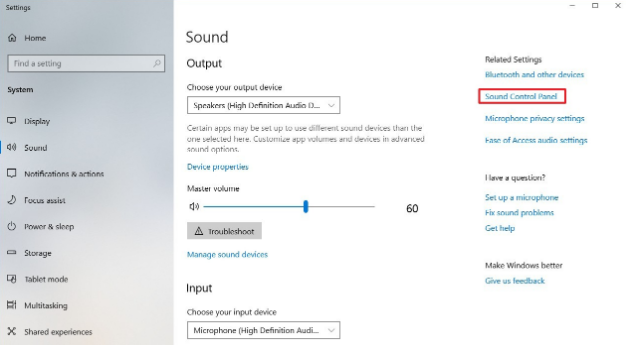
- First, open Settings.
- Tap on System.
- Tap on Sound.
- Now under the “Related Settings” section, on the right side, you need to click the Sound Control Panel option.
- Tap on the Playback tab.
- Choose the speaker currently set as the default (the one with the green checkmark).
- Tap on the Properties button on the bottom right.
- Tap on the Enhancements tab.
- Then check the Loudness Equalization option.
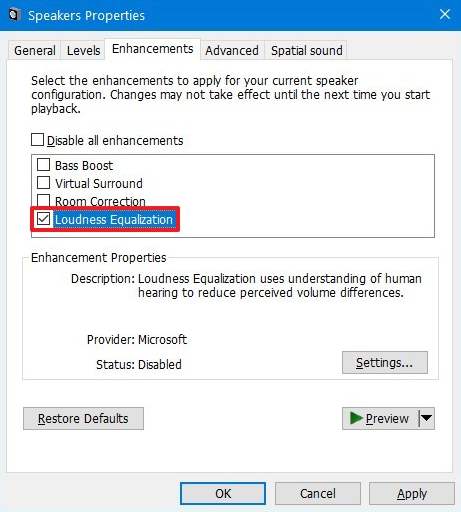
- Press the Apply button.
- Press on the OK button.
When you complete the steps, then you should now be able to watch your TV shows online or listen to music along with a consistent volume level.
In addition to that, you guys can also use the Loudness Equalization option on Windows 10 in order to boost sound volume. Even when you max it out, and you are still hearing the things too low. As you probably noticed this option “reduces perceived volume differences,” which makes quiet and loud sounds easier to hear actually.
It’s really important to note that most media applications include some sort of “loudness equalization” or “volume normalization” feature. But, Windows 10, same as the Windows 8.1, Windows 7, and older versions, features an option that allows normalizing volume system-wide.
Conclusion
Alright, That was all Folks! I hope you guys like this article and also find it helpful to you. Give us your feedback on it. Also if you guys have further queries and issues related to this article. Then let us know in the comments section below. We will get back to you shortly.
Have a Great Day!


