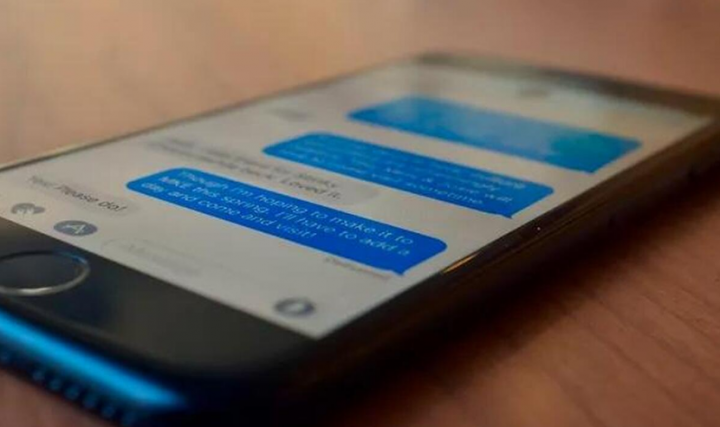
 iOS 13 actually has a feature that permits users to create a profile for Messages. It works for iMessage threads. Whenever you enable this profile, the picture or Animoji that you have created is sent to whoever you are messaging as well. It’s a neat way to select how you guys appear as a contact, and what information you actually share. In this article, we are going to talk about Sharing names and Photo Not Available on iPhone. Let’s begin!
Naturally, it also works best between Apple devices. You guys can set it up even if you do not have a device that actually supports Animoji. You guys can use a regular photo rather than an Animoji avatar.
Formerly, iMessage users could not change their display names or photos. That changed along with the rollout of the iOS 13 for the iPhone. Now, users can also personalize their iMessage profile along with a name, photos, or Memoji of choice. The customization is pretty straightforward, however, some iOS users are presented along with an error message. Whenever they try to edit their iMessage name and photo.
This issue is pretty common on new iPhones. Some users who also recently updated their iOS 13 also experienced this problem as well. The issue could be because of an iOS 13 bug or some conflict in your device’s Apple ID setup as well.
Luckily, the problem is fixable, and we have listed four(4) troubleshooting methods. That will also help get things back in order on your device.
Contents
Sharing Name and Photo Not Available on iPhone
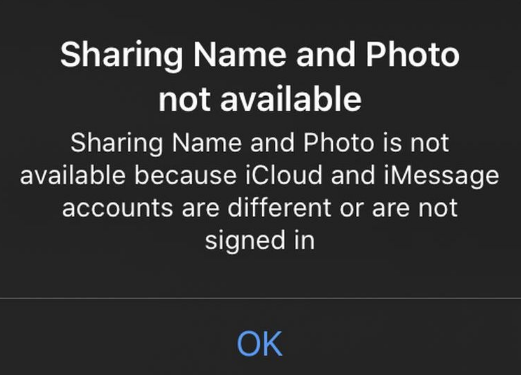
In some of the cases, when you try to turn on the ‘Share name and photo’ feature. You guys get a message ‘Sharing name and photo not available. This error generally tells you guys that Sharing Name and Photo is not available since iCloud and iMessage accounts are different or are not signed in as well.
Here is how you guys can actually fix it.
Sign in to iCloud
An iOS device does not really have to be signed in to iCloud. You can use it without every adding an account to iCloud, however, doing so means you won’t be able to use some features, one of which is the iMessage profile feature actually.
If you want to fix this, then
- First of all, just open the Settings app.
- At the very top, you guys will see the Apple ID that your device uses. Just click on it.
- On the Apple ID screen, you have to tap iCloud.
- When prompted to, sign in to iCloud along with the same Apple ID that you guys use for iMessage.
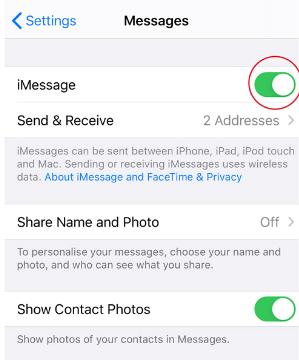
Turn on Apple ID for iMessage
On an iPhone, you guys can send and receive messages on your phone number. You do not necessarily need to use your Apple ID for it. On Macs, you can’t actually use a phone number which is why the Apple ID is important. If you guys don’t turn on Apple ID for iMessage though, you won’t be able to turn on name and photo sharing as well.
- First, open the Settings app.
- Click on Messages.
- Then tap Send & Recieve.
- Click on ‘Use Your Apple ID For iMessage‘.
- Now confirm on the pop-up that you guys want to use your Apple ID and also make sure it is the same one. That is actually signed into the device in the Settings app.
- When the iMessage is enabled for your Apple ID, you can then turn on Name and Photo sharing.
Sign out of iCloud and iMessage
Well, generally speaking, signing into iCloud and iMessage along with the same Apple ID will solve the problem. However, most of the time an iOS device can have trouble connecting to Apple’s servers and enabling name and photo sharing.
- First, you have to open the Settings app.
- Then just tap on your Apple ID at the top.
- Now scroll to the bottom, and press the Sign Out.
- Next, just return to the main Settings app screen, and click on Messages.
- Turn off iMessages as well.
- Now Restart your iPhone.
- Open the Settings app, and then sign in with your Apple ID.
- Choose Messages on the main Settings app screen. And then enable iMessage for both your phone number and also the Apple ID that you just signed in with.
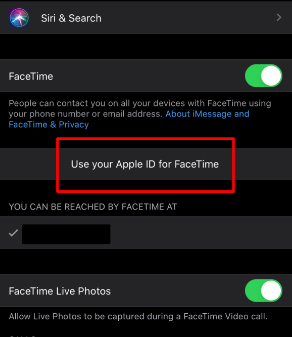
Turn on Facetime for Apple ID
Although the feature is not actually connected to FaceTime if you guys do not have FaceTime enabled. Then it may prevent you from turning on Name and photo sharing.
- First, you have to open the Settings app and click on FaceTime.
- Then turn on FaceTime
- Press the ‘Use your Apple ID for FaceTime’ option.
- Sign in along with the same Apple ID that you guys are using in the Settings app.
Delete All Apple ID and Re-Add One
In almost each and every case, Any of the first two methods will actually solve your problem. But, If you see the problem still exists, then you can delete all the iCloud accounts from your iPhone. Then, just add the main account. Have a look at the details –
- At first, you have to head to Settings > Passwords & Accounts > iCloud.
- Now, press the Sign Out in order to remove your accounts.
Now, Again just add the main iCloud account on your iPhone. In order to do it, just follow these things.
- At first, head to Settings.
- Now, You guys will see the option “Sign in to your iPhone.” Just, click on it.
- Then, Login along with your Apple ID.
After that, you need to repeat methods 1 and 2. It will surely fix name and photo sharing not available problems on iPhone as well.
These are basically the ways that you can follow in order to get rid of this type of problem. But, You may also have any unique idea to troubleshoot name and photo sharing not available problem. You can also share it in the comment box as well.
Last verdict
In some of the cases, this might be a really simple network error. You guys can wait a few hours and try to turn on the feature again. You guys can also connect to a different network and run via the above fixes.
Generally speaking, you guys should run solutions 1 and 2 one after the other. And then just turn on the name and photo sharing feature. This error basically tends to appear disproportionately on newer iPhones i.e., those that are actually running iOS 13 out of the box.
If you guys are having trouble on an iPhone that you restored, and the above fixes are not working. You have to try to reset the network settings from Settings>General>Reset.
Conclusion
Alright, That was all Folks! I hope you guys like this article and also find it helpful to you. Give us your feedback on it. Also if you guys have further queries and issues related to this article. Then let us know in the comments section below. We will get back to you shortly.
Have a Great Day!
Also See: Different Ways To Fix IPv6 No Network Access Issue


