Well, windows users never actually got Paint.net. This version of Paint no longer received any new feature actually. Along with the advent of Paint 3D, MS Paint has deprecated as well. This basically means, the app no longer receives an update. But, the Paint application is still an extremely useful picture editor that has very basic, yet helpful features in order to serve fundamental editing purposes. Such as resizing, cropping an image, cutting pasting parts of an image. In this article, we are going to talk about How to Add Paint.net Grid Lines in Windows 10. Let’s begin!
The Paint app will not be closed via Microsoft. The Redmond-based tech giant is now focusing mainly on the Paint 3D and trying hard in order to leverage the app as the ultimate 3D image and logo editor. The paint will still available on Windows Store as a free application for download as well.
Paint.net is basically the version of Paint that Windows users never got. The Paint app is now deprecated which actually means it’s never ever going to get new features. Paint.net is really what Windows users have left and it’s fortunate as well. That the app is good and still actively developed as well. You guys can use Paint.net for most basic image editing needs and also create basic images as well. If you guys need to create a custom grid in Paint.net, you guys can do so along with a little plugin.
Contents
How to Add Paint.net Grid Lines in Windows 10
In order to create a custom grid image in Paint.net, then you guys need to install a plugin called Grid Maker. If you have Paint.net open, close it and navigate to the following location on your system. You will need admin rights to paste a file here.
C:/Program Files/paint.net/Effects
If you guys are using the Paint.net app that’s available in the Microsoft Store. You have to navigate to the following location where Documents is your documents library as well.
Documents/paint.net App Files/Effects/
Just open Paint.net and head to Effects>Render> Grid Checker Maker. Choose this option and a new window will then open. This is where you guys can create your grid. The plugin can also create a grid, a checker pattern, and a dotted pattern as well. If you guys want to pick what you want to create, grid, checkered, or dotted pattern, and open the Grid type dropdown.
Further | paint.net grid
In order to create a proportional grid, just choose the ‘Same Step H/V’ option. If you guys need a transparent grid, then choose the ‘Transparent only’ option.
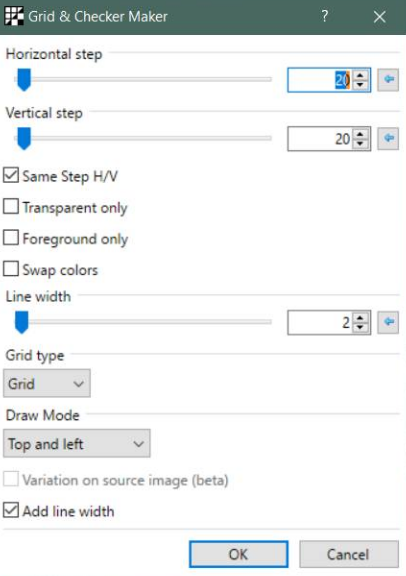
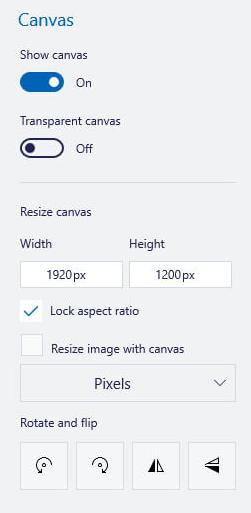
As you guys make changes to this window, they will be reflected on the canvas. You guys ought to resize the canvas before you create the grid. Size it to whatever you want your grid size to be. If you need to center it, then open the Draw Mode dropdown and choose Centered on lines. Play around with the draw options till you have a grid that looks right for whatever you guys need to use it for as well.
The grid will then be transparent, however, it’s up to you in order to save the final image as a PNG. To make sure that there is no fill layer under the grid. You guys should create the grid on an empty layer so that it’s pretty easy to edit it later. If you want to customize the color of the grid lines you should first choose it from the colors wheel/swatch. And then open the plugin as well. It will basically draw in whichever color is set as the main or primary color.
Paint.net is not exactly an app that can actually rival Photoshop or Gimp in any way. However, if you ever need to create a grid, then it doesn’t get easier than this.
Adding Gridlines in Paint 3D
- Paint 3D does not really include a built-in gridlines option, however, users can still insert transparent grids over their images. First, you just open Paint 3D via selecting that app on the Start menu.
- Next, tap on the Menu tab.
- Press the Browse files button in order to open an image.
- Users can also download transparent grid images from Free Icons PNG as well. You have to pen the Free Icons grid image page in a web browser.
- Choose a grid from there, and then tap on the Download PNG or Icon button.
- Now return to Paint 3D, and press the Insert button.
- Then choose the downloaded grid, and click the Open button.
- Next, users might want to resize the grid a bit along with the 2D selection tool. So that it exactly fits the image. Tap on outside the selection box whenever that’s done.
- In order to remove empty white spaces above and below the picture, decrease the borders of the canvas. So that they match the image’s dimensions. In order to do that, drag the canvas borders in with the Canvas utility. That will leave users along with an image grid just like the one shown below.
Well, overall, it’s better to utilize the original MS Paint to add gridlines to images. But, Paint 3D users can still add gridlines to their pictures along with overlapping grid images.
Conclusion
Alright, That was all Folks! I hope you guys like this “paint.net grid” article and also find it helpful to you. Give us your feedback on it. Also if you guys have further queries and issues related to this article. Then let us know in the comments section below. We will get back to you shortly.
Have a Great Day!


