Have you ever try to use Credential Manager on Windows 10? Did you save the incorrect sign-in info for a network drive? Do you want to move your web and Windows 10 credentials to the latest installation? Then you want to use Credential Manager, and here’s how.
On Windows 10, Credential Manager is the feature that saves your sign-in information for websites (via Microsoft Edge), apps, and networks (like shared folders or mapped drivers) after you check the option to store your credentials for future logins.
Credential Manager not only enables you to store your login usernames and passwords, but it also lets you to delete, view, add, backup, and recover login credentials. If you want to know more about it then dive down below:
Contents
What is the Credential Manager?
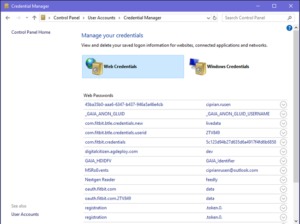
It is the “digital locker” where Windows save log-in credentials such as passwords, usernames, and addresses (as mentioned above). This information can be stored by Windows for use on your local PC, on other PC in a similar network, servers, or internet locations like websites. However, Windows use the data itself or by apps and programs such as Microsoft Office, File Explorer, virtualization software, Skype, and so on. Credentials are divided into different categories:
Windows Credentials:
They can be used only by Windows and its services. For instance, Windows can use these credentials to log you automatically into the shared folders of another PC on your network. Also, can save the password of the Homegroup you have joined and automatically uses it each time you access what is being shared in that Homegroup. After you type an incorrect log-in credential, Windows knows it and fails to access what you want. When it happens, you can simply edit or erase the wrong credential.
Certificate-Based Credentials:
They are used simultaneously with smart-cards, mostly in complex environments of the business networks. Some people don’t want to use these credentials and this section is empty on their PCs.
Generic Credentials:
They are defined and used by some apps you install in Windows so that they get the authorization to use some resources. Then instances of these apps include Slack, OneDrive, Xbox Live, etc.
Web Credentials:
However, they represent login information for websites that are saved by Windows, Internet Explorer, Skype, or other Microsoft apps. They exist only in Windows 10 and Windows 8.1, but not in Windows 7.
These credentials are automatically saved and managed by Windows and the apps that you use. However, the Credential Manager gets notifications when authentication information modifies and updates it automatically. Also, it saves the latest valid information. Unless you need to know which credentials are saved on your PC or you want to erase or edit a wrong one, you don’t want to use the Credential Manager.
In this article, you’ll learn the instructions to use the Credential Manager on Windows 10 to manage or organize all your logon information.
Credential Manager On Windows 10 -> Edit Previous Sign-In Information
If you want to update a username or password already saved on Windows 10, use these instructions:
Step 1:
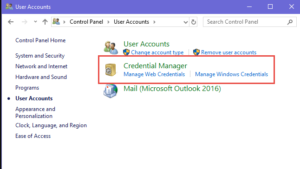
Head over to the Control Panel on Windows 10.
Step 2:
Tap on User Accounts.
Step 3:
Tap on Credential Manager.
Step 4:
Also, tap the Windows Credentials tab (or Web Credentials).
Step 5:
Choose the account.
Step 6:
Tap the Edit button.
Step 7:
Simply update the password or username as required.
Step 6:
Tap the Save button.
After you complete the instructions, the information will also be updated with the latest credentials. It means no more login prompts whenever you originally stored the incorrect username or password or the sign-in information has modified.
Credential Manager On Windows 10 -> Remove Sign-In Information
Simply remove an account credential already saved on Windows 10, use these instructions:
Step 1:
Head over to the Control Panel.
Step 2:
Then tap on User Accounts.
Step 3:
Tap on Credential Manager.
Step 4:
Tap the Windows Credentials tab (or Web Credentials).
Step 5:
Choose the account.
Step 6:
Tap the Remove button.
Step 7:
The tap the Yes button.
Once you complete all the instructions, the account credentials can’t be available on the device. It means that future logins will needs you to input a username or password.
How To Add New Sign-In Info Via Credential Manager
If you want to add an app or network credential on Windows 10, use these instructions:
Step 1:
Head over to the Control Panel.
Step 2:
Then tap on User Accounts.
Step 3:
Tap on Credential Manager.
Step 4:
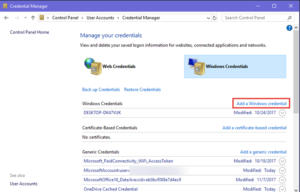
Also, tap the Windows Credentials tab.
Step 5:
Tap the Add a Windows credential (or Add a certificate-based credential) option.
Step 6:
Then set the address of the internet or network that corresponds to the network or app resource.
Step 7:
Set the password or username to authenticate.
Step 8:
Then the OK button.
After you complete the instructions, the new account information will also be added to your device to automatically sign-in to the next time whenever you access the apps or network shared.
Recover Sign-In Info Via Credential Manager

If you want to export and recover all your credentials for apps and networks, use these instructions:
Step 1:
Head over to the Control Panel.
Step 2:
Tap on User Accounts.
Step 3:
Then tap on Credential Manager.
Step 4:
Also, tap the Windows Credentials tab.
Step 5:
Tap the Back up Credentials option.
Step 6:
Tap the Browse button to set a destination for the backup.
Step 7:
Then set a name for the .crd backup file.
Step 8:
Tap the Save button.
Step 9:
Also, tap the Next button.
Step 10:
Then use the Ctrl + Alt + Delete keyboard shortcut to continue.
Step 11:
Set a password to secure the Credential Manager file on Windows 10.
Step 12:
Tap the Next button.
Step 13:
Then tap the Finish button.
Whenever you finish the steps, you’ll end up with a .crd file. Also, the file contains all your Windows 10 and web credentials that you can import to another PC or to the same device after a clean installation.
Restore Via Credential Manager
If you want to restore or recover your sign-in information from backup on Windows 10, use these instructions:
Step 1:
Head over to the Control Panel.
Step 2:
Then tap on User Accounts.
Step 3:
Also, tap on the Credential Manager.
Step 4:
Tap the Windows Credentials tab.
Step 5:
Tap the Restore Credentials option.
Step 6:
Then tap the Browse button.
Step 7:
Also, choose the .crd files with the backup information.
Step 8:
After this, tap the Open button.
Step 9:
Then tap the Next button.
Step 10:
Also, use the Ctrl + Alt + Delete keyboard shortcut to continue.
Step 11:
Input the password to unlock the Credential Manager backup.
Step 12:
Tap the Next button.
Step 13:
Tap the Finish button.
After you complete all the steps, all your app, web, and network credentials will be recovered on your device.
However, this article focuses on Windows 10, Credential Manager has been available for a long time. It means that all the instructions will also work on Windows 8.1/Windows 7.
Conclusion:
To conclude we can say that the Credential Manager plays an important role in your computing experience. I hope you understand lots of things about it. Also, if you want to share anything else regarding Credential Manager then let us know below!
Till then! Stay Happy 🙂
Also Read:


