Many users basically face an error code 0x80072efe whenever trying to update their Windows via Windows update, that is quite a serious problem. Without even updating the system, it can actually be vulnerable to spyware, viruses as well as malware. The Windows Update Error Code 0x80072efe mostly means that the system cannot contact Microsoft’s Windows Server. Well, Microsoft also has certain criteria you must meet to download the latest updates from its servers. Also, including having the correct date & time on your PC. In this article, we are going to talk about How to Fix the 0x80072efe Error in Windows. Let’s begin!
Yes, the main cause of this error actually has incorrect date & time on your PC. Or also it can also be because of the Firewall blocking the connection. In any case, you guys won’t be able to download and install the latest updates from Microsoft. And in order to Fix Windows Update Error Code 0x80072efe. Now you must follow the below troubleshooting guide as well.
Contents
How to Fix 0x80072efe Error in Windows
Temporarily Disable Antivirus and Firewall
Many times the Antivirus program can actually cause an error, and to verify this is not the case here. You guys have to disable your antivirus for a limited time. So that you can also check if the error still appears whenever the antivirus is off.
- Just right-click on the Antivirus Program icon from the system tray and choose Disable.
- Next, choose the time frame for which the Antivirus will remain disabled.
Note: Select the smallest amount of time possible, Such as 15 minutes or 30 minutes.
- When you do that, again try to connect to open Google Chrome and then check if the error resolves or not.
- Search for the control panel from the Start Menu search bar and then tap on it to open the Control Panel.
- Next, tap on System and Security and then click on Windows Firewall.
- Now from the left window pane just tap on Turn Windows Firewall on or off.
- Choose Turn off Windows Firewall and restart your PC.
Again try to open Google Chrome and then visit the web page, which was earlier showing the error. If the above method doesn’t work, then please follow the same steps to turn on your Firewall again.
Run CCleaner and Malwarebytes | 0x80072efe
- Just download and install CCleaner & Malwarebytes.
- Run Malwarebytes and now let it scan your system for harmful files. If malware is found, then it will automatically remove them.
- Now run CCleaner and choose Custom Clean.
- Just under Custom Clean, choose the Windows tab and checkmark defaults, and tap on Analyze.
- When Analyze is complete, then make sure you’re certain to remove the files to be deleted.
- At last, click on the Run Cleaner button and also let CCleaner run its course.
- To further clean your system, just select the Registry tab, and make sure the following are checked:
- Tap on the Scan for Issues button and allow CCleaner to scan, and then click on the Fix Selected Issues button.
- Whenever CCleaner asks “Do you want backup changes to the registry?” then choose Yes.
- When your backup completes, tap on the Fix All Selected Issues button.
- Now restart your PC to save changes.
Set Correct Date & Time on your PC | 0x80072efe
- Tap on the date and time on the taskbar and then choose “Date and time settings.
- If on Windows 10, just make “Set Time Automatically” to “on.”
- For others, tap on “Internet Time” and then tick mark on “Automatically synchronize with an Internet time server.”
- Choose Server “time.windows.com” and tap onupdate and “OK”. You guys don’t need to complete the update. Just tap on OK.
Setting correct date & time should actually Fix Windows Update Error Code 0x80072efe, however, if the issue is still not resolved, continue.
Uncheck Proxy Option
- Tap on Windows Key + R then type inetcpl.cpl and click on enter to open Internet Properties.
- Next, Head to the Connections tab and choose LAN settings.
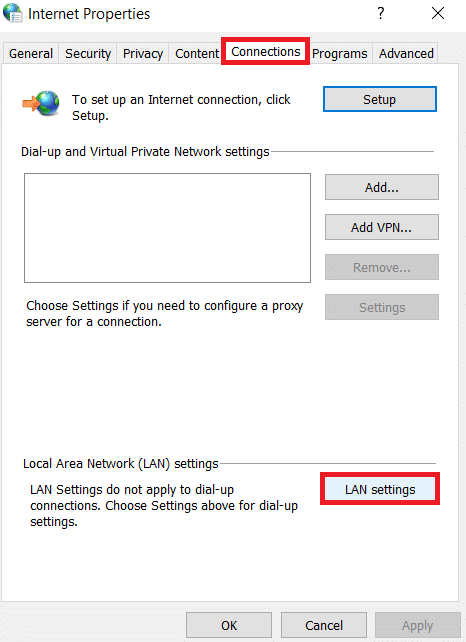
- Now uncheck Use a Proxy Server for your LAN and then make sure “Automatically detect settings” is checked.
- Tap on Ok then Apply and reboot your PC.
Conclusion
Alright, That was all Folks! I hope you guys like this article and also find it helpful to you. Give us your feedback on it. Also if you guys have further queries and issues related to this article. Then let us know in the comments section below. We will get back to you shortly.
Have a Great Day!


