Bluestacks is undoubtedly one of the best cloud-based Android emulators, that is available to both Windows and Mac users as well. For those unaware, Bluestacks basically lets you run Android games and applications on your pc. But, as things go, the Android emulator application isn’t all that smooth. However, mostly stable, using Bluestacks is known to be really infuriating because of the number of issues that it brings along. Bluestacks Engine won’t start one such problem as well. In this article, we are going to talk about How to Fix Bluestacks Engine Won’t Start. Let’s begin!
The error message “You can try to restart Engine, or your PC” is basically known to appear when trying to open the application. However, restarting both of them achieves absolutely nothing. There are a number of culprits that also might be prompting the error. Also, including an inherent bug in a certain version of Bluestacks, restrictions imposed via antivirus software, etc.
Contents
- 1 How to fix Bluestacks Engine won’t start?
How to fix Bluestacks Engine won’t start?
As mentioned earlier that there are multiple reasons why the Bluestacks engine might be failing to start. So no one shoe fits that fits all, and the solution to every user/computer will be unique. Try all the below solutions one by one and also after performing each, run Bluestacks to check if the problem has resolved or not.
Before you move to the more advanced solutions, try temporarily to disable your antivirus software. Every third-party application, specifically Bluestacks, is always under an antivirus software’s radar, that leads to software conflicts. These conflicts can adversely affect the application’s performance and cause many issues.
The method of disabling an antivirus application is really unique for each. But, most can disable via right-clicking on their icons present in the system tray and then choosing the appropriate options.
Switch to DirectX and change RAM capacity
Bluestacks is basically an android gaming emulator. Thus, switching up its graphics mode is known to be an easy fix to the engine won’t start issue. By default, Bluestacks runs via OpenGL, but it can also be run via DirectX. The option to make the switch is just present in Bluestacks settings.
In the engine settings of BlueStacks, you guys will have the option of using OpenGL or DirectX. By default, BlueStacks will use OpenGL and this option will be selected. Switching to DirectX and then rebooting mostly solves this issue.
- Just Open BlueStacks
- Tap on the options button from the top right corner. This button will actually look like a downwards arrow
- Choose Settings
- Tap on Engine from the left pane
- Choose DirectX
- Press Restart Now
Check if the problem is now resolved or not. If the problem still persists then follow all the steps given above (but do not tap Restart Now button). Once you have selected the DirectX option, then change the Core number from the drop-down menu and try different RAM capacity settings. When done, tap Restart Now and check if this resolves the issue. Sometimes a different RAM setting aired along with DirectX resolves the issue.
Turn on Virtualization Technology | Bluestacks Engine Won’t Start
Well, making sure that the Virtualization is enabled on your PC also helps in resolving this issue. A lot of users solved the problem via simply turning on the Virtualization option from the BIOS. Virtualization, if you guys don’t know, basically gives Intel hardware a boost whenever virtualizing and helps BlueStacks run smoother and faster.
However, before you enable the Virtualization technology, let’s just first check whether your system supports this technology or not. Here are the steps for checking if the Virtualization Technology is available or not.
For Intel Users
- Click here and tap on the MSI button from the left pane. This will basically download the Intel Processor Identification Utility. Note: You can scroll down and download the Intel Processor Identification Utility in your particular language.
- When downloaded, run the Utility and install it
- When installed, run the Utility and tap on the CPU Technologies tab
- Now look for the Intel® Virtualization Technology in the list. If there is a Yes written in front of it then you guys have this technology and you can proceed to enable the technology. If your processor doesn’t really support this technology then there isn’t anything that we can do for you. You can just skip this method.
For AMD Users
- Tap here to download the AMD V Detection Utility
- When downloaded, run the Utility and it will tell you if you have the Virtualization Technology or not. The message should actually something like this “The system is compatible with Hyper-V”.
If your system is compatible then just continue otherwise skip this method.
So, here are the steps to enable the Virtualization Technology.
- First, Reboot your PC
- Tap either Esc, F8, F12 or F10 whenever your manufacturer’s logo appears. The button changes from manufacturer to manufacturer so you guys check the documentation or try these buttons one by one. You can also look at the corners whenever your manufacturer’s logo appears. There is mostly a message such as “Press F10 (or some other key) to enter BIOS”.
- This will open the BIOS menu. If you guys still aren’t in the BIOS menu then you might see a list of options. There should be an option BIOS menu in this list too. Simply use your arrow keys to navigate and click on Enter to select the option. Navigate to the BIOS menu option and click on Enter
- Now you should be in the BIOS menu actually. Again, the BIOS menu will vary relying on your manufacturer so you will have to look for the option yourself. There should be an option rhat is named Virtualization Technology as well as Intel Virtualization Technology or Intel VT for Direct I/O (or a variation of this option). Turn these options on, save the settings and then exit the BIOS. Note: You can use your arrow keys to navigate and Enter key in order to select or change an option.
You should be good to go on your next startup now.
Run Bluestacks in compatibility mode & give complete security access
It is also possible that Bluestacks doesn’t have the important security clearance to run on your computer. The security settings might also have changed after the latest Windows update or application update. To give Bluestacks full control:
- Right-tap on Bluestacks’ desktop shortcut icon and choose Open file location from the context menu. If you do not have a shortcut icon in place, then go to the following location C:\ProgramData\BlueStacks\Client in file explorer.
- Now locate the Bluestacks.exe file, right-click on it, and choose Properties. (or choose the file by left-clicking and press Alt + Enter)
- Switch to the Security tab of the Properties window and tap on the Edit button in-line with To change permissions, press Edit.
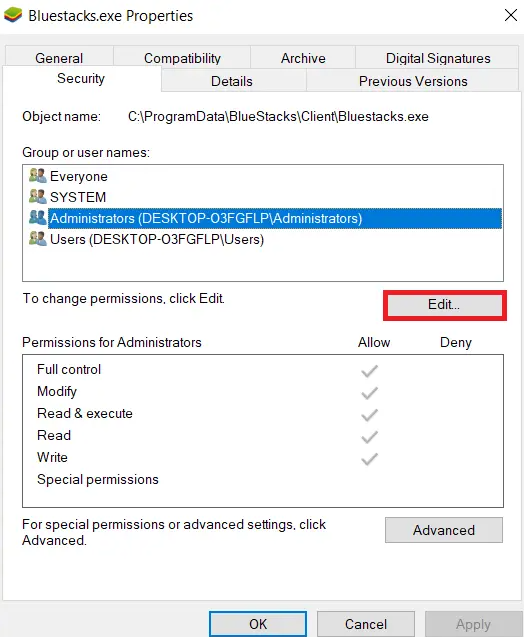
- First, choose your username from the list of users displayed under group or user names, and also under Permissions for *username*. Just check the box in the Allow column for Full control.
- Tap on Apply to save changes and then OK to exit.
Uninstall Bluestacks and reinstall in safe mode | Bluestacks Engine Won’t Start
If none of the above-explained methods worked, then it is possible that the issue is an inherent bug in the application itself. In that case, you will have to uninstall the current version and then just replace it with the most updated build of Bluestacks.
- We will start via ending any and all Bluestacks processes that might also run in the background.
- If you have Bluestacks open, then close it via clicking on the X button at the top-right and right-tap on the Bluestacks icon on your system tray, and choose Quit. If that doesn’t work for some reason, just open Task Manager (Ctrl + Shift + Esc). Then locate all the Bluestacks processes & services, and end them (right-tap> End Task).
- Well, as a precautionary measure, we will also be deleting all the temporary files on our PC. To do this, type %temp% in either the Run command box (Windows key + R) as well as the start search bar and click enter.
- In the following File Explorer windows, tap on ctrl + A to select all items and hit shift + del key to permanently delete them. If you receive any prompts asking for administrative permission, give them. Skip files that can’t be deleted as well.
- Rather than following the usual route for deleting an application, we will use the official Bluestacks uninstaller to delete all traces of it from the computer to perform a clean install later on.
- Tap on the following link BSTCleaner to download the Bluestacks uninstaller tool. Run the application when downloaded to remove Bluestacks from your computer and all of its files. Give any permissions it asks for. Tap on the OK button at the final screen when done.
Further
- Alternatively, delete Bluestacks via Windows Settings (Settings > System > Apps & Features. Tap on Bluestacks and select Uninstall) and then manually delete the folders at the respective paths:
C:\Program Files (x86)\BlueStacks or C:\Program Files\BlueStacks C:\ProgramData\BlueStacks
- So, time to reinstall Bluestacks now. Go to Download Bluestacks and download the latest version of the app.
- We are installing the app after booting into Safe Mode.
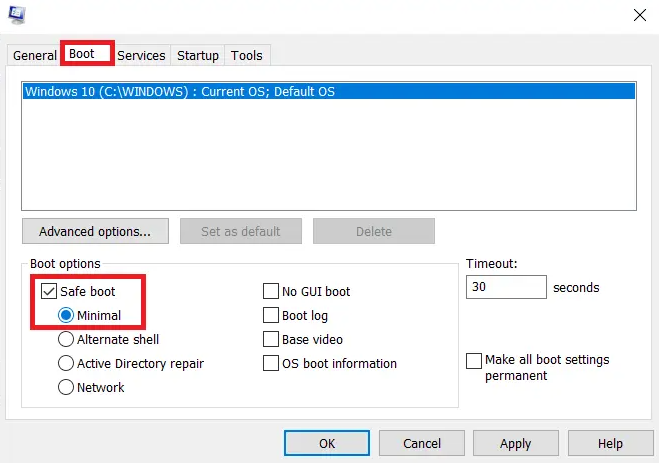
- When Window starts in Safe Mode, go to the folder (Downloads) where you downloaded the Bluestacks installation file and then run it. Follow the on-screen instructions in order to finish the installation.
- Now that we also have reinstalled Bluestacks, we can now turn off Safe Mode and boot back normally.
- Open Run, then type msconfig, and click enter. In the Boot tab, untick the box next to Safe mode and tap on OK.
- At last, restart your computer and then run Bluestacks to check if the problem has resolved.
Conclusion
Alright, That was all Folks! I hope you guys like this article and also find it helpful to you. Give us your feedback on it. Also if you guys have further queries and issues related to this article. Then let us know in the comments section below. We will get back to you shortly.
Have a Great Day!
Also See: The Best Apple Business Apps That We Enjoyed in 2021


