Failed To Play Test Tone error is caused via corrupted or outdated drivers in windows, invalid sound configurations as well. This error basically indicates that there is an underlying problem between your sound hardware and software as well. Users also have seemed to face this issue in Microsoft operating system and also have no sound at all is actually a major issue that also needs to be fixed immediately. So without even wasting any further time let’s see how to fix this issue. In this article, we are going to talk about How to Fix Failed to Play Test Tone Issue. Let’s begin!
Contents
- 1 How to Fix Failed to Play Test Tone Issue
- 1.1 Run System File Checker (SFC) and Check Disk (CHKDSK)
- 1.2 Install the High Definition Audio Device driver
- 1.3 Restart Windows Audio Service
- 1.4 Turn off all enhancements
- 1.5 Change the Sample Rate | failed to play test tone
- 1.6 Add the Local Service in the Local Users and Groups
- 1.7 Switch to default drivers | failed to play test tone
- 1.8 Change the sound format | failed to play test tone
- 1.9 Disable Exclusive Mode | failed to play test tone
- 1.10 Conclusion
How to Fix Failed to Play Test Tone Issue
Run System File Checker (SFC) and Check Disk (CHKDSK)
- Tap on Windows Key + X then tap on Command Prompt(Admin).
- Now type the following in the cmd and click on enter:
Sfc /scannow
sfc /scannow /offbootdir=c:\ /offwindir=c:\windows
- Now, wait for the above process to finish and when done restart your PC.
- Next, you have to run CHKDSK
- Now let the above process complete and again reboot your PC in order to save changes.
See if you guys are able to Fix Failed to Play Test Tone Error, if not then continue along with the next method.
Install the High Definition Audio Device driver
- Tap on Windows Key + R then type ‘Devmgmt.msc’ and hit enter in order to open Device Manager.
- Just expand Sound, video, and game controllers and right-tap on your Audio Driver, and then choose Update Driver Software.
- Now choose “Search automatically for updated driver software” and let the process finish.
- If it wasn’t able to update your graphic card then again choose Update Driver Software.
- This time choose “Browse my computer for driver software.“
- Next, choose “Let me pick from a list of device drivers on my computer.“
- Choose the appropriate driver from the list and tap on Next.
- Let the process complete and then just restart your PC.
- Just like that, go to your manufacturer’s website and then download the latest drivers.
After installing the latest drivers, you have to check if you’re able to Fix Failed to Play Test Tone Error.
Restart Windows Audio Service
- Tap on Windows Key + R then type “services.msc” (without quotes) and click on enter.
- Now find ‘Windows Audio‘ then right-click on it and choose Restart.
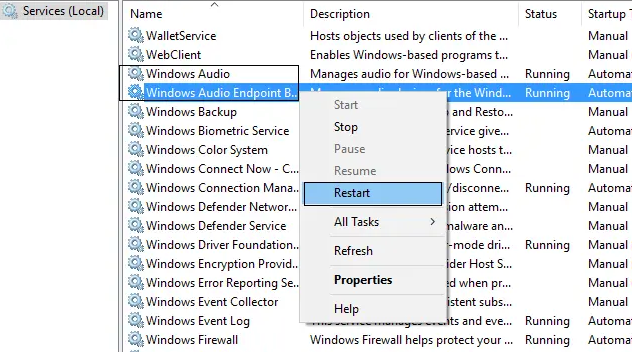
- Then close the Services window and restart your PC to save changes.
Turn off all enhancements
- Right-tap on the Speaker icon in Taskbar and select Sound.
- Next, from the Playback tab right-tap on Speakers and choose Properties.
- Switch to the Enhancements tab and then tick mark the option ‘Disable all enhancements.’
- Tap on Apply followed by OK and then restart your PC to save changes.
Change the Sample Rate | failed to play test tone
- Just right-click on the Speaker icon in Taskbar and choose Playback devices
- In the Playback tab, choose Speakers and click Properties.
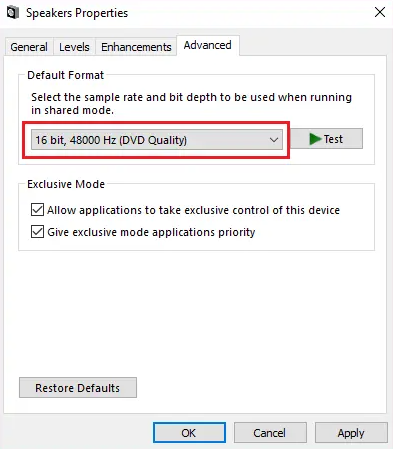
- Then switch to the Advanced tab and change the sample rate to 16 bit, 48000 Hz.
- Tap on Apply followed via OK.
- If the sample rate is not set by default, then just tap on Restore Defaults and test if the sound’s back.
Add the Local Service in the Local Users and Groups
- Tap on Windows Key + R then type “compmgmt.msc” (without quotes) and click on enter to open Computer Management.
- Next, expand System Tools then Local Users and Groups, and choose Groups.
- Right-click Administrators in the list in the right window pane and choose Add to Group.
- Tap on Add, then Advanced, and then click Find Now. Double-tap on Local Service, and click OK. You guys should see
NT Authority\Local Service in the list, just tap on OK. - Now close the Computer Management window and reboot your device. Your problem should be solved as well.
Switch to default drivers | failed to play test tone
- Head to Device Manager and locate your audio driver.
- Right-tap on it, and choose Uninstall.
- Now check to Delete the driver software for this device and click Uninstall.
- After the driver has been uninstalled tap on the Search for new hardware button. This will install the default audio driver as well.
The next thing we’re going to try is switching to default drivers. In order to do this, you have to do the above steps.
Change the sound format | failed to play test tone
- Right-tap the volume icon in your sysbar and choose Playback devices from the menu
- When the Sound window opens, then make sure that your speakers or headphones are set as the default device.
- If not, then you can set them by right-clicking the device and choosing Set as the default device from the menu.
- Choose your audio device and tap on Properties.
- Whenever the Properties window opens, then navigate to the Advanced tab.
- Now in the DefaultFormat section choose a different audio format. Tap on Apply and OK to save changes.
If you’re mostly getting Failed to play sound test tone error message. Then you might be able to solve the problem simply via changing your audio format. After doing that, just check if your sound is working properly. Many users reported that this solution fixed the problem for them, so make sure to try it out.
Keep in mind that you’ll have to try using many different formats before you find the one that works for you. If changing the format doesn’t work, then a lot of users are recommending clicking the Restore Default button to restore your audio settings to original values as well.
Disable Exclusive Mode | failed to play test tone
- Just open Speaker Properties.
- Now navigate to the Advanced tab and in the Exclusive Mode section turn off Allow applications to take exclusive control of this device. Now tap on Apply and OK to save changes.
Failed to play sound test tone error message mostly appears because of your sound settings, and one of the common problems is Exclusive Mode.
After disabling the Exclusive Mode the issue should be resolved completely as well.
Conclusion
Alright, That was all Folks! I hope you guys like this article and also find it helpful to you. Give us your feedback on it. Also if you guys have further queries and issues related to this article. Then let us know in the comments section below. We will get back to you shortly.
Have a Great Day!


