Whenever trying to extract the contents of a zip file you guys may also face the following error message “Windows cannot complete the extraction. The destination file could not be created.” and in order to fix this issue just follow this guide. Now there are many other variations of this error such as “The compressed (zipped) folder is invalid” or The destination path is too long, as well as The compressed zipped folder is invalid, etc. In this article, we are going to talk about How to Fix Windows Cannot Complete the Extraction. Let’s begin!
It’s also possible that you guys may receive any of the above error messages whenever trying to compress a file or while extracting the contents of a zipped file as well. So without even wasting any time let’s see how you can actually Fix Windows cannot complete the extraction error with the help of the below-listed troubleshooting guide as well.
Contents
- 1 How to Fix Windows Cannot Complete the Extraction
How to Fix Windows Cannot Complete the Extraction
Below are major tips and measures you guys can put in place to fix Windows cannot complete the extraction error:
Move the Zip File to Another Location
A possible reason why you guys are encountering the Windows cannot complete the extraction error, is that the zip file is located in a protected place as well. You can fix this via moving the zip file to a different location such as a different profile folder. From the new location, just try to extract the files once again and see if it works.
See if you can open another zip file | Windows Cannot Complete the Extraction
Chances are that Windows Explorer might get corrupted and that’s why you guys are not able to access your files. In order to make sure this is the case here just try to extract any other zip file in different locations in Windows Explorer and then see if you’re able to do that. If other zip files open properly then this specific zip file may be corrupted or invalid.
Perform Clean Boot
If your Windows cannot complete the extraction of zip files, then it could be due to different software conflicts. You have to perform a clean boot of your system to start afresh and also figure out what the culprit software are:
- Tap on Windows Key + R then type msconfig and click on enter to System Configuration.
- Now on the General tab, choose Selective Startup and under it make sure the option “load startup items” is unchecked.
- Now navigate to the Services tab and then checkmark the box that says “Hide all Microsoft services.“
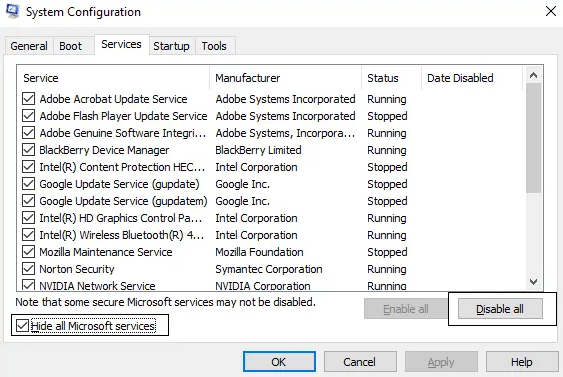
- Next, just tap on Disable all which would disable all the other remaining services.
- Restart your PC to check if the problem persists or not.
- After you guys had finished troubleshooting make sure to undo the above steps in order to start your PC normally.
See if you’re able to extract the contents of the zip file in Clean Boot if you are then some 3rd party app might be conflicting along with Windows.
Run SFC and CHKDSK | Windows Cannot Complete the Extraction
- Tap on Windows Key + X and then click on Command Prompt(Admin).
- Now type the following in the cmd and click on enter:
Sfc /scannow
sfc /scannow /offbootdir=c:\ /offwindir=c:\windows (If above fails then try this one)
- Now, wait for the above process to finish and when done restart your PC.
- Next, you have to run CHKDSK
Now let the above process complete and again reboot your PC in order to save changes. See if you’re able to Fix Windows that cannot complete the extraction error, if not then just continue with the next method.
Fix The file name(s) would be too long for the destination
If you guys are facing the above error message then it clearly states the file name is too long. So just rename the zip file to something short like test.zip and then again try to access the zip file and see if you are able to Fix Windows that cannot complete the extraction error.
Reboot the Computer | Windows Cannot Complete the Extraction
A lot of time, all you just need is a simple reboot of your computer. To reboot your computer, you have to follow these steps:
- You have to open “Start”.
- Then select the power icon at the top (in Windows 8) or the bottom (Windows 10) of the screen as well
- Then tap on “Restart”
- Repair more than one file at a time as well
- Repair corrupted videos along with “Moov Atom Not Found Error” from different devices. Such as memory cards, SD cards, computer hard drives, cameras, as well.
Conclusion
Alright, That was all Folks! I hope you guys like this article and also find it helpful to you. Give us your feedback on it. Also if you guys have further queries and issues related to this article. Then let us know in the comments section below. We will get back to you shortly.
Have a Great Day!


