In Windows 10, File Explorer basically opens at a location called ‘Quick Access’. Quick Access is not a real location on your system. You guys will not find a folder inside your user folder that is called Quick Access. This location, and the files and folders in it, then update as you use your PC. It also shows you the recent files and folders that you accessed and updates constantly. In this article, we are going to talk about File Explorer Working On It Error Message – Fix. Let’s begin!
It also works flawlessly, for the most part, however, File Explorer can and does slow down. Whenever File Explorer slows down, you guys see a ‘Working on it’ message when you open it. The message goes away after a while as well. File Explorer might become unresponsive during this time as well.
If you guys are seeing this message a lot, and it’s also taking too long to go away. You have a problem on your hands that will get worse along with time. Fortunately, there’s a really simple solution. In order to fix this problem, you have to delete the Quick Access cache and File Explorer’s history.
What are the Reasons Windows Explorer not respond to errors?
Based on user reports from the Windows 10 community, we guys can determine multiple causes. That may lead to your Windows Explorer not responding, freezing, or also not opening at all.
- The File Explorer history needs to clear. There’s also a possibility that your File Explorer history is clogged and also it’s causing the Windows Explorer in order to behave incorrectly. Clearing this should actually do the trick. You can also find out how you can clear the File Explorer history below.
- Your display settings were changed as well. Users report those changes in order to display settings. Such as the font size can cause Windows Explorer to break as well. If you guys have recently changed the settings or permitted an application to change them, that reverts is the best option.
- The Windows 10 version that you’re using is out of date. Updating Windows is crucial actually. However, it may bring some annoyances in the form of new bugs, it also patches up many existing issues and also security holes. If you guys are running an older version of Windows 10. Don’t rule out the possibility of updating to the latest release as well.
- There’s also no available space on your system drive. If your system drive is full, the Windows Explorer may not be able to function as intended actually. Also, make some space following our tips below.
- Something is wrong along with your system. Most of the time your system files can cause the Windows Explorer in order to stop responding or opening. There are a lot of general troubleshooting options listed below in order to help you fix system-level issues.
File Explorer Working On It Error Message – Fix
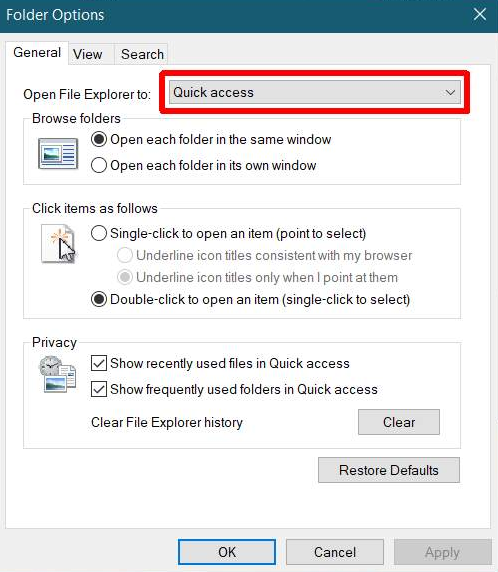
First, open File Explorer. Head to the View tab and tap on the Options button. In the Options window, you have to open the ‘Open File Explorer to’ dropdown and then choose the ‘This PC‘ option.
Clear File Explorer History
On this very same window, you have to look at the bottom section called ‘Privacy’. There’s also a ‘Clear’ button that will delete the history File Explorer maintains of your frequently accessed files and folders as well. Tap on it.
Remove File Explorer Cache
There’s just one more thing that you guys need to do. Clear the File Explorer cache as well. YOu have to open the following location in File Explorer.
%AppData%\Microsoft\Windows\Recent\AutomaticDestinations
Remove all the files in this folder. Reset File Explorer in order to open Quick Access. The ‘Working on it’ message will stop appearing from this point forward as well.
The ‘Working on it’ message basically appears whenever File Explorer’s cache is either corrupted or also has become too big for your system to handle as well. It can be a sign of an aging system that is unable to keep up along with more demanding apps as well. If you see this message more often whenever you guys have multiple apps open. And less most of the time or never whenever you have anything running on your PC. Then it’s a system resource problem. The above steps will actually fix the message for a while. However, if your system is dated it will eventually return.
File Explorer is instantly in order to rebuild its cache so you won’t be inconvenienced via this too much. If you guys need access to a particular folder and can’t wait for File Explorer to add it to your frequent folders as well. Then just pin it to the Quick Access bar on the left.
Try to rebuild the Search Index
- First of all, you have to open the Indexing Options via the Search bar.
- Next, tap on the appropriate listing, e.g. Users folder.
- After that, you need to tap on the Advanced button. This will open a mini-sized window and from there, head to the Index Settings tab.
- Then tap on the “Rebuild” option under the Troubleshooting section.
- Now tap on OK after the rebuilding is completed. This should rebuild the search index for all of the files and hence, fix the File Explorer stuck on the “Working on it…” message.
Try to optimize the folder for General Items
You might also want to try optimizing the folder for General Items as it can help the File Explorer to load the contents faster.
- Just right-click on the folder that takes time in order to load the contents in it and is showing the “Working on it…” message as well.
- After that, you need to tap on Properties to open the Properties mini window.
- From there, just head to the Customize tab and click on the drop-down menu to “Optimize this folder for” under the “What kind of folder do you want?” section and then choose General Items.
- Then you need to check the checkbox along with a label that says, “Also apply this template to all subfolders” and then tap on the OK button in order to save the changes.
- Restart File Explorer and then check if the problem is now fixed or not.
Try to perform a System Restore
Running System Restore can also help you to resolve whatever issue that’s actually causing the “Working on it…” message. You can also do this option either via booting into Safe Mode or in System Restore as well. If you guys are already in the Advanced Startup Options, then just directly choose System Restore and proceed along with the next steps. And if you have just booted your PC into Safe Mode, then just refer to the steps below.
- Press the Win + R keys in order to open the Run dialog box.
- After that, type in “sysdm.cpl” in the field and then click on Enter.
- Next, Head to the System Protection tab then press the System Restore button. This will now open a new window where you have to choose your preferred System Restore point.
- After that, follow the on-screen instructions in order to finish the process and then restart your computer and then check if the problem is fixed or not.
Further
On top of the Windows File Explorer getting stuck on the “Working on it…” message. If you are also facing other issues right now on your Windows 10 computer. That has been bothering you for quite some time, then there is also a one-tap solution known as Restore you can use. This program is a really useful tool that can repair corrupted registries and optimize your PC’s overall performance. Apart from that, it also cleans out your computer for any junk or corrupted files as well. That also helps you to eliminate any unwanted files from your system as well. This is basically a solution that’s within your grasp along with just a click. It’s easy to use as it is user-friendly as well. For a complete set of instructions in downloading and using it, you need to refer to the steps below.
Steps
You have to perform a full system scan using Restore. In order to do so, follow these steps:
- Turn on your PC. If it’s already on, then you have to reboot
- After that, the BIOS screen will be displayed, but, if Windows pops up rather, reboot your computer and try again. When you guys are on the BIOS screen, repeat pressing F8, through doing this the Advanced Option shows up.
- In order to navigate the Advanced Option use the arrow keys and choose Safe Mode with Networking then hit
- Well, the windows will now load the Safe Mode with Networking.
- Tap and hold both the R key and Windows key.
- If done correctly, then the Windows Run Box will show up.
- Then type in the URL address in the Run dialog box and then click on Enter or tap OK.
- After that, it will then download the program. You have to wait for the download to finish and then open the launcher in order to install the program.
- Now after that, it will download the program. You have to wait for the download in order to finish and then open the launcher to install the program as well.
- After the scan completes, then just the “Fix, Clean & Optimize Now” button.
Conclusion
Alright, That was all Folks! I hope you guys like this article and also find it helpful to you. Give us your feedback on it. Also if you guys have further queries and issues related to this article. Then let us know in the comments section below. We will get back to you shortly.
Have a Great Day!
Also See: How to Identify USB Symbol on Computer


