
Google play store ‘No connection Retry’ error message is faced whenever the play store is not able to connect to an Internet connection actually. You may notice that almost everything is well-connected and working well, however, still, it is showing the error. But this is not a big problem, and you can easily fix the Google play store along with no connection error. The methods are also explained below. In this article, we are going to talk about Fix Google Play Store No Connection Error. Let’s begin!
Contents
- 1 Fix Google Play Store No Connection Error
- 1.0.1 Clear cache of play store
- 1.0.2 Update the correct Gmail or Google password
- 1.0.3 Check the time and date
- 1.0.4 Factory reset
- 1.0.5 Changing Play Store language
- 1.0.6 Uninstalling Google Play Updates
- 1.0.7 Clear Google Services Framework Cache
- 1.0.8 Edit the Host file (Rooted Devices Only)
- 1.0.9 Doing a Factory Reset
- 1.0.10 Conclusion
Fix Google Play Store No Connection Error
Clear cache of play store
Well, clearing the cache and data is a really simple and easy solution to this problem. In order to do this move to Settings,> Manage Application > All > Google play store and press the Force stop button there in order to find out the clear cache and then clear data button. Press both the button one by one in order to clear cache and data from the Google play store and then check if the problem is solved now or not.
Update the correct Gmail or Google password
Well, this problem may occur when there is a mismatch between the Gmail password that you have and the one you entered in your Google play store as well. So remember that if you have changed the password and forgot to update it on your android device actually. Correct the password on your phone and try to use the net again and the problem should also be solved now.
Check the time and date
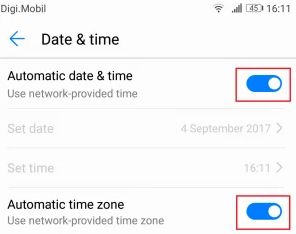
Sometimes incorrect dates and timing might be the reason in order to face this error message. So whenever you guys get this type of error check the time and date. Then first and go ahead with any other method if this method does not really work out for you.
Factory reset
If you guys have tried all the above methods, however, the problem is not solved yet then factory reset is basically the last option in order to fix Google play store No connection error. However, don’t forget to back up all the data before going for this method actually.
Changing Play Store language
Some users have also reported that “Server error” has disappeared after changing the language to English. Although I wasn’t able to verify it myself, if you guys are using a different language whenever browsing Play Store, it might be worth a shot. Here’s how you can do it:
- Just visit this link and sign in with your Google account. You guys can either do this from your Android browser or from a PC.
- Click or tap on Account preferences and choose Language & Input Tools
- Click or tap on Language and select English as well.
- Pick up your Android device and then head to Settings >Accounts and tap on Google.
- Click on Sync now and now wait until the data is update. Open Play Store again and then see if the error has disappeared or not.
Uninstalling Google Play Updates
If you’ve tried the methods above to no avail, then uninstalling the updates from Google Play might finally fix it. If you root, and you can try to uninstall Google Play completely if the steps below fail. However, I would advise against it.
- Head to Settings > Apps (Applications). Choose the All apps filter and then scroll down to Google Play Store.
- Click on Uninstall Updates. Restart your phone and avoid letting Play Store update again until you guys confirm that the error is gone.
Clear Google Services Framework Cache
Google Services Framework is basically the process responsible to sync and store device data. If the glitch related to the error originates from here, force stopping it and also clearing its cache might do the job. Here’s what you have to do:
- Head to Settings and click on Application Manager. Keep in mind that some manufacturers hide system processes somewhere in the app tab. If you guys can’t find Application Manager, then head to Settings > Apps (Applications) and click on the menu icon (three-dot icon). From there chooe Show System processes.
- Just scroll down and click on Google Services Framework.
- Now click on Force Stop.
- Head to Storage and tap on Clear Cache. Reboot your device and then open the Play Store.
Edit the Host file (Rooted Devices Only)
If you guys are using or have used an ad blocker, then there’s a slight chance it ended up blocking the wrong hosts actually. The bad news is that you’re going to need a text editor. However, most manufacturers include one in their list of preloaded apps. Now here’s what you have to do:
- Just remove your Google account as shown in Method 5.
- Along with Root Explorer (or the same app), navigate to, etc/hosts.
- Then open the host file present there along with a text editor.
- Now look for Google’s IP address and then insert an “#” in front of it. It’s mostly on the second line. Doing this will turn off the blocking of that IP. The end result should look just the same as this “#74.125.93.113 android.clients.google.com“.
- Save the file, restart your device, also re-add your Google account, and then open Google Play Store again.
- If you’re present along with the same error after the restart. Then try to uninstall any ad-blocker or VPN app that you might have and delete the host file completely
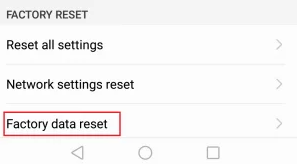
Doing a Factory Reset
If nothing worked for you so far, then there’s one last thing to try before sending your phone to a technician for an OS re-flash actually. Performing a factory reset will restore your phone to its initial state as well. This means all of your personal data that isn’t present on the SD card will be deleted as well.
In order to avoid unnecessary data loss, just head to Settings > Advanced settings and then click on Backup & reset. Tap on Back up my data and now wait for it to create.
When you’ve got that out the way, then here are the steps of doing a factory reset:
- Head to Settings > Advanced Settings > Backup & reset and then scroll all the way down to Factory data reset
- Click on Reset Phone and confirm.
- Your device will now restart at the end of the process.
- When it’s initialized, open Google Play Store and then see if it’s working normally.
Conclusion
Alright, That was all Folks! I hope you guys like this article and also find it helpful to you. Give us your feedback on it. Also if you guys have further queries and issues related to this article. Then let us know in the comments section below. We will get back to you shortly.
Have a Great Day!


