We are right now in a constant path of Upgradation with a lot of new technical features that are uploaded onto the computers that we are using daily. Most of the folks who are using systems on a daily basis definitely are the prey to constant upgrades. That are put up actually. We all know the fact that the Windows operating system from Microsoft is probably one of the most delicate software that is used by many all around the globe. In this article, we are going to talk about How to Fix Generic PNP Monitor Driver Issue. Let’s begin!
This means that whenever you are using a system that is widely used, the probability of you facing an upgrade request is really common. Most of the upgrades mostlly don’t agree with the system on the first go and this actually leads to a lot of technical difficulties within the system.
Out of all the errors, one of the most common types of error to occur is actually the Generic PNP Monitor Driver issue. Now, this issue is a really common occurrence for a very long time and this means that you have to be aware of the common troubleshooting tips. In order to make sure you solve this issue all through yourselves without even the usage of service personnel that might cost you some extra bucks as well.
Contents
- 1 Overview of PNP monitor driver Issue
- 2 What is actually Generic PnP Monitor Windows 10?
- 3 How can you Fix Generic PnP Monitor In Windows 10/7
- 4 Uninstall Generic PnP Monitor Driver
- 5 Update Generic PNP Monitor Driver and Display card Driver
- 6 Run the System File Checker
- 7 Check for Windows 10 Update
- 8 Reconnect Monitor Cables
- 9 Conclusion
Overview of PNP monitor driver Issue
Well, the generic PNP monitor problem is actually one of the most common issues. That the normal user would face after an official update of the operating system of windows. PNP basically stands for plug and plays support that is importnat for many applications and their parameters to run effectively. If, in case the PNP extension of the monitor does not work properly. This can now be fixed with just a simple tweak or tweaks to make sure that the extension is supported effectively as well. The first common sign that the monitor is actually not working properly is the display of the text “Failed to load hardware monitor driver”.
On the onset of these types of issues, there are a lot of methodologies that you can try to make sure that the error is lifted. Now before we go further with how we can actually solve the issue we must know why this issue actually happened. There are a lot of possible explanations that one can give however, the reasons would be;
- You guys might have installed a third party application that has root access that might have probably messed up with the drive actually.
- The installation files that are used in the system might not be in a industrious phase leading to not properly installed application files.
- Improper processing of the new update from windows that may not have been installed properly during the installation.
- Booting the system with an alternate operating system might most of the time have messed up the overall basic files of the operating system.
- Downloading files from the internet and saving them in the C drive of the file. This drive is actually the most important aspect of your system that stores the most crucial information of an operating system.
What is actually Generic PnP Monitor Windows 10?
The PNP is basically short for Plug and Play. In the computer, it is used in order to connect the external devices (Monitor, USB Devices) to Windows PC. So whenever you plug a monitor (Dell, ASUS, Other brands) or USB devices (keyboard, mouse) into a computer, then the system will recognize the device automatically. And install all the right drivers for the device, so that it can run it run properly.
Well, the Generic PnP Monitor Driver for Windows 10 basically means Windows 10 has installed one of the basic monitor drivers and also it can run smoothly as well. Although it may function not as perfect because the manufacturer’s monitor driver. Such as, you may not set the best monitor resolution and screen refresh rate along with this kind of PnP monitor driver.
Mostly, folks would find out that the monitor in display settings > Advanced settings > Monitor > Properties actually.
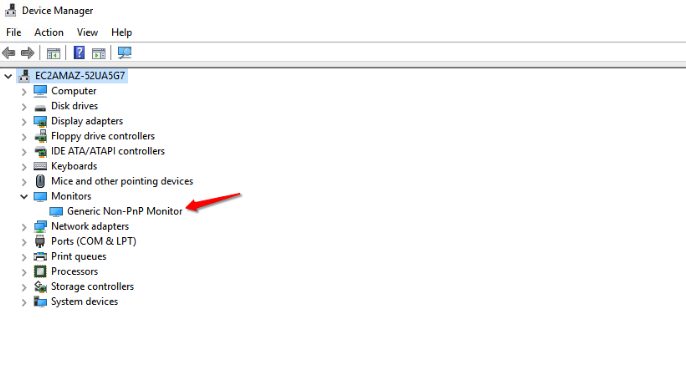
But unfortunately, whenever the monitor driver is missing or it is install failed on Windows 10. Your monitor will then show as Generic PnP Monitor, and in device manager, you will also see the generic PNP/non-PNP monitor along with a yellow exclamation.
If it occurs to you, then maybe there is a Generic PnP Monitor driver issue. It is time for you to fix this device manager problem on Windows 10 as well.
How can you Fix Generic PnP Monitor In Windows 10/7
You ave to apply these fixes one by one, until you find the best solution for you.
Uninstall Generic PnP Monitor Driver
You can start with uninstalling the PNP driver because most of the time rolling back solves monitor issue. When you uninstall generic PNP monitors, your PC will then automatically search and install the required driver. In order to uninstall, you have to follow these steps.
- First, open Device Manager for that Right-click on the Windows + R keys. Type “devmgmt.msc” and then tap on enter.
- When the Device Manager window appears, then you have to look for the Monitors option and tap on it to expand.
- There you will see the Generic PnP monitor option, right-click on, and choose the Uninstall device option.
- Confirmation of the command if asked, now choose Uninstall.
- Now tap on the Scan for hardware changes.
Windows will then recognize and install the monitor as the real monitor and not the generic PnP monitor. If this simple fix does not solve the windows 10 monitor driver then you need to follow the next method.
Update Generic PNP Monitor Driver and Display card Driver
Most of the time its the old driver or old graphics card driver that causes this problem. If you update these drivers then there’s a good chance that Windows 10 ghost monitor problem will then vanish. In this step, you need to first update the driver monitor and then the graphics card driver as well. Follow these simple steps;
- First, open Device Manager, for that Right-tap on the Windows + R keys. Type “devmgmt.msc” and then click on enter.
- When the Device Manager window appears, then click on Monitors’ option in order to expand it. Now right-click on Generic PnP Monitor to Update Driver as well.
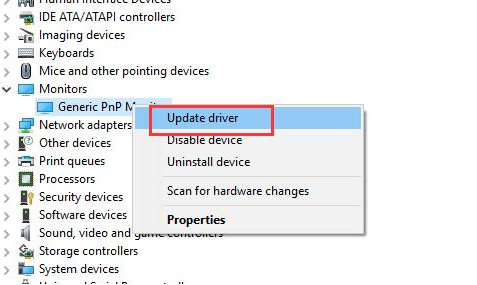
- When you tap on the updated driver a new box will then appear. There choose Search automatically for updated driver software. You Windows will search online for that driver and then update it.
- In case Windows is unable to find and update the driver then again right tap on Generic PnP monitor and then update it. However this time rather than selecting search automatically choose to Browse my computer for driver software.
- Then choose Let me pick from a list of device drivers on my computer.
- Now tik the box written as “Show compatible hardware” so that compatible driver appears actually. Here you have to select the driver and then install it.
- When again click on the Display Adapters option. Expand it and then right-click on your graphics card in order to Update it.
- Again choose the first option, Search automatically for updated driver software to download and then install the driver automatically
- When the drivers are installed, then restart your computer.
Run the System File Checker
If the problem still persists then you need to run the system file checker now. It’s actually a built-in Windows 10 utility which scans and fixes corrupted drivers. Then you have to follow these steps to run SFC.
- First, you have to open Command prompt. To do that press Windows + R keys and then type “cmd“. Alternatively, search Command Prompt from results and right-click on it to Run as administrator.
- When a new window opens, you have to type the following command and press Enter. sfc /scannow
- The SFC scan will then start and fix the issues. Be patient during the scan as it takes time sometime around 15 minutes axtually .
- When the process completes then it will fix your problem with PNP devices.
Check for Windows 10 Update
Well, the Windows 10 update can solve many problems like system bugs, driver error, hardware issues, etc. If the generic PnP monitor error occurs, then try to update the Windows 10 version in order to solve it.
- Head to here: Start > Settings > Update & Security > Windows Update.
- Then tap on Check for updates.
Windows system will help you to download the new drivers, new system files. After that, you have to check if the real monitor back in device manager.
Reconnect Monitor Cables
So, if the problem of generic PnP monitor still appearing on desktop PCs. Then you can also try this easy tip.
- You have to turn off your computer and the monitor.
- Remove the power cable of the monitor and then wait for at least 10 minutes.
- Then unplug the video cable from the CPU and wait for 5 minutes.
- Now, plug in the video cable to the CPU and also power cable of the monitor.
- Then restart the computer.
Conclusion
Alright, That was all Folks! I hope you guys like this article and also find it helpful to you. Give us your feedback on it. Also if you guys have further queries and issues related to this article. Then let us know in the comments section below. We will get back to you shortly.
Have a Great Day!


