Are you looking for a solution to fix the ‘Like What You See’ issue in Windows Spotlight? If yes then stay with us. Windows Spotlight is an element that is naturally added to Windows 10. However, it downloads ads or pictures consequently from Bing and shows them when the lock screen is being appeared on your computer executing Windows 10.
No doubt, Windows Spotlight highlight shows the best wallpapers on your lock screen and then modify it with new wallpaper.
In case if you are using Windows 10 model 1511 or later, you can improve this element from the Settings app > Personalization > Lock Screen.
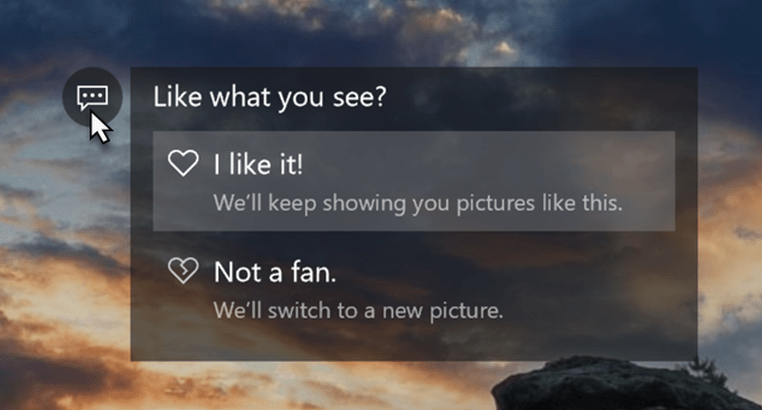
At the point whenever you view Windows Spotlight wallpaper on your lock screen and float pointer over this wallpaper, you’ll then view the ‘Like what you see’ option. Tapping this option provides you the pathway to get the same wallpaper or deny it if you don’t like the wallpaper. But if then option ‘Like what you see’ is missing for you, here is how to recover it back.
Also See: User Guide On Find Windows Spotlight Lock Screen Images On Windows 10
How To Fix ‘Like What You See’ Missing For Windows Spotlight:
Solution 1 – Via Lock Screen Options
- Right-tap the Start Button or simply hit Win + X keys and choose Settings.
- From the Settings app, you can simply discover or explore to Personalization > Lock screen.
- From the right pane of the Lock screen, under Background, specify the option to Picture. At that point recover back this option to Windows Spotlight once more.
- You can then hit Win + L keys and view if the ‘Like what you see’ option restored or not
In case if the issue (Like What You See) still occurs then head over to FIX 2.
Solution 2 – Via Registry
It is strongly recommended that you create a System Restore point first before altering or modifying the registry. The most effective way is to configure and use System Restore in Windows 10.
Part 1 – Turn On System Protection
- Initially, hit Win + R and input rstrui in the Run dialog box. You can then tap OK or hit the Enter key.
- Now when the System Restore window opens. You’ll then view a message that no restore points have been created on your computer’s system drive. If you wish to create a restore point open System Protection. Then continuously, tap on the system protection interface there.
- Well, from the System Properties window, choose your system root drive underneath the Protection Settings heading. You can then tap on the Configure button. Well, the System Restore or create button is turned gray out.
- Now from the System Protection window for chose drive, choose the Turn on System Protection option. Then tap Apply pursued by OK.
With these lines, we have successfully configured System Protection which allows the system creates restore points naturally. You’ll then view that the grayed buttons in the window appear in step 3.
Also See: How To Fix “L2TP Connection Attempt Failed” Error
Part 2 – Create System Restore Point
Tap on the Create button in the System Properties window that appeared in step 3 of PART 1. Then specify a name to the restore point that you’re making now and then tap Create.
- We recommend you to utilize such a name, we’ll then push you to efficiently perceive the restore point later.
- After a few minutes, you’ll then receive a message for the successful creation of restore points. Tap close.
Back To Registry
- Hit Win + R and put regedit in the Run dialog box to successfully open Registry Editor. Then tap on the here button then tap OK.
- From the left space of the Registry Editor window, discover the following registry key:
HKEY_CURRENT_USER\SOFTWARE\Microsoft\Windows\CurrentVersion\Lock Screen\Creative
- From the right sheet of the Creative registry key. You can simply double-tap on LockImageFlags registry DWORD (REG_DWORD) to alter its Value information.
- Then modify the Value information from 1 to 0 and then tap OK. Now exit the Registry Editor and reboot.
Then restart your system, the issue must be fixed. In case if the issue (Like What You See) still occurs then head over to the other method.
Solution 3 – Re-register Windows Spotlight
In the event that you wish to reinforce the earlier displayed Windows Spotlight pictures. You can do it before you perform the given steps. Well, subsequent to experiencing these instructions, those images and related content of Windows Spotlight will be removed for sure.
- Head over to Administrative Command Prompt.
- Then input the following command and hit the Enter key:
DEL/F/S/Q/A “%USERPROFILE%/AppData\Local\Packages\Microsoft.Windows.ContentDeliveryManage
- When the earlier mentioned command run, simply input in another comparative command and then press the Enter key:
DEL/F/S/Q/A “%USERPROFILE%/AppData\Local\Packages\Microsoft.Windows.ContentDeliveryManager_cw5
- When this command execution is effective, quit the Command Prompt.
- Then head over to Windows PowerShell and then enter the following cmdlet. Then hit the Enter key at that point to run it:
Get-AppxPackage – Name Microsoft.Windows.ContentDeliveryManager | Foreach {Add-AppxPackage – DisableDevelopmentMode – Register “$($_.InstallLocation)\AppXManifest.xml” – Verbose}
Then exit Windows PowerShell and reboot your PC. You can subsequently restart your PC. Then choose Windows Spotlight next to Background for your Lock Screen, under the Settings app. In case if the issue (Like What You See) still occurs then head over to another method.
Solution 4 – Remove Windows Content Delivery Settings Folder
This is the solution that worked for many users and performing this solution is quite easy or simple. Just open the Packages organizer from the AppData directory and then open the Windows Content Delivery envelope to remove the settings. As it sounds difficult yet it really isn’t. Just pursue the instructions mentioned under it and you will be done right away.
- At first, you must know the username of your PC’s. Then head over to the Command Prompt and type the ‘whoami’ command to know your username.
- When you know your username, then open the Windows Run box after hitting the keyboard combination Windows Key + R and then head over to the following way.
C:\Users\<USERNAME>\AppData\Local\Packages\
- When you are in this envelope, then view for an organizer named:
Microsoft.Windows.ContentDeliveryManager_<somerandomcharacters>
- Then simply open the envelope and then find the Settings organizer.
- You can now leave the window opened and then again open the Windows 10 Settings app after tapping on the Start Menu and then tapping on the gear icon.
- Head over the Personalization and then switch to Lock Screen.
- Now from the background drop-down menu, simply modify the setting from Windows Spotlight to Picture.
- Then limit this window and then navigate to the Windows Content Delivery organizer window.
- Permanently remove the Settings organizer in this window.
- Again return back to the Lock screen Personalization Settings window and choose Windows Spotlight initiating from the drop.
Once done, you just want to restart your computer and you’ll then view that the issue is resolved and Windows Spotlight is working flawlessly.
Conclusion:
So, these were some of the best methods to fix the “Like what you see” issue. If you know of any other alternative method to fix it then let us know in the comment section below.
Also Read:


