
An average PC basically comes along with two graphics cards. The first, the default one, is called the ‘On-board’ graphics card and also it’s mostly an Intel chip. The second one is the ‘Dedicated’ graphics card and Nvidia and AMD are actually the best ones available. In this article, we are going to talk about How to Force Program to Use GPU on Windows. Let’s begin!
A dedicated graphics card is normally found on gaming PCs, however, it’s not uncommon to find a lower-end GPU on a non-gaming rig as well.
Contents
- 1 What is a GPU?
- 2 Do I use my dedicated graphics card?
- 3 Why and when should a dedicated GPU be used?
- 4 Windows 10 Settings | force program to use GPU
- 5 Force App In order to Use NVIDIA Graphics Card
- 6 With NVIDIA, it’s pretty easy | force program to use GPU
- 7 Force App In order to Use AMD Graphics Card
- 8 Windows UWP Apps – NVIDA GPU
- 9 How can you know if a specific GPU is being used? | force program to use GPU
- 10 How can we set the default GPU (system-wide)?
- 11 Conclusion
What is a GPU?
A modern Graphical Processing Unit or GPU is just the same as a CPU, however, makes use of parallel processing. And is able to handle a lot of processes and threads at the same time. A GPU has many processing cores, however, a CPU has only a few.
Because of its parallel processing, a GPU is normally used for graphics processing and rendering as well.
Do I use my dedicated graphics card?
Whenever an application’s requirements exceed the capabilities of the onboard graphics card, then your system switches to the dedicated GPU. This actually happens most of the time when you guys play games. You guys can however force an app in order to use the dedicated GPU. Now let’s see how.
As mentioned earlier, there are basically two major GPU manufacturers that dominate the market; Nvidia, and AMD as well. We are going to show you how you guys can force an app in order to use the dedicated GPU from both manufacturers.
Why and when should a dedicated GPU be used?
GPU should be used for programs and apps that run various threads and processes and need parallel processing as well. If an app only needs a single processing core in order to process its data. That is running it with a GPU will degrade its performance. This is because CPU cores are more powerful than GPU cores as well.
Running apps along with a dedicated GPU will also consume more power. If you guys are on battery life and want to prolong battery usage time as well. You should consider not using a dedicated GPU for any app as well.
Windows 10 Settings | force program to use GPU
You guys must be running Windows 10 1809 or later for this to work as well. It does not really matter which GPU you have as this will work for both.
- First, you have to open the Settings app and head to the System group of settings.
- Choose the Display tab and then scroll down.
- Tap on the ‘Graphic Settings‘ option.
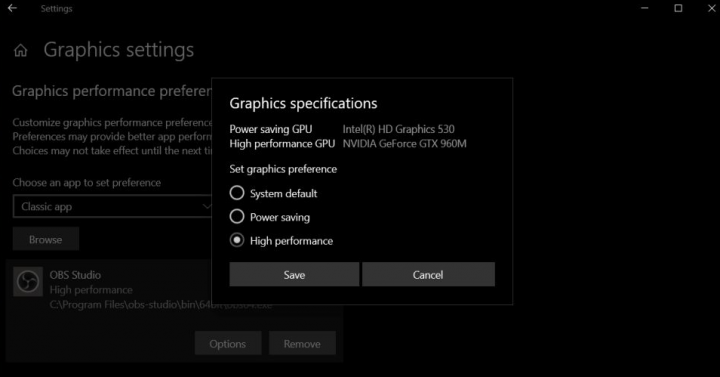
- Then on the Graphics Settings screen, and open the ‘Choose an app to set preference‘ dropdown.
- Select the type of app you want to set the GPU use for; Classic app for desktop apps, and Universal app for UWP or Store apps as well.
When you select, tap on the Browse button and choose the app. Tap on the ‘Options‘ button under the app when it has added actually.
In the window that opens, then just choose ‘High Performance‘ and tap on ‘Save‘.
Force App In order to Use NVIDIA Graphics Card
It’s actually worth mentioning that NVIDIA uses Optimus Technology. Whenever it detects that an app needs additional, more powerful resources, and also the dedicated GPU kicks in. That said, you guys can still force an app to use the dedicated GPU.
With NVIDIA, it’s pretty easy | force program to use GPU
You have to open the NVIDIA control panel. Right-tap on an empty area on your desktop and choose the ‘NVIDIA Control Panel‘ option from the context menu.
Head to the Desktop menu and turn on the ‘Add “Run with graphics processor” to the Context Menu option.
Now return to your desktop. Right-click the app that you want to force in order to use the dedicated GPU. The right-click context menu will have a ‘Run with graphics processor’ option. Choose ‘High-performance NVIDIA processor’ from the sub-options and also the app will run via your dedicated GPU.
Force App In order to Use AMD Graphics Card
You guys can force an app in order to use your AMD graphics card but it isn’t as easy, or as accessible as the NVIDIA option. Along with AMD, you can choose which apps will use the dedicated graphics card. You guys don’t have an option in the context menu. Rather, you add apps to the AMD Catalyst Control Center.
First of all, open the AMD Catalyst Control Center app via right-clicking on an empty area on your desktop.
- Choose ‘Catalyst Control Center‘ from the context menu.
- From the list of panels on the left, and choose ‘Power‘.
- Now under ‘Power’, you have to choose ‘Switchable application graphics settings‘.
There you will see a list of apps that AMD already recognizes as needing better GPU support. Now on this panel is an ‘Add Application’ button as well. Tap on it and choose the EXE of the app you want to force in order to use the AMD graphics card.
After you guys add the application, then open the dropdown next to it for setting graphics options. Choose ‘High performance’ and you guys are done. The app will always use AMD graphics cards.
We should mention that some options may differ relying on your driver version and the GPU model that you have. These solutions will still work, however, the options may be found under a different menu as well.
Windows UWP Apps – NVIDA GPU
Unfortunately, this does not really work for Windows UWP apps. That does not mean you can’t force them in order to use the dedicated GPU. Then just that the process is different for an NVIDIA GPU.
- First of all, you have to open the NVIDIA control panel and head to 3D Settings>Manage 3D Settings.
- Choose the Program Settings tab and tap on the ‘Add’ button. Browse for the Windows UWP app you want in order to run with the dedicated GPU, and add it.
- From the ‘Select the preferred graphics processor for this program’ dropdown, you need to select your GPU.
How can you know if a specific GPU is being used? | force program to use GPU
In order to make sure that a certain application is using a dedicated GPU, however, the others are using the integrated one. We can also check for it using the secondary GPU’s Control Panel.
- Right-tap on the blank space on the desktop and then choose GPU’s Control Panel.
- Turn on the Display GPU activity icon in Notification Area. This will create a new icon in the bottom-right of the screen as well.
- Tap on this icon in order to view all the applications via the dedicated GPU.
You guys can also check the GPU activity in the Windows Task Manager performance tab. This will basically give you an idea of which GPU is being used.
How can we set the default GPU (system-wide)?
If you guys have a desktop computer, then you can manage your default GPU via the BIOS and set the default GPU to Integrated, PCI, or PCI-E as well.
But, in the case of a laptop, the default GPU cannot be managed via BIOS as it does not have any PCI slots. However, we can also manage it through the GPU’s control panel.
- If you guys have an Nvidia graphics card, then just open the Nvidia control panel.
- In the left pane, you need to select Manage 3D settings.
- Now in the right pane, under the Global Settings tab, and tap on the drop-down menu under Preferred Graphics Processor.
- Choose the graphics card that you want to set as default, then tap on Apply in order to enforce the changes
If done intelligently, then this application-specific graphics processor usage option can optimize system performance to the next level actually.
Conclusion
Alright, That was all Folks! I hope you guys like this “force program to use GPU” article and also find it helpful to you. Give us your feedback on it. Also if you guys have further queries and issues related to this article. Then let us know in the comments section below. We will get back to you shortly.
Have a Great Day!
Also See: How To Turn On DirectPlay On Windows 10


