In Windows 10, Microsoft now added a “Share” option in Microsoft Edge so that folks can share any link with their friends via email, Twitter, Facebook, etc. Now, Microsoft has also enhanced this feature. You will now see the Share option in the right-click context menu as well. The Share item shows when you right-click on any media file such as image, video, etc. It also lets you share the file with someone via email, Skype, LINE, etc. Apart from that, you can also save the file to OneDrive, or also set a Cortana Reminder, and much more. If you have no use for it and would like to delete the Share item. In this article, we are going to talk about How to Remove Share with Skype in Windows 10. Let’s begin!
Luckily, there is actually a way to get rid of this annoying new addition to our already crowded context menu on Windows 10. However, it is not a straightforward job as you would want because you will need to deal with the registry editor. Something that is actually not easy to do for the faint of hearts.
Contents
A context menu is actually a pop-up menu that gives shortcuts for actions the software developer anticipates the user might want to take.
In a Windows environment, the context menu is basically accessed with a right mouse click. Such as, if the end-user right-clicks in a Word document. The pop-up menu will include shortcuts for undo, cut, copy and paste as well. If the end-user right-clicks in Excel, but, the context menu also includes shortcuts for insert cell, delete a cell, paste special. And all the other commands that are mostly used for that program.
User interaction with context menus basically depends upon the computing device. Its operating system (OS), and its input mechanisms. If the user does not have a mouse, Such as, he may access context menus through tapping a keyboard combination, tapping and holding a trackball. Holding a tap on a touch screen, or placing two fingers on a touchpad. Context menus can be closed through choosing an action or tapping outside the menu area in open space.
A very recent update to the Skype app has added now an option for users to share files right from the context menu. This has caused the already cluttered menu to expand even more further, which users find totally unnecessary. In order to remove the option from the context menu, we will be using the Windows 10 Registry Editor actually.
Using Regedit
Regedit is the actual Registry editor built into Windows 10. This also lets you delete and modify keys to your OS. It basically acts such as a dictionary for your computer. It should be also noted that any changes that you make to the registry can adversely affect your device. So you need to make sure you do not delete anything that you are not sure of.
In order to open your Registry Editor, you need to click the Start button and type ‘Registry’. Now it actually depends on where you downloaded the application from, your key will be in different locations.
NOTE: You may also want to back up your registry settings first before editing it for Skype. In case the job goes bad, then you can safely restore things back to normal with the backup as well.
If you downloaded the installer from the website
If you guys have downloaded your Skype application from the Skype website, then this is where you will find your key.
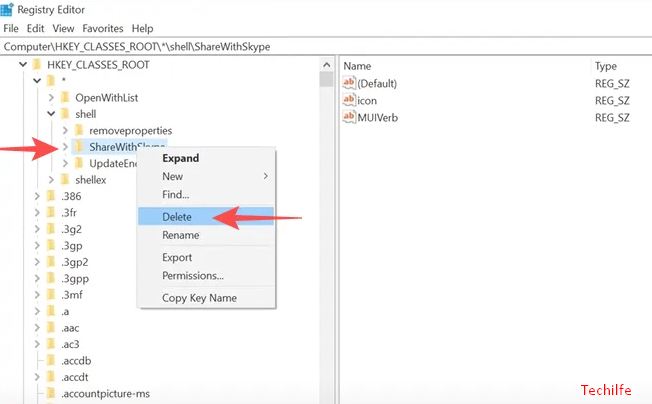
HKEY_CLASSES_ROOT\*\shell\ShareWithSkype
In order to navigate through the Registry Editor, you either need to double click a folder or click the little arrow beside it.
When you reach ‘ShareWithSkype’, then right-click the folder and choose ‘Delete’.
Now restart your PC for the changes to take effect. Give it a try by right-tapping a file to see that the ‘Share with Skype’ option has disappeared or not.
If you uninstalled from the Microsoft Store
This is a little tricky if we compared it to the above method. If you downloaded your Skype application from the Microsoft Store, then this is where you will find your key.
Computer\HKEY_LOCAL_MACHINE\SOFTWARE\Classes\PackagedCom\Package
Now, choose the option with SkypeApp in its name, and then Class > {776DBC8D-7347-478C-8D71-791E12EF49D8}.
Now in the right panel you need to look for DllPath. Right-click the key and then select ‘Modify’. All you have to do now is add a hyphen (-) before the Value data actually. Your Value data should read these of the following:
-Skype\SkypeContext.dll

Tap ‘OK’ in order to complete the value change. Go ahead and then restart your PC. Give it a try by right-clicking a file to see that the ‘Share with Skype’ option has disappeared or not.
Note: If you guys want to bring the ‘Share with Skype’ option back to the context menu. Then all you have to do is remove that hyphen (-) in the Value data. Remember, when you are making changes in Regedit, always make sure to restart your PC.
Uninstall Skype
In case you do not find yourself using Skype much, then you can simply remove the Skype program from your PC to remove Skype from the context menu. After all, since the lockdown, we have indeed started paying attention to many other alternatives such as Zoom, Google Meet, Google Duo, Microsoft Teams, and much more.
Conclusion
Alright, That was all Folks! I hope you guys like this article and also find it helpful to you. Give us your feedback on it. Also if you guys have further queries and issues related to this article. Then let us know in the comments section below. We will get back to you shortly.
Have a Great Day!
Also See: Turn Off Skype Read Receipts on Mobile And Desktop


