CompatTelRunner.exe is the process of Microsoft Compatibility Telemetry. It occasionally shares usage and performance data to MS IP addresses so that improvements can be made on user experience & usage, and resolve potential fixes. It turned on by default, and the data points are essential for Microsoft to improve Windows 10. Some users, however, have claimed that it shows high Disk or CPU usage and also slows their PC.
Contents
- 1 What do you now about Microsoft Compatibility Telemetry (CompatTelRunner.exe)
- 2 How to turn off CompatTelRunner.exe activity?
- 2.1 Turn off Application Experience Tasks in Task Scheduler
- 2.2 Turn off Windows Telemetry via Group Policy Editor
- 2.3 Turn off Telemetry using Registry
- 2.4 Restart Your computer
- 2.5 Update Microsoft Windows 10
- 2.6 Turn off Microsoft Compatibility Appraiser
- 2.7 Disk Checking
- 2.8 Wipe Up Running Memory to Speed up Your PC
- 2.9 Upgrade the Hard Drive to a Larger One
- 3 Conclusion
What do you now about Microsoft Compatibility Telemetry (CompatTelRunner.exe)
Windows Telemetry is PC data that is uploaded by the Telemetry component and Connected User Experience. Also, it is used to keep your Windows devices secure. Also, it helps Microsoft to improve Windows quality and Microsoft services. CompatTelRunner.exe on Windows 10 is the program that manages everything.
If you move to Windows Settings > Privacy > Diagnostics and feedback, you can then configure Telemetry here. You can also modify your feedback frequency from always to once a week or even never. The same place provides you the choice to remove the diagnostic data.
How to turn off CompatTelRunner.exe activity?
Some users claimed that when this program executes, it scans many files on the hard disk and shares a huge amount of data over the internet. It begins whenever the PC begins, and this activity displays the PC and also makes it unresponsive at times.
If you want to turn off CompatTelRunner.exe, here is what you can do:
Turn off Application Experience Tasks in Task Scheduler
Step 1:
Input taskschd.msc in the Run prompt and press Enter.
Step 2:
Task Scheduler will open.
Step 3:
Head over to Task Scheduler Library > Microsoft > Windows > Application Experience
Step 4:
Choose the Microsoft Compatibility Appraiser task, right-tap on it, and turn it off.
The task you turned off gathers program telemetry information if opted-in to the Microsoft Customer Experience Improvement Program.
You can also modify the time the data is sent across.
Step 1:
Right-tap on the program, and tap on Properties
Step 2:
Then Trigger section, and double-tap on any of the triggers to open it.
Step 3:
Here you can modify the schedule of the program. Then repeat task settings, delay, and much more.
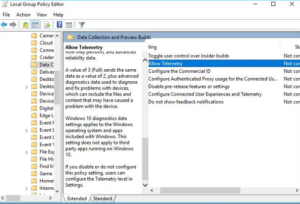
Turn off Windows Telemetry via Group Policy Editor
It is a program that gathers all sorts of data in Windows. There are 4 levels of Telemetry in Windows 10. These are Security, Enhanced, Basic, and Full. You can also select to use a Basic level to limit the activity.
Computer Configuration > Administrative Templates > Windows Components > Data Collection and Preview Builds
Turn off Telemetry using Registry
Step 1:
Run REGEDIT and head over to the following key:
Computer\HKEY_LOCAL_MACHINE\SOFTWARE\Policies\Microsoft\Windows\DataCollection
Step 2:
Right-tap in the right side pane and select DWORD (32-bit) Value. Name the key Allow Telemetry and provide it a value of 0.
Restart Your computer
Another alternative method to fix Microsoft Compatibility Telemetry high disk usage is to restart your PC. Follow the instructions below:
Step 1:
Tap the “Start” icon.
Step 2:
Head over to “Shut down or sign out > Restart.”
Then, your PC will restart automatically, check if you still encounter the issue.
Update Microsoft Windows 10
The problem is related to Windows 10 update. After getting the latest updates, you might fix your issue.
Step 1:
Tap the “Start” icon.
Step 2:
Head over to “Settings > Update & Security settings > Windows Update”.
Turn off Microsoft Compatibility Appraiser
It scans Windows 7/8/8.1/10 apps files that are residing on the PC to assess their compatibility with Windows 10 if an upgrade is performed. To fix the issue, you might turn off this service from the Task Scheduler by following the instruction below:
Step 1:
Tap Start, input Task Scheduler, and then hit Enter.
Step 2:
On the TaskScheduler window, head over to this path: Task Scheduler Library\Microsoft\Windows\Application Experience.
Step 3:
Now on the Application Experience folder, just for Microsoft Compatibility Appraiser.
Step 4:
Right-tap on it, choose “Disable”, and then confirm to end the process.
Disk Checking
If the problem still appears, you can check the status of your hard drive to view if there is a disk error.
Step 1:
Hit the Windows key and type cmd.
Step 2:
Right-tap “Command Prompt” and select “Run as administrator.”
Step 3:
Input the following command:
chkdsk E: /f /r /x
“E” means the drive letter of the partition you like to check.
Wipe Up Running Memory to Speed up Your PC
After trying the solutions above, if your computer is running slow, it’s time to wipe up the running memory to speed up your PC. Wipe up running memory appropriately will low disk usage and make your computer faster. Follow the instructions to fix the high disk usage issue.
Step 1:
Install and download EaseUS Tools M. to choose “System Cleanup” on the main screen.
Step 2:
Choose the type of junk files you like to scan and tap “Analyze”.
Step 3:
Check and choose useless files and tap “Clean up” to erase those files from your computer or laptop.
Upgrade the Hard Drive to a Larger One
If your computer gets 100% disk usage error such as Microsoft Compatibility Telemetry high usage, Antimalware Service Executable high disk usage or you can then take upgrading hard drive to a larger on into account. EaseUS Partition Master can help you to replace the hard drive with the latest one instantly. Connect the other hard disk to the PC.
Initially, download the free tool – EaseUS free partition software. It not only upgrade the hard drive but also have many amazing features.
- Resize/move partition
- Clone disk
- Merge partitions
- Check partitions
- Modify partition label and more
Follow the steps to wipe up junk files and increase your computer speed.
Download: Link
Step 1:
Choose the source disk.
- Head over to the EaseUS Partition Master. Right-tap the disk that you like to copy or clone. Then, choose “Clone”.
Step 2:
Choose the target disk.
- Select the required HDD/SSD as your destination and tap “Next” to continue.
Step 3:
View the layout of the disk and edit the target disk partition size.
- Then tap “Continue” when the program warns it will clear out all data on the target disk.
- You can then choose “Clone as the source” “Autofit the disk” or “Edit disk layout” to customize your disk layout.
Step 4:
Run the operation.
- Tap the “Execute the operation” choices and tap “Apply” to begin the disk cloning process.
Conclusion
Here’s all about “Microsoft Compatibility Telemetry”. I hope that you managed to resolve the high CPU issue, and your PC works perfectly now. If you have tested other alternatives to fix the issue, then let us know in the comment section below!
Also Read:


