Ever since users have figured out that their Android phones are also capable of more than what the manufacturers really offer. The rooting has been gaining traction actually. If you’re trying to turn on the features such as VoLTE that your manufacturer also has for some reason disabled. Or attempting to fix a particular error whenever operating your phone. There are a bunch of hotfixes that rooting your Android can bring you actually. In this article, we are going to talk about How to Fix OEM Unlock Greyed Out / Disabled Issue. Let’s begin!
The very first step of rooting your Android device needs you to “Enable OEM to unlock”. That is a feature tucked away in the Developer options. But, many users have experienced that this feature has been greyed out from the Developer options actually, regardless of their device Android version or manufacturer. We’ve sieved via the forums in order to find out why this issue surfaces on many devices. And how you can fix the “Enable OEM Unlock” option yourself too.
Reasons why OEM Unlock greyed out
The bootloader is already unlocked
As much of a no-brainer like it may seem, one of the reasons that you’re unable to toggle the OEM Unlock button in the Developer options could be because the bootloader of your Android device is already unlocked as well.
Well, on devices that are running Android 7.x Nougat, the option is automatically greyed out. When the bootloader of the device has been unlocked earlier. In order to confirm this theory, you can also check to see if the bootloader of your device is unlocked or not.
- Just open Developer options and turn on USB debugging.
- Open the Minimal ADB and Fastboot tool on the computer and connect your phone via a USB cable.
- Then type in the following command in order to make sure your device is detected via the computer:
adb devices
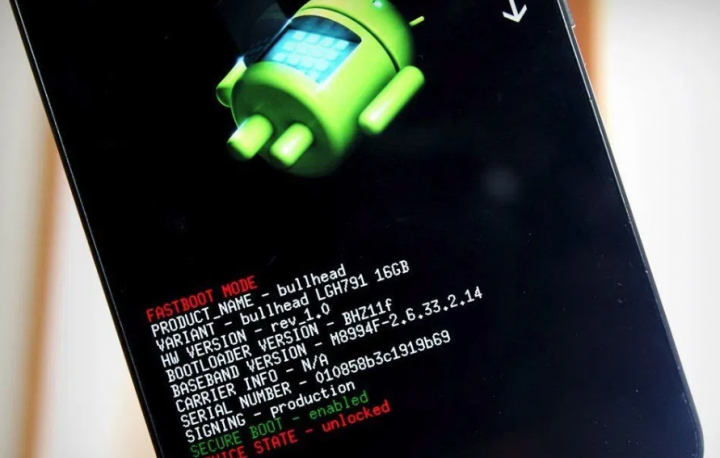
- Now just enter the following command in order to put your device into bootloader mode:
adb reboot bootloader
- On the device screen, you guys will be able to see the DEVICE STATE as “locked” or “unlocked”, confirming if the bootloader status.
If it says unlocked, then it actually means that because the bootloader is already unlocked. The OEM unlock option has been greyed out via the system as its purpose has already been served.
You recently unlocked or re-locked the bootloader
Considering that some Android OEMs regard your warranty as void when you unlock the bootloader. It is also safe to assume that they’re not completely supportive of you doing it. Either way, when you guys do unlock or relock the bootloader of your Android device. The Unlock OEM option from the Developer options could be greyed out as well. On many devices, users have experienced that the system greys out the option for a period of 7 days, however, this could vary based on the devices.
OEM Unlock may not be available for certain devices and regions
As undesirable like it may be to the end-user, however, the brand you purchase your Android device from. And also even the network carrier that your device is tied to can determine how you guys use your mobile phone. In the case of the OEM Unlock option, then it directly depends on many network carriers. And if the network carrier also has set the status of the bootloader to “locked”, then there’s no way around it. However, certain Android OEMs offer the ability in order to unlock the bootloader along with no questions asked. Your region could also play a role in it too.
Solutions for greyed out OEM Unlock option
A bunch of users also has reported that the missing ability to turn on OEM Unlock on their Android devices was restored. After clearing out the device cache and also even performing a factory reset.
Wipe cache partition
- Turn off the Android device, and then tap and hold the Volume Up and Power button simultaneously.
- Now release the Power button whenever the logo appears, however, continue to hold the Volume Up button.
- On the Android recovery screen, you have to use the Volume Down button in order to navigate down to wipe cache partition and tap on the Power button to choose it.
- Use the Volume Down button in order to select Yes — delete all user data, and then tap on the Power button in order to confirm.
- Now, wait for the reset to finish and tap on the Power button when prompted along with the message to Reboot system now.
Perform a factory reset
- Turn off the device, and then tap and hold the Volume Up and Power button simultaneously.
- Just release the Power button whenever the Samsung logo appears, but continue to hold the Volume Up
- On the Android recovery screen, just use the Volume Down button to navigate down to wipe data/factory reset. And tap on the Power button to select it.
- You can use the Volume Down button to select Yes — delete all user data, and then tap on the Power button to confirm.
- Now, wait for the reset to finish and click the Power button when prompted along with the message to Reboot system now.
Conclusion
Alright, That was all Folks! I hope you guys like this article and also find it helpful to you. Give us your feedback on it. Also if you guys have further queries and issues related to this article. Then let us know in the comments section below. We will get back to you shortly.
Have a Great Day!


Sone phones are actually bootlocked.