Do you want to use the DISM command tool to fix Windows 10 image? Deployment Image Servicing and Management (DISM) is a tool in Windows 10 designed for network administrators to modify, prepare, and repair system images. It includes the Windows Setup, Windows Recovery Environment, and Windows PE (WinPE). However, anyone can also use the tool to resolve common issues with the hidden recovery image on your PC.
Usually, when your device is encountering performance problems, doesn’t initiate correctly, or you’re facing troubleshooting bugs. Then you can use the System File Checker tool to detect, scan, and replace faulty or missing system files using the locally available recovery image.
However, when the replacement files reside in the Windows 10 image are corrupted in any way. Then the SFC tool stops working. In this situation, you should try the DISM tool to repair or scan the “install.wim” image, which you can then use with SFC to repair your installation.
In this article, we’ll move you through the instruction to use the SFC or DISM tools via Command Prompt to bring your device back to a healthy working state.
- Run DISM to repair Windows 10 image
- Run SFC to repair issues of Windows 10
Caution: Well these are non-destructive instructions, you’ll be making system modification. You must try to create a temporary full backup before moving further.
Contents
- 1 Use DISM To Fix Windows 10 image
- 1.1 Checking Complexities with DISM using CheckHealth option
- 1.2 Checking problems with DISM via ScanHealth option
- 1.3 Repairing Problems with DISM using RestoreHealth option
- 1.4 Repairing Problems with DISM using WIM image
- 1.4.1 Step 1:
- 1.4.2 Step 2:
- 1.4.3 Step 3:
- 1.4.4 Step 4:
- 1.4.5 Step 5:
- 1.4.6 Step 6:
- 1.4.7 Step 7:
- 1.4.8 Step 8:
- 1.4.9 Step 9:
- 1.4.10 Step 10:
- 1.4.11 Step 11:
- 1.4.12 Step 12:
- 1.4.13 Step 13:
- 1.4.14 Step 14:
- 1.4.15 Step 15:
- 1.4.16 Step 1:
- 1.4.17 Step 2:
- 1.4.18 Step 3:
- 1.4.19 Step 4:
- 1.4.20 Step 5:
- 1.4.21 Step 1:
- 1.4.22 Step 2:
- 1.4.23 Step 3:
- 1.4.24 Step 4:
- 1.4.25 Step 5:
- 1.4.26 Step 6:
- 2 How To Execute SFC To Repair Issues On Windows 10
- 3 Conclusion:
Use DISM To Fix Windows 10 image
After using the Deployment Image Servicing and Management command tool, you have three major choices to repair a Windows 10 image. It includes “ScanHealth,” “CheckHealth,” and “RestoreHealth,” and you wish to run them in that hierarchy order. Also, relying on the issue complexity, there are extra settings that you can use via the “RestoreHealth” option to resolve an image using various sources. You can use DISM to fix windows 10:
Checking Complexities with DISM using CheckHealth option
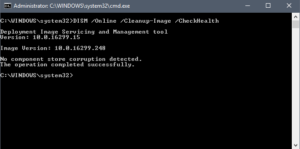
You can also use the CheckHealth option with DISM to instantly determine if there are any errors inside the local image, but the choices can’t perform any repairs.
If you want to check for problems within the image with DISM, use these instructions:
Step 1:
Initially, tap on Start.
Step 2:
Now search for Command Prompt, right-tap the top result, and choose the Run as administrator option.
Step 3:
Enter the following command to perform an instant health check and hit Enter:
DISM /Online /Cleanup-Image /CheckHealth
After you complete the steps, the command will execute and check if there is any data corruption that wants fixing.
Checking problems with DISM via ScanHealth option
You can also execute DISM with the ScanHealth option rather than “CheckHealth” to perform many advanced scans to check if the Windows 10 image has any issue.
If you want to perform an advanced scan with DISM, use these instructions given below:
Step 1:
Initially, open Start.
Step 2:
Look for Command Prompt, right-tap the top result, and choose the Run as administrator option.
Step 3:
Enter the following command to perform an advanced DISM scan and hit Enter:
DISM /Online /Cleanup-Image /ScanHealth
Once you complete the steps, the advanced scan will take a few minutes to check if the local image wants repairing.
Repairing Problems with DISM using RestoreHealth option
If there are still problems, you can then use DISM with the RestoreHealth option, that run an advanced scan and repair any issues automatically.
If you want to repair Windows 10 image issues with DISM, use these steps given below:
Step 1:
Initially, tap on Start.
Step 2:
Look for Command Prompt, right-tap the top result, and choose the Run as administrator option.
Step 3:
Input the following command to repair the Windows 10 image and hit Enter:
DISM /Online /Cleanup-Image /RestoreHealth
After you complete the steps, the DISM tool will connect to the Windows Update servers to download or install and replace any corrupt files in the local image for Windows 10 if required.
Repairing Problems with DISM using WIM image
The Deployment Image Servicing and Management tool is to run into problems, but in some cases that Windows Update is causing issues getting the replacement files or you don’t have a wifi connection. Then you want to use another source to repair the files using another image via Source option.
Before you can set out a different source. You want an install.wim or install.esd file from another PC, bootable installation media, or ISO file. Also, remember that the source of the known good files matches the same model, edition, and Windows 10 language that you’re using on your PC.
Download Windows 10 ISO file:
The method is given below for accessing a good image via Media Creation Tool to download an ISO image of Windows 10.

If you want to download the ISO file of Windows 10, use these steps:
Step 1:
Head over to this Microsoft support website.
Step 2:
Tap the Download tool now button.
Step 3:
Double-tap the MediaCreationToolxxxx.exe file to launch the app.
Step 4:
Tap the Accept button to agree to the terms.
Step 5:
Choose the Create installation media (USB flash drive, DVD, or ISO file) for another PC option.
Step 6:
Tap the Next button.
Step 7:
Then tap the Next button again.
Step 8:
Choose the ISO file option.
Step 9:
Tap the Next button.
Step 10:
Choose the destination for the ISO file.
Step 11:
Tap the Save button.
Step 12:
Tap the link to open the location of the file with File Explorer.
Step 13:
Tap the Finish button.
Step 14:
Double-tap the Windows.iso file to mount the image.
Step 15:
At the bottom of This PC section, in the left pane, just confirm the drive letter for the mounted image.
Once you complete the steps, you can then use Deployment Image Servicing and Management with the “Source” option to repair the Windows 10 local image.
Resolve Windows 10 recovery image
If you want to run the Deployment Image Servicing and Management tool after specifying a different source (install.wim) image, use these instructions given below:
Step 1:
Open Start.
Step 2:
Look for Command Prompt, right-tap the top result, and choose the Run as administrator option.
Step 3:
Input the following command to repair the Windows 10 image and hit Enter:
DISM /Online /Cleanup-Image /RestoreHealth /Source:D:\Sources\install.wim
In the command mentioned above, remember to replace “D” for the letter that reacts to your ISO mount point.
Step 4:
(Mandatory) Type the following command to restrict the use of Windows Update and hit Enter:
DISM /Online /Cleanup-Image /RestoreHealth /Source:D\Sources\install.wim /LimitAccess
Step 5:
(Mandatory) Enter the following variant of the earlier command to fulfill the same task and hit Enter:
DISM /Online /Cleanup-Image /RestoreHealth /Source:wim:D:\Sources\install.wim:1 /LimitAccess
In the command, remember to modify “D:\Sources,” for the path that corresponds to the location of the install.wim file.
After you complete the steps, the command will then scan and repair any problems using the install.wim image that you specified.
Repairing problems via DISM using ESD image
On the other hand, if you have an encrypted install.esd image from a current upgrade, you can then use it to repair the corrupted files.
If you want to run DISM specifying a various source (install.esd) image, use these steps:
Step 1:
Initially open Start.
Step 2:
Look for Command Prompt, right-tap the top result, and choose the Run as administrator option.
Step 3:
Enter the following command to repair the image with an external source and hit Enter:
DISM /Online /Cleanup-Image /RestoreHealth /Source:C:\$Windows.~BT\Sources\install.esd
In the command, remember to modify “C:\$Windows.~BT\Sources,” for the path that corresponds to the location of the install.esd file.
Step 4:
(Mandatory) Input the following command to restrict the use of Windows Update and hit Enter:
DISM /Online /Cleanup-Image /RestoreHealth /Source:C:\$Windows.~BT\Sources\install.esd /LimitAccess
Step 5:
(Mandatory) Input the following command of the earlier command to complete the same task and hit Enter:
DISM /Online /Cleanup-Image /RestoreHealth /Source:esd:C:\$Windows.~BT\Sources\install.esd:1 /LimitAccess
Step 6:
(Mandatory) Enter the following command to use an install.esd file located in another drive and hit Enter:
DISM /Online /Cleanup-Image /RestoreHealth /Source:D:\Sources\install.esd
In the command, remember to modify “D:\Sources,” for the path that reacts to the location of the install.esd file.
After you accomplish the steps, the DISM tool will execute and repair the corrupted files using the files included in the install.esd image. After the process ends, the log files will be saved on %windir%/Logs/CBS/CBS.log and %windir%\Logs\DISM\dism.log capturing any problems found and those that were resolved.
How To Execute SFC To Repair Issues On Windows 10
The steps mentioned above to use DISM will repair any problems with the local hidden image. But they can’t resolve any issues with the actual installation of Windows 10. However, now you have a healthy image, you can then use it with the System File Checker to repair common problems securing your device from running perfectly.
If you want to use the SFC command tool to repair the Windows 10 installation, use these instructions given below:
Step 1:
Tap on Start.
Step 2:
Look for Command Prompt, right-tap the top result, and choose the Run as administrator option.
Step 3:
Enter the following command and hit Enter:
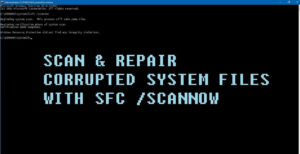
SFC /scannow
Important: When you found errors, you might want to execute the command about three times to remember that everything is fixed properly.
After you complete the steps, the System File Checker then scan your device and repair PC files using the good files from the local image to backup the health of Windows 10.
Conclusion:
Here’s all about ” Use DISM Command Tool To Fix Windows 10 image”. We’re concentrating this article on Windows 10. But also you can use Deployment Image Servicing and Management to service images on Windows 8.1 or Windows 7. But the alternatives available will vary depending on the model that you’re using.
For further queries and questions let us know in the comment section below!
Also Read:


