Mostly, Component Object Model (COM) technology in Windows is used to communicate and take advantage of Windows services for COM+ applications actually. COM technologies will basically include COM+, DCOM, and ActiveX Controls as well. In this article, we are going to talk about ‘The Server Did Not Register With DCOM Within The Required Timeout’ – Fix. Let’s begin!
Some components in Windows may also need to register themselves along with DCOM. If they fail to do that, then you will see this log in the Event Viewer. In the Event Viewer window, you can then also find this log under Windows logs > System along with Event ID 10010:
The server <GUID> did not register with DCOM within the required timeout.
What is DCOM (Distributed Component Object Model)
DCOM is actually a set of concepts and program interfaces that permit a client program object in order to request one or more services from a so-called server program. DCOM is basically derivates from the Component Object Model (COM). That actually makes it possible for client and server apps in order to communicate on the same machine.
A server failing to register along with DCOM because of timeout is quite routine. So the error message can also turn out to be harmless. But, most of the users discover the error in their Event Viewer after a serious symptom just like their hard disk being locked at 100% usage or no sound across all the applications actually.
Pinpointing the exact cause of this issue is not really easy to identify. But, there are a few scenarios that will mostly cause this issue. Here are some of the components that are likely to cause this particular error as well:
- Conflict or miss credentials
- Firewall settings as well
- Conflict DCOM settings for the local machine and app as well
If you guys are currently struggling with this particular problem, just start troubleshooting your issue along with the potential fixes below. Please just follow each and every method in order until you encounter a fix that basically resolves your issue.
‘The Server Did Not Register With DCOM Within The Required Timeout’ – Fix
Via Component Services
- Tap on the Windows + R and put
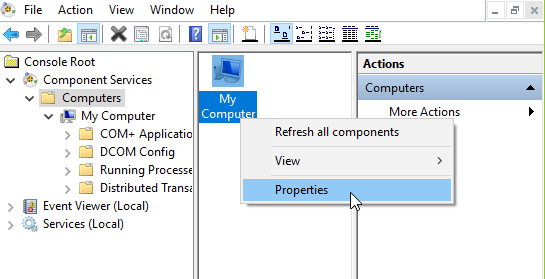
dcomcnfgin the Run dialog box and then tap Enter key in order to open Component Services. - In Component Services, click on Component Services > Computer > right-click on My Computer, and then choose Properties.
- On the property sheet, switch to the COM Security tab. Now under Access Permissions, just tap on Edit Default.
- Now in the Access Permission window, just make sure that you guys have applied correct permission to objects under Group or user names section. Tap on OK.
- So, just repeat step 4 for Launch and Activation Permissions as well.
Via Registry Editor | The Server Did Not Register
- Tap on Windows + R and put
regeditin the Run dialog box in order to open Registry Editor. Tap on OK. - In the Registry Editor window, just tap Ctrl+F and type the GUID you got mentioned in Event Viewer error 10010 as well. You guys will find the resulted registry key as HKEY_CLASSES_ROOT\CLSID\GUID. In the right pane, just copy the AppID registry string (REG_SZ) value actually.
- Again tap on Ctrl+F and type the AppID that you received in the previous step. You’ guys will find the resulted registry key as HKEY_CLASSES_ROOT\CLSID\AppID. Right-click on this AppID registry key and then choose Permissions.

- In the Permissions window, you have to tap on Add.
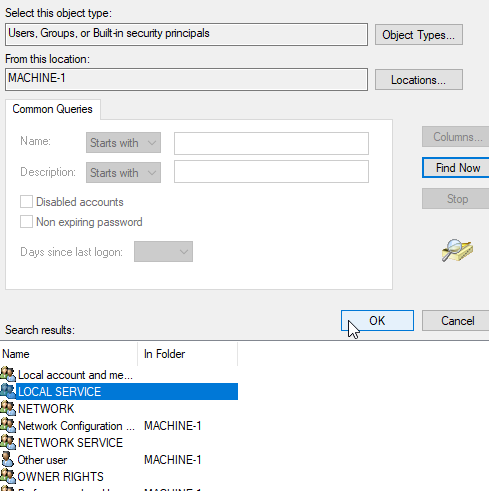
- Then on Select Users or Groups window, tap on Find Now. Choose LOCAL SERVICE and then tap on OK.
- Back in the Permissions window, just choose LOCAL SERVICE and then make sure under Permissions for LOCAL SERVICE. You tick Allow for Full Control as well. Then just tap on Apply followed via OK.
Turn off DCOM from Component Services
Well, if all of the above methods have failed, you can then probably remove the error via turning off Distributed COM in Component Services. However, doing this basically disables communication along with components hosted on other computers. Relying on the software installed on your computer, might or might not affect your system actually.
If your PC is part of a network, the DCOM wire protocol will also be needed to communicate along with components on other computers. All of the Windows-based systems are initially configured to turn on DCOM. Although you can also turn off DCOM, it might not have a beneficial effect on your PC actually.
Note: Use the following procedure in order to disable DCOM and see how your system reacts to it. If you guys find that it does not help you. Or it produces unexpected problems with other applications, reverts to the steps below, and then re-enables DCOM. Moreover, if you turn off DCOM on a remote computer, you will not be able to remotely access the computer again in order to re-enable DCOM. In that case, you guys will have to gain physical access to that PC.
Steps | The Server Did Not Register
- Click on Windows key + R in order to open a Run window. Then type “comexp.msc” and click on Enter to open Component Services.
- In the console tree, you have to navigate to Computer Services > Computers, right-tap on My Computer, and then choose Properties.
- In My Computer Properties, just head to Default Properties, uncheck the box next to Enable Distributed COM on this computer, and then tap on Apply in order to register the changes.
After you guys disable DCOM, reboot your system and monitor Event Viewer for any new occurrences of the “server did not register with DCOM within the required timeout” error. So, in the event that you guys find that some applications are affected via this issue, use the steps above in order to re-enable Distributed COM.
Conclusion
Alright, That was all Folks! I hope you guys like this “The Server Did Not Register” article and also find it helpful to you. Give us your feedback on it. Also if you guys have further queries and issues related to this article. Then let us know in the comments section below. We will get back to you shortly.
Have a Great Day!