
If you guys are facing this issue where your WiFi network is not showing up in the available network list actually. Then you can make sure that the issue is related to corrupt, outdated, or incompatible network drivers as well. To verify this is the issue, just see if you guys are able to connect to your WiFi via another device. And if you were successful then this actually means the problem is true along with your PC network drivers. In this article, we are going to talk about How to Fix WiFi Network Not Showing Up in Windows. Let’s begin!
However, if you guys still can’t connect to your WiFi network then this means the issue with the WiFi modem or router. And you have to replace it to successfully fix the issue. A really simple restart might be able to resolve this issue in many cases, however, it’s worth a try. Anyway, without even wasting any further time let’s now see How you can Fix WiFi Network Not Showing Up on Windows 10 along with the help of the below-listed tutorial.
Contents
- 1 How to Fix WiFi Network Not Showing Up in Windows
- 1.1 Restart your Router
- 1.2 Disable and Enable your NIC (Network Interface Card)
- 1.3 Turn on the Physical Switch for WiFi on Keyboard | WiFi Network Not Showing Up
- 1.4 Enable Wireless Network Related Services
- 1.5 Uninstall Wireless Network Adapter Drivers
- 1.6 Update Network Adapter Driver | WiFi Network Not Showing Up
- 1.7 Run Network Troubleshooter
- 1.8 Delete Wlansvc Files
- 1.9 Perform a Clean Boot | WiFi Network Not Showing Up
- 1.10 Disable Microsoft Wi-Fi Direct Virtual Adapter
- 1.11 Conclusion
How to Fix WiFi Network Not Showing Up in Windows
Restart your Router
- You have to turn off your WiFi router or modem, then just unplug the power source from it.
- Now wait for 10-20 seconds and then again connect the power cable to the router.
- Just switch on the router and again try to connect your device and then see if this Fix WiFi Network Not Showing Up Issue.
Disable and Enable your NIC (Network Interface Card)
- Tap on Windows Key + R and then type ncpa.cpl and click on Enter.
- Right-tap on your wireless adapter and choose Disable.
- Again right-tap on the same adapter and this time select Enable.
- Now restart your and again try to connect to your wireless network and then see if the issue is resolved or not.
Turn on the Physical Switch for WiFi on Keyboard | WiFi Network Not Showing Up
Before moving forward, just make sure WiFi is enabled via the dedicated key on your keyboard. Such as, my Acer laptop has Fn + F3 key in order to enable or disable the WiFi on Windows 10. You have to search your keyboard for the WiFi icon and click on it to enable WiFi again. In many cases it’s Fn(Function key) + F2.
- You have to right-click on the network icon in the notification area and choose “Open Network and Internet settings“.
- Tap on the Change adapter options that are under Change your network settings section.
- Just right-click on your WiFi adapter and select Enable from the context menu.
- Now again try to connect to your wireless network and then see if you’re able to Fix the No WiFi network found the issue.
- If the problem still persists then tap on Windows Key + I in order to open the Settings app.
- Tap on Network & Internet and then from the left-hand menu choose Wi-Fi.
- Next, under Wi-Fi, just make sure to Enable the toggle which will enable the Wi-Fi.
- Now again try to connect to your Wi-Fi network and this time it just might work.
Enable Wireless Network Related Services
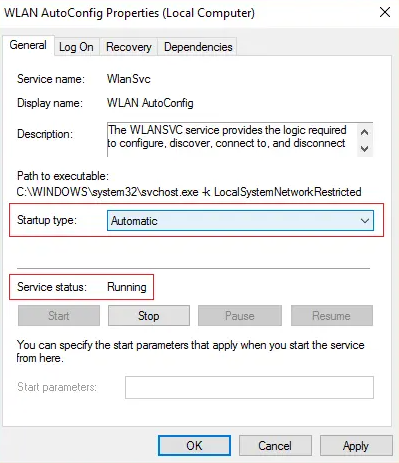
- Tap on Windows Key + R then type services.msc and click on Enter.
- Now make sure the following services are started and then their Startup type is set to Automatic:
DHCP Client
Network Connected Devices Auto-Setup
Network Connection Broker
Also, Network Connections
Network Connectivity Assistant
Network List Service
Also, Network Location Awareness
Network Setup Service
Network Store Interface Service
WLAN AutoConfig
- Just right-click on each of them and choose Properties.
- You have to make sure the Startup type is set to Automatic and then tap on Start if the service is not running.
- Tap on Apply followed via OK.
- You have to reboot your PC to save changes.
Uninstall Wireless Network Adapter Drivers
- Tap on Windows Key + R and then type “devmgmt.msc” and then click on Enter to open Device Manager.
- Now just expand Network Adapters and find your network adapter name.
- Just make sure you note down the adapter name just in case something goes wrong.
- Right-click on your network adapter and then choose Uninstall.
- Now restart your PC and Windows will automatically install the default drivers for the Network adapter as well.
- If you guys are not able to connect to your network then it actually means the driver software isn’t automatically installed.
- Now you have to visit your manufacturer’s website and then download the driver from there.
- Just install the driver and reboot your PC. With reinstalling the network adapter, you guys can get rid out of this WiFi Network Not Showing Up on Windows 10 issue too.
Update Network Adapter Driver | WiFi Network Not Showing Up
- Tap on Windows key + R and type “devmgmt.msc” and click on Enter to open device manager.
- Now expand Network adapters, and then right-click on your Wi-Fi controller(Such as Broadcom or Intel) and select Update Drivers.
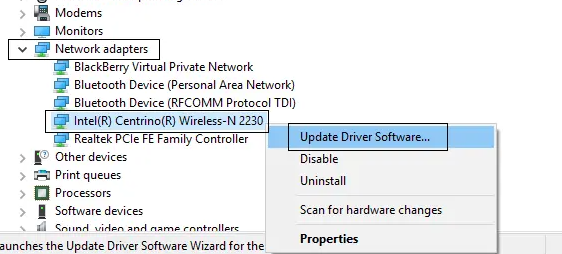
- On the Update Driver Software window, you need to choose “Browse my computer for driver software.“
- Now just choose “Let me pick from a list of available drivers on my computer.“
- Just try to update drivers from the listed versions.
Note: Choose the latest drivers from the list and tap on Next.
- If the above didn’t really work then just head to the manufacturer’s website to update drivers: https://downloadcenter.intel.com/
- Now reboot to apply changes.
Run Network Troubleshooter
- Tap on Windows Key + I in order to open Settings and then tap on Update & Security.
- From the left-hand menu, you have to choose Troubleshoot.
- Now under Troubleshoot tap on Internet Connections and then tap on Run the troubleshooter.
- Just follow further on-screen instructions in order to run the troubleshooter.
- If the above didn’t really fix the issue then from the Troubleshoot window. Then click on Network Adapter and then tap on Run the troubleshooter.
- Now reboot your PC in order to save changes.
Delete Wlansvc Files
- Tap on Windows Key + R and then type services.msc and click on Enter.
- Just scroll down till you guys find WWAN AutoConfig and then right-click on it and select Stop.
- Now again press Windows Key + R and then type “C:\ProgramData\Microsoft\Wlansvc\” (without quotes) and click on Enter.
- Just delete everything (most probably the MigrationData folder) in the Wlansvc folder except for profiles.
- Now, just open the Profiles folder and delete each and everything except the Interfaces.
- Just like that, open the Interfaces folder then delete everything inside it.
- Now close File Explorer, then in services window right-tap on WLAN AutoConfig and choose Start.
Perform a Clean Boot | WiFi Network Not Showing Up
Many times 3rd party software can also conflict with the System and therefore the cause Wifi network not to show up actually. In order Fix WiFi Network Not Showing Up on Windows 10, you have to perform a clean boot on your PC and then diagnose the issue step by step.
Disable Microsoft Wi-Fi Direct Virtual Adapter
- Tap on Windows Key + R and then type devmgmt.msc and click on Enter to open Device Manager.
- Now just expand Network adapters then tap on View and choose Show hidden devices.
- Right-tap on Microsoft Wi-Fi Direct Virtual Adapter and then choose Disable.
- Now just reboot your PC to save changes.
Conclusion
Alright, That was all Folks! I hope you guys like this article and also find it helpful to you. Give us your feedback on it. Also if you guys have further queries and issues related to this article. Then let us know in the comments section below. We will get back to you shortly.
Have a Great Day!


