
Well, in Windows 7 users actually have the option in order to turn off sticky corners. Whenever using more than one monitor, however, it seems just like Microsoft has disabled that feature in Windows 10. Well, the problem is that there is some part of the screen where your mouse cursor will actually be stuck, and the mouse movement is not permitted in that part whenever you are using more than one monitor. This feature is basically called sticky corners. And when users were able to turn off this feature in Windows 7, the mouse could then move freely across the top of the screen between any number of monitors. In this article, we are going to talk about How To Disable Windows 10 Sticky Corners. Let’s begin!
So, windows 10 also got sticky corners where there are actually a few pixels at the top corners of each and every monitor (display) where the mouse cannot really cross over to the many other monitor. One must move the cursor away from this region is to transition to the next display. So without now wasting any further time let’s now see how you guys can actually Disable Sticky Corners in Windows 10 along with the below guide.
Note: In Windows 8.1, 8 and 7 changing the value of the MouseCornerClipLength registry key from 6 to 0 was able to turn off Sticky corners. However, unfortunately, this trick doesn’t really seem to work in Windows 10
How To Disable Windows 10 Sticky Corners
Windows 10 brought a lot of changes to the world of Windows right. Most of these went over quite well along with Windows users, however, some did not. One of the changes that users REALLY didn’t appreciate is the fact that Microsoft actually decided to take the option to turn sticky corners off. Whenever using more than one monitor off away from Windows 10 users. The option was previously present in Windows 7, Windows 8 as well as Windows 8.1. And almost every single Windows user who used more than one monitor loved this feature as sticky corners can be pretty annoying and frustrating. I mean, who won’t be infuriated whenever their pointer simply sticks to one corner for a couple of seconds. That just feels like an eternity when they are trying to move it from one monitor to another.
Steps
Make sure you guys create a restore point just in case something actually goes wrong.
- First of all, you have to tap on Windows Key + I together in order to open Settings and then click on System.
- Then from the left-hand menu, just tap on Multitasking, and in the right window pane. You guys would see a category that is called Snap.
- Now disable the toggle that is under “Arrange windows automatically by dragging them to the sides or corners of the screen” as well.
- Tap on Windows Key + R then type Regedit and click on Enter in order to open Registry Editor.
- Now, in the Registry Editor, you need to navigate to the following key:
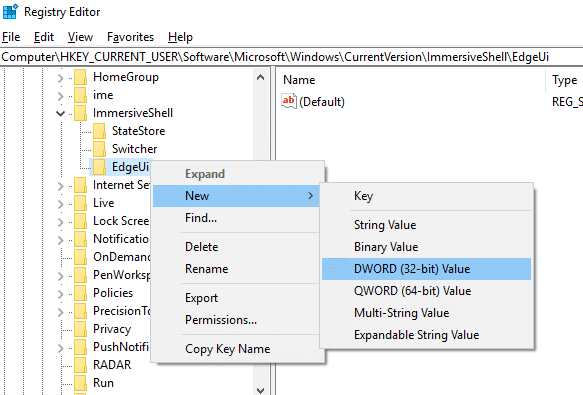
HKEY_CURRENT_USER\Software\Microsoft\Windows\CurrentVersion\ImmersiveShell\EdgeUi
Note: If the EdgeUi key is not really present then right-click on ImmersiveShell then just select New > Key and name it as EdgeUi.
- Now you have to right-click on EdgeUi then choose New > DWORD (32-bit) value.
- You can name this new DWORD as MouseMonitorEscapeSpeed.
- Then double click on this key and set its value to 1 and tap on OK.
- Now just reboot your PC in order to save changes.
Conclusion
Alright, That was all Folks! I hope you guys like this article and also find it helpful to you. Give us your feedback on it. Also if you guys have further queries and issues related to this article. Then let us know in the comments section below. We will get back to you shortly.
Have a Great Day!
Also See: How To Change IMEI Number On iPhone


