Well, it has been more than five years since mainstream support for Windows 7 ended. A lot of computers still run the beloved Windows 7 OS. Surprisingly, as of July 2020, almost 20% of computers running on the Windows operating system also continue to use the older Windows 7 version. Although the latest and greatest by Microsoft, Windows 10, is much more advanced. In terms of features and design, many computer users prevent updating from Windows 7. Because of its simplicity and ability to run smoothly on older systems and less powerful hardware. In this article, we are going to talk about How to Fix Windows 7 Won’t Update. Let’s begin!
But, with Windows 7 nearing its end, new operating system updates are really rare and arrive only when on a blue moon. These updates, usually seamless, can many times be quite a headache to download and install. Windows update service actually has been designed to quietly work in the background. Just download new updates whenever available, install some, and then save others for whenever a PC restart is performed. Although, users across Windows 7,8, and 10 have also reported a number of issues whenever trying to update their OS.
Amidst the challenges of Windows 7 updates, seeking assistance from a proficient website development company can streamline the transition to more modern operating systems like Windows 10, ensuring a smoother experience for users encountering update-related issues.
The most common problem faced is Windows Update gets stuck at 0% whenever downloading the fresh updates or at the ‘searching/checking for updates’ phase as well. Users can also solve these issues regarding Windows 7 updates through implementing one of the below solutions.
Contents
- 1 How to Fix Windows 7 Won’t Update
- 1.1 Restart Windows Update Service
- 1.2 Run the Windows Update Troubleshooter
- 1.3 Check if you guys have Internet Explorer 11 and also .NET 4.7 (Prerequisites for updating Windows 7)
- 1.4 Turn off Windows Firewall
- 1.5 Try to update after a clean boot
- 1.6 Download and install new updates manually
- 1.7 Modify Security Permissions of the SoftwareDistribution Folder
- 1.8 Conclusion
How to Fix Windows 7 Won’t Update
Relying on the root of the issue, a variety of solutions seem in order to resolve the problem for users. The most common and easiest solution is just to run the built-in Windows Update troubleshooter. It is followed via restarting the Windows Update Service. You can also turn off your antivirus program temporarily or perform a clean boot and then just try to download the update. Also, updating Windows 7 needs Internet Explorer 11 and the latest version of the .NET framework installed on your PC. So, first, just check if you have these programs and, if not, just download and install them in order to solve the ‘updates not downloading’ issue. Ultimately and unluckily, if nothing works, then you can always manually download and install the new Windows 7 updates as well.
Restart Windows Update Service
All software update-related activities such as downloading and installing are controlled via the Windows Update service that continually runs in the background. A corrupt Windows Update service can also lead to updates being stuck at 0% download. Just reset the problematic use and then just try downloading the new updates as well. However, the Windows Update troubleshooter performs the same action, doing it manually can also help in resolving the issue.
- Tap on Windows key + R on your keyboard to launch the Run command box. Then type services.msc, and tap on OK in order to open the Services application.
- In the list of local services, just locate Windows Update.
- Choose the Windows Update service and then tap on Restart present on the left (above the service description). As well as right-click on the service and choose Restart from the ensuing context menu.
Run the Windows Update Troubleshooter
Before moving to the advanced and then more cumbersome methods. You should try running the Windows update troubleshooter in order to resolve any issues you might be facing with the updating process. The troubleshooter is also available on all versions of Windows (7,8 and 10). The troubleshooter does a number of things automatically such as restarting the Windows update service. Actually renaming the SoftwareDistribution folder to clear the download cache, as well.
- Tap on the Start button or press the Windows key on your keyboard and search for Troubleshoot. Tap on Troubleshooting to open the program. You guys can also open the same from the Control Panel.
- Now under System and Security, tap on Fix problems with Windows Update.
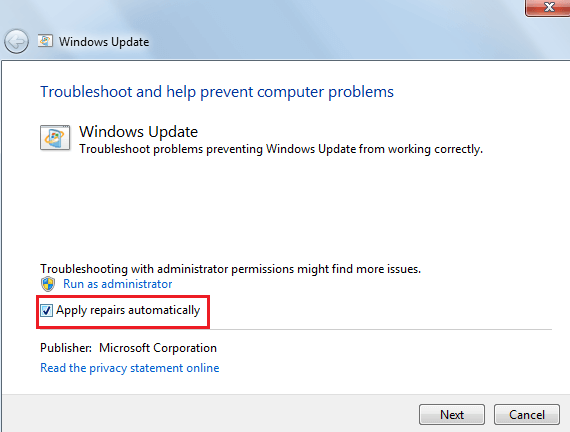
- Tap on Advanced in the following window.
- Just select Apply repairs automatically and finally tap on Next to start troubleshooting.
The Windows Update troubleshooter may also be absent on some computers. They can actually download the troubleshooter program from here: Windows Update Troubleshooter. When downloaded, open the Downloads folder, double-tap on the WindowsUpdate.diagcab file in order to run it. And now follow the on-screen instructions in order to complete the troubleshooting process.
Check if you guys have Internet Explorer 11 and also .NET 4.7 (Prerequisites for updating Windows 7)
In order to update Windows7, your PC needs to have Internet Explorer 11 and also the latest .NET framework. Many times, you guys might be successful in performing an update without even these programs, but, that’s not always the case.
- You have to visit Download Microsoft .NET Framework 4.7 and then just click on the red Download button. In order to start downloading the latest version of the .NET Framework.
- When downloaded, locate the downloaded file and follow the on-screen instructions in order to install it. Also, make sure you have constant internet access whenever installing the .NET framework.
- Now, it is time to enable or check the integrity of the newly installed .NET 4.7 framework.
- Then type Control or Control Panel in the Run command box or Windows search bar and click on enter to open the Control Panel.
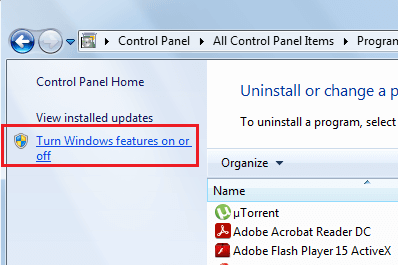
- Just tap on Programs and Features from the list of All Control Panel Items. You guys can adjust the size of the icons to small or big through clicking on the View via the option in order to make looking for an item easier.
- In the following window, click on the Turn Windows feature on or off (that is present on the left.)
Turn off Windows Firewall
Many times, the Windows Firewall itself prevents the new update files from being downloaded. And many users have indeed reported solving the issue via temporarily disabling the Windows Firewall.
- Now just open the control panel and tap on Windows Defender Firewall.
- Then in the following window, choose to Turn Windows Defender Firewall on or off from the left pane.
- At last, click on the radio buttons next to Turn off Windows Defender Firewall (not recommended). That is under both Private and Public Network Settings. Tap on OK to save and exit.
Also, turn off any third-party antivirus/firewall program you might have running, and then just try downloading the updates.
Try to update after a clean boot
Apart from inherent problems along with the Windows Update service. It is also quite possible that one of the many third-party applications you guys have installed on your PC. Might be interfering with the update process as well. If this is indeed the case, you guys can try to install the update after performing a clean boot in which only the essential services and drivers are loaded as well.
- You have to open the system configuration tool via typing MSConfig in the Run command box as well as a search bar and then click on enter.
- Hop over to the Services tab of the MSConfig window and then just tick the box next to Hide all Microsoft Services.
- Now, tap on the Disable All button in order to disable all the remaining third-party services.
- Just switch to the Startup tab and again, tap on Disable All.
- Tap on Apply, followed via OK. Now, restart your PC and then try downloading the new update as well.
If you guys were successful in installing the update, then open the system configuration tool again, and then enable all the services back on. Just like that, enable all the startup services and then restart your PC to boot back normally.
Download and install new updates manually
At last, if none of the above solutions did the trick for you. Then it is now time to take matters into your hands and install the new OS updates manually. The Windows Update service might also be failing to download the latest updates if it needs to be updated.
- Based on your system architecture, just download the 32-bit or 64-bit version of the servicing stack
- Now, open Control Panel (Type control in Run command box and click on OK) and tap on System and Security.
- Tap on Windows Update followed via Change Settings.
- You have to expand the Important Updates drop-down menu and choose ‘Never Check For Updates (Not Recommended)’.
- Tap on the OK button in order to save the changes and perform a computer restart.
- When your computer boots back up, then just head over to the Downloads folder and double-click on the KB3020369 file that you downloaded in the first step. You need to follow all the on-screen instructions in order to install the servicing stack.
- Now, it is time to install the July 2016 update for Windows 7. Again, based on your system architecture, just download the appropriate file, and then install it.
- Then your computer restarts as part of the installation process. Go back to Windows Update in the Control Panel and just change the settings back to ‘Install updates automatically (recommended)’.
Now, tap on Check for updates, and you should not face any problems in downloading or installing them through the Windows Update tool.
Modify Security Permissions of the SoftwareDistribution Folder
You guys also won’t download the Windows 7 updates if the Windows Update service fails. In order to write the information from the .log file at C:\WINDOWS\WindowsUpdate.log to the SoftwareDistribution folder. This failure to report data can also be rectified via allowing Full Control of the SoftwareDistribution folder to the user as well.
- Just open Windows File Explorer (or My PC in older versions of Windows) via double-clicking on its shortcut on the desktop. As well as using the hotkey combination Windows key + E.
- Now just navigate to the following address C:\Windows and then locate the SoftwareDistribution folder.
- Right-click on the SoftwareDistribution folder and choose Properties from the ensuing context menu or choose the folder and click on Alt + Enter.
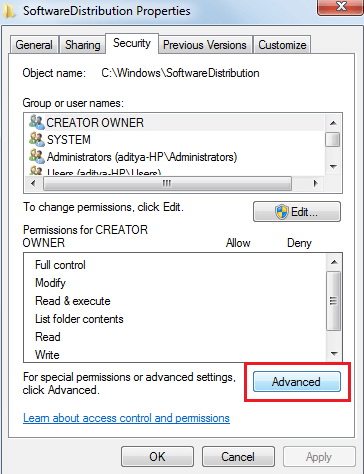
- Just switch to the Security tab of the SoftwareDistribution Properties window and tap on the Advanced button.
- You have to switch to the Owner tab and tap on Change next to the Owner.
- Just Enter your username in the textbox under ‘Enter the object name to select or tap on the Advanced option and then choose your username.
- Tap on Check Names (your username will be verified in a couple of seconds, and then you will be prompted to enter the password if you guys have one set) and then on OK.
- When again, right-click on the SoftwareDistribution folder and choose Properties.
Tap on Edit… that is under the Security tab.
- First, just choose the user name or user group via clicking on it, and then just check the box for Full Control under the Allow column.
Conclusion
Alright, That was all Folks! I hope you guys like this “Windows 7 Won’t Update” article and also find it helpful to you. Give us your feedback on it. Also if you guys have further queries and issues related to this article. Then let us know in the comments section below. We will get back to you shortly.
Have a Great Day!


