
If you guys are working on a system having a huge number of files and you need to search in between the contents of those files. Then this article may interest you as well. In this article, we are going to talk about Windows: Allow Files on this Drive to have Contents Indexed. Let’s begin!
In Windows, the files on a drive can actually be indexed for search in two ways actually. The first way is to index only file properties such as its name, date created, modified, etc. In this way, the search can’t really look for what is inside the file. The second way is actually to index file contents, in addition, to file properties as well. In this way, you guys can use search in order to look for contents inside your files. So whenever the file contents are indexed, it is then quite easier for you in order to look out for something in between your files.
Now the question is how you can configure this setting. Well, there is a simple dedicated UI option that you guys configure independently for almost each of your drives. Here is how you guys can manage the setting as well.
Contents
Windows: Allow Files on this Drive to have Contents Indexed
- First, you have to open File Explorer by pressing Windows + E keys.
- Now just tap on This PC in the left navigation pane. Then in the right pane, right-click on the drive for which you guys want file contents to be indexed, and then choose Properties.
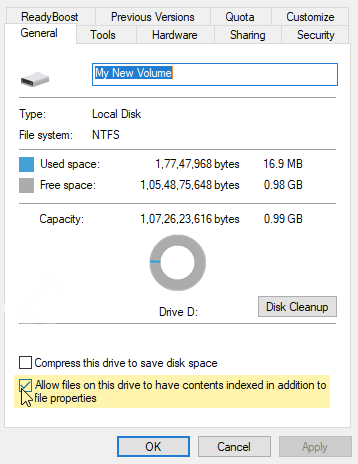
- Well, in the property sheet, on the General tab, just locate the Allow files on this drive to have contents indexed in addition to the file properties option. You guys can check or also uncheck this option in order to enable or disable file contents indexing, respectively. By default, the option is checked as well.
- When you enable or disable the option, you should then receive Confirm Attribute Changes window. In this window, you can also choose if you want to apply indexing change for the drive only. Or you want to apply it to subfolders and also the files as well, along with the drive. Select your relevant option and tap on OK to go ahead.
Only Add Specific Locations | drive to have contents indexed
If you guys just allow the indexing for specific locations, that is now going to help speed up your computer’s performance. If you want to access the indexing options click on the search icon and type indexing options. Tap on the option in order to open it. When you guys are in the indexing options choose the Modify button at the bottom left-hand corner as well.
You guys should now be in indexing locations, now, select the folder you want the files to be saved in or uncheck the ones you guys want to exclude. In order to make programs easier to open, I would recommend that you add the Start menu to your options as well.
Well, thanks to this change, your Windows computer will only look for files in locations actually. For example My Pictures, Downloads, Etc. It will just look for the files in places where you actually search for files.
How Do I Completly Turn Off Indexing | drive to have contents indexed
Well, turning off the indexing has been known in order to cause some issues, however, if it’s something you guys need to do, then here’s how you do it. Open the Control Panel and then select Administrative Tools. Click on the Services option. If you prefer, you can also open Services via typing services.msc in the Run dialog.
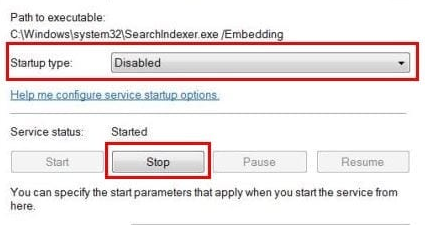
When you’re in Services, then just look for the Windows Search or Indexing Service option. Double-tap on the Windows Search and whenever the new window appears. Just click on the Stop button at the bottom. Don’t forget to modify the Startup Type to Disabled actually.
When you do that with the changes, you’ll have to reboot your computer. Just because you guys have turned Indexing off, it does not really mean that there is no way you guys can perform a search. When you guys do try to look for something, then you’ll just get a message. That tells you that it will be slower because it’s not functioning.
Conclusion
Alright, That was all Folks! I hope you guys like this “drive to have contents indexed” article and also find it helpful to you. Give us your feedback on it. Also if you guys have further queries and issues related to this article. Then let us know in the comments section below. We will get back to you shortly.
Have a Great Day!
Also See: Your Pin is No Longer Available Due to a Change to the Security Settings on this Device