The error “Windows Can’t Communicate along with the Device or Resource (Primary DNS Server)” occurs. Whenever your computer is unable to connect to the primary DNS server set via your internet service provider. This error message pops up in the Network Diagnostics that is run whenever you are unable to connect to the internet. In this article, we are going to talk about Windows Can’t Communicate With the Device or Resource – Fix. Let’s begin!
This error message can be caused via a number of reasons such as your IPv4 or IPv6 settings not configure properly. You running a proxy server, also a conflict along with the network settings, or whenever the DNS server you are trying to access is temporarily unavailable as well. We will go through all the workarounds present via starting along with the simplest one and working our way to more complex solutions as well.
Note: Try to disable proxy servers before you start with the solutions listed here. Also if you are using restricted internet in any institution (college, university as well.). It is best to follow the guidelines given by them like they have their own internet settings as compared to unrestricted internet we actually use in our homes.
Contents
- 1 Windows Can’t Communicate With the Device or Resource – Fix
- 1.1 Use Google DNS
- 1.2 Obtain the DNS server address and IP address automatically
- 1.3 Clear DNS cache and Reset TCP/IP | windows can’t communicate
- 1.4 Uninstall Wireless Network Adapter Drivers
- 1.5 Update your network driver | windows can’t communicate
- 1.6 Edit Windows Hosts file
- 1.7 Disable Intel PROSet/Wireless WiFi Connection Utility | windows can’t communicate
- 1.8 Run CCleaner and Malwarebytes
- 1.9 Changing IPv4 and IPv6 Settings | windows can’t communicate
- 1.10 Conclusion
Windows Can’t Communicate With the Device or Resource – Fix
There are actually three common causes for this error to happen. You either also have outdated network drivers, badly configured settings, or also connection issues to the DNS server you are using. Something a lot of users report is proxy servers causing trouble that can also lead to this error message appearing as well. Before you attempt any of our methods, then try simply disabling your proxy server to see if you guys can gain your internet back.
If you have a restricted internet connection (college, work, public wifi, as well.). It’s best not to mess along with the settings like it can cause the error as well. These connections use different settings and also guidelines than home connections. This can cause conflict in settings, that make you unable to go online.
Use Google DNS
You guys can use Google’s DNS instead of the default DNS set via your Internet Service Provider or also the network adapter manufacturer. This will make sure that the DNS your browser is actually using has nothing to do with the YouTube video not loading. To do that,
- Right-click on the network (LAN) icon at the right end of the taskbar, and tap on Open Network & Internet Settings.
- In the settings app that opens, then tap on Change adapter options in the right pane.
- Right-click on the network you guys want to configure and tap on Properties.
- Tap on Internet Protocol Version 4 (IPv4) in the list and then tap on Properties.
- Now under the General tab, choose ‘Use the following DNS server addresses and then put the following DNS addresses.
Preferred DNS Server: 8.8.8.8
Alternate DNS Server: 8.8.4.4
- At last, click OK at the bottom of the window in order to save changes.
- Reboot your PC and when the system restart, see if you’re able to Fix Windows that can’t communicate with the device or resource.
Obtain the DNS server address and IP address automatically
- Tap on Windows key + R, then type ncpa.cpl and click on enter.
- Now right-click on your WiFi (NIC) and then choose Properties.
- Choose Internet Protocol Version 4 (TCP/Ipv4) and then tap on Properties.
- Make sure in order to checkmark the following options:
Obtain an IP address automatically
Obtain DNS server address automatically.
- Tap on Ok and exit WiFi properties.
- Just reboot to apply changes.
Clear DNS cache and Reset TCP/IP | windows can’t communicate
- Just open Command Prompt. The user can perform this step via searching for ‘cmd’ and then tap on Enter.
- Now type the following command and then tap on Enter after each one:
ipconfig /release
ipconfig /flushdns
ipconfig /renew
- Again, open Admin Command Prompt and type the following, and click on enter after each one:
ipconfig /flushdns
nbtstat –r
netsh int ip reset
netsh winsock reset
- Just reboot to apply changes. Flushing DNS seems to Fix Windows can’t communicate with the device or resource error as well.
Uninstall Wireless Network Adapter Drivers
- Tap on Windows Key + R then type devmgmt.msc and hit Enter in order to open Device Manager.
- Now expand Network Adapters and then find your network adapter name.
- Make sure you note down the adapter name just in case something goes wrong as well.
- Right-click on your network adapter and choose to uninstall.
- If ask for confirmation, then just select Yes.
- Now restart your PC and then try to reconnect to your network.
- If you guys cannot connect to your network, it also means the driver software isn’t automatically installed.
- Now you have to visit your manufacturer’s website and download the driver from there as well.
- Just install the driver and then reboot your PC.
Update your network driver | windows can’t communicate
- Tap on Windows key + R and type devmgmt.msc in the Run dialogue box in order to open the device manager.
- Just expand Network adapters, then right-click on your Wi-Fi controller(Such as Broadcom or Intel) and select Update Drivers.
- In the Update Driver Software Windows, just choose “Browse my computer for driver software.”
- Now choose “Let me pick from a list of device drivers on my computer.”
- Just try to update drivers from the listed versions.
Edit Windows Hosts file
- Tap on Windows Key + Q then type Notepad and right-tap on it in order to select Run as administrator.
- Then click File then choose Open and browse to the following location:
C:\Windows\System32\drivers\etc
- Next, from the file type, choose All Files.
- Then just choose the hosts file and tap on Open.
- Delete each and everything after the last # sign.
- Then File>save then close notepad and also restart your PC.
Disable Intel PROSet/Wireless WiFi Connection Utility | windows can’t communicate
- You have to search for the control panel from the Start Menu search bar and tap on it to open the Control Panel.
- Then tap on Network and Internet > View network status and task.
- Now on the bottom left corner just tap on Intel PROset/Wireless Tools.
- Next, open settings on Intel WiFi Hotspot Assistant and then uncheck “Enable Intel Hotspot Assistant.”
- Tap on OK and reboot your PC in order to save changes.
Run CCleaner and Malwarebytes
- You have to download and install CCleaner & Malwarebytes.
- Run Malwarebytes and then let it scan your system for harmful files. If malware is found, then it will automatically remove them as well.
- Now run CCleaner and then choose Custom Clean.
- Under Custom Clean, just choose the Windows tab and checkmark defaults, and tap on Analyze.
- When Analyze is complete, make sure you’re certain in order to remove the files to be deleted.
- At last, click on the Run Cleaner button and let CCleaner run its course.
- To further clean your system, choose the Registry tab, and make sure the following are checked:
- Tap on the Scan for Issues button and allow CCleaner to scan, and then click on the Fix Selected Issues button.
- When CCleaner asks “Do you want backup changes to the registry?” choose Yes.
- When your backup has completed, then just tap on the Fix All Selected Issues button.
- Now restart your PC in order to save changes.
Changing IPv4 and IPv6 Settings | windows can’t communicate
The Internet Protocol version 4 (IPv4) is actually a protocol for use on packet-switched Link Layer networks (e.g. Ethernet). IPv4 gives an addressing capability of approximately 4.3 billion addresses. The Internet Protocol version 6 (IPv6) is also more advanced and has better features as compared to IPv4. It also has the capability to give an infinite number of addresses.
We will try to change both the settings on your computer and see if this solves the problem. This is the most common workaround to solve this problem and mostly solves the error message instantly.
- Tap on Windows + R, type “control panel” in the dialogue box and click on Enter.
- When in the control panel, tap on on the sub-heading “Network and Internet”.
- Just choose “Network and Sharing Center” from the next window you guys are navigated to.
- There you will find the network to which you guys are connected. Tap on the network present in front of “Connections” as shown in the screenshot below.
- Now tap on “Properties” present at the near bottom of the small window that pops up as well.
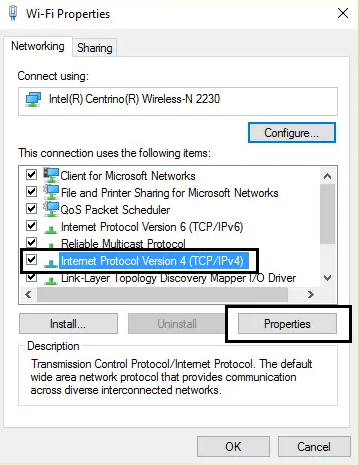
- Double-tap on “Internet Protocol Version 4 (TCP/IPv4)”. Set both the options in order to “Obtain an IP address automatically” and “Obtain DNS server address automatically”.
- Tap OK in order to save changes. Now click on “Internet Protocol Version 6 (TCP/IPv6)” perform the same steps as mentioned in the earlier step.
- Tap on OK to save changes and exit. Now just check if you can connect to the internet successfully.
Conclusion
Alright, That was all Folks! I hope you guys like this article and also find it helpful to you. Give us your feedback on it. Also if you guys have further queries and issues related to this article. Then let us know in the comments section below. We will get back to you shortly.
Have a Great Day!
Also See: How do New Technologies Help Students Cope with Social Problems?