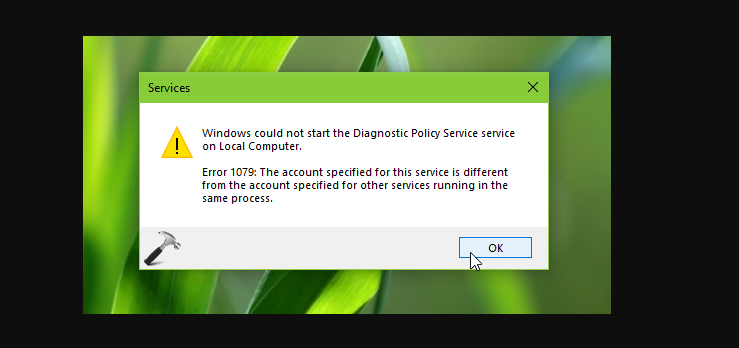
Do you want to fix Windows 7 error 1079? Error 1079 is a type of Runtime error that is found in the MS Windows OS. However, the file can be found for Windows 7.
Contents
- 1 Errors
- 2 Steps To Fix Windows 7 Error 1079
- 2.1 Reinstall Windows 7
- 2.2 Erase Registry Entry
- 2.3 Make Sure Junk Is Not Causing The Issue
- 2.4 Resolve Infections & Remove Malware From Your Computer
- 2.5 Return To The Past To Remove Error 1079
- 2.6 Error 1079 Occurs Due To Outdated Drivers
- 2.7 Call Windows System File Checker Into Action
- 2.8 Error Occur Due To Corrupted RAM:
- 2.9 Hard Drive Causes Issues:
- 2.10 Refresh OS To Remove Persistent Error:
- 2.11 Conclusion:
Errors
This guide contains information on Error 1079 or alternatively known as Windows 7 Error 1079. Errors like Windows 7 Error 1079 show your machine offers corrupt software/hardware that can be resolved when possible. Come let’s check how to fix Error 1079 and get your PC back to normal.
Errors Indication:
- When your PC locks up or freezes at random.
- When your system crashes when you are executing Windows 7.
- If Windows 7 Error 1079 appears and causes a program to turn off or your PC to crash.
- Your PC is executing slow, taking too much time to boot up, and you suspect Error 1079 by Windows 7 is the main cause.
Runtime Errors Causes:
There are many causes of runtime errors such as Windows 7 Error 1079, like viruses, outdated drivers, missing folders or files, poor or incomplete installation, and registry errors. Also, they occur because of an issue with the PC’s memory, which might often be because of hardware issues. In some situations, there was an issue installing Windows 7 and the occurrence of an error.
Also See: How To Fix Windows 10 Reference Token Error
Steps To Fix Windows 7 Error 1079
Follow the instructions to fix the Error 1079 problem. If you wish to ignore these instructions as they are too time-consuming or you are not a PC expert, check our simpler solution below.
Reinstall Windows 7
If the error occurs because of Windows 7, you might want to try reinstalling it and check if the issue is resolved. Please follow these instructions:
- Tap “Start Menu”.
- Then tap “Control Panel”.
- Tap “Uninstall a Program” which is under the “Programs” header.
- Now look for the Error 1079 associated program.
- Right-tap on it and choose “Uninstall”.
- The uninstaller that appears will give you instructions. Simply tap “okay” or “next” or “yes” until it ends.
- Reinstall the software and then execute the program.
Erase Registry Entry
- Take a proper backup of all registry files.
- Tap “Start”.
- Input regedit, choose it and allow permission to proceed further.
- Tap HKEY LOCAL MACHINE>>SOFTWARE>>Microsoft>>Windows>>Current Version>>Uninstall.
- Check the Windows 7 Error 1079 software from the list you like to uninstall.
- Choose the software and double-tap the UninstallString icon located on the right side.
- Now Ctrl+C the highlighted text.
- Exit and move to the search field.
- Then paste the data that you copy earlier.
- Choose Okay just to uninstall the program.
- Reinstall the software.
Make Sure Junk Is Not Causing The Issue

Any space that is not cleaned out regularly or on daily basis tends to accumulate junk. Your personal PC is no exception. Installation of applications, constant web browsing, and also browser thumbnail caches slow down your PC and in the absence of enough memory, can also trigger a Windows 7 Error 1079 error.
So how do you get rid of this issue?
- Simply use Disk Cleanup Tool.
- Or else you can use a hard drive clean up solution that does a good job and flushes the temporary files from your computer.
Both fixes may take a few minutes to complete your system data processing if you can’t conduct a clean up in a while. The browser caches fill up very fast. Come let’s check how you can execute the Window’s Disk Cleanup Tool, without performance issues or surprises.
- For Windows 7 and Windows XP, you can run a program from “Start” and from the “Command Prompt”.
- Tap “Start”, head over to All Programs > Accessories > System Tools, click Disk Cleanup. Then select the type of files you like to erase, tap OK, followed by “Delete Files”.
- Head over to the Command Prompt. Then input “c:\windows\cleanmgr.exe /d” for XP and “cleanmgr” for Windows 7. Finish after hitting “Enter”.
- For Windows 8/8.1, the Disk Cleanup Tool can directly be accessed from “Settings”. Simply tap “Control Panel” and then “Administrative Tools”. You can also choose the drive that you like to execute the clean u. Choose the files you like to get rid of and then tap “OK” and “Delete Files”.
- For Windows 10, the process is further simplified. Enter Disk Cleanup directly in the search bar and hit “Enter”. Then select the drive and then the files that you like to wipe. Tap “OK”, followed by “Delete Files”.
Also See: How To Fix 0x80071771 Error On Windows 10
Resolve Infections & Remove Malware From Your Computer
How do you measure if your PC is infected with virus or malware?
Well, for one, you might find some app misbehaving. And you might view the occurrence of Error 1079. Infections and viruses are the results of:
- Internet browsing through open or unencrypted public Wi-Fi connections
- Downloading apps from unwanted and untrustworthy sources
- Intentional planting of malware in your office or home networks
What to do?
- Input “safe mode” after hitting the F8 key repeatedly whenever your device is restarting. Select “Safe Mode with Networking” from the Advanced Boot Options menu.
- Restore all the data in your device to a proper location. The storage unit is not connected to your existing network.
- Simply leave program files as it is. They are where the viruses generally spread from and might have been compromised.
- Execute a full-system scan or view an on-demand scanner. If you already have an anti-malware or antivirus program installed, let it do the system scanning.
- Restart your PC when the process executes its course.
- At last, modify all your passwords and update your OS and drivers.
Return To The Past To Remove Error 1079
The instructions mentioned above until this point in the guide should have resolved Windows 7 Error 1079 error.
Windows devices provide the ability to travel back in time and back up system settings to an error-free state. Y9ou can do this through the best or suitable “System Restore” program. The good thing about the process is the fact that System Restore can’t affect your personal data. You don’t need to take proper backups of pictures or songs on your hard drive.
- Head over to “Control Panel” and then tap on “System & Security”.
- Select the option “System”.
- Head over to the left modal, tap on “System Protection”.
- You can then view the System Properties window. You’ll be able to view the option “System Restore”. Tap on it.
- Move with “Recommended restore” for the path of least surprises or hassles.
- Select a system restore point that guarantees to take your device back to the time when Error 1079 occurs.
- Click “Next” and wrap up after tapping “Finish”.
After using Windows 7 OS, you can simply reach “System Restore” after following the path Start > All Programs > Accessories > System Tools.
Error 1079 Occurs Due To Outdated Drivers

Updating a driver is not as easy as updating your OS or an app used to execute front-end interface tasks. Whenever you detect a Windows 7 Error 1079 error, simply update your drivers may be a good bet. But it is time-wasting and can’t be viewed as a quick fix.
Here’s the complete process you can move through to update drivers:
- Head over to the hardware maker site for the new models of all the drivers you want. Install and extract them. To install an incompatible driver causes lots 0f issues than it can ever fix.
- Head over to the “Device Manager” from the Control Panel.
- Move through the different hardware component groupings and select the ones you want to update.
- On Windows 10 or Windows 8, right-tap on the hardware icon you want to update and then tap “Update Driver”.
- On Windows Vista and 7, simply right-tap the hardware icon, choose “Properties”, navigate to the Driver panel, and then click “Update Driver”.
- Then you can allow your device to automatically search for the compatible drivers, or you can select to update the drivers from the models you have on your hard drive. When you have an installer disk, then the latter should be your preferred course of action. The former might often get the driver selection incorrect.
- You might want to navigate a host of warnings from the Windows operating system whenever you finalize the driver update. These include “Windows can’t verify the publisher of this driver” and “Windows can’t verify that the driver is compatible”. If you know that you have the correct one in line, tap “Yes”.
- Restart your PC and hopefully the Windows 7 Error 1079 error should be fixed.
Also See: How To Troubleshoot Printer Error 0x80040003 – Tutorial
Call Windows System File Checker Into Action
If you still face the issue then head over to the Windows File Checker option.
Using the Windows File Checker, you can simply audit all the system files your device wants to operate, then locate missing ones, and back up them. It is just like “System Restore”, but not quite. The System Restore can take you back in time to the perfect setup of your system files. The File Checker is very exhaustive.
- Initially open up an elevated command prompt.
- Then, if you are using Windows 8, Windows 8.1, or Windows 10, input “DISM.exe /Online /Cleanup-image /Restorehealth” into the window and hit Enter.
- The process of executing the Deployment Image Servicing and Management (DISM) tool might take a few minutes.
- When it completes, input the following command into the prompt “sfc /scannow”.
- Now your device moves through all protected files and if it detects an anomaly, it will simply replace the compromised variant with a cached version that resides at %WinDir%\System32\dllcache.
Error Occur Due To Corrupted RAM:
If nothing works then diagnosing your RAM may be the best option.
You can simply use the Windows Memory Diagnostics Tool to get the job done. Users who are using Mac or Linux can use memtest86.
- Head over to your device and move straight to the “Control Panel”.
- Then tap on “Administrative Tools”.
- Select “Windows Memory Diagnostic”. It burns an ISO image of your RAM and boots the PC from this image.
- The process takes a few minutes to complete. Once it is done, the “Status” field under the screen populates with the diagnosis result. If there are no problems using your RAM/memory, you’ll then view “No problems have been detected”.
One disadvantage of the Windows Memory Diagnostic tool pertains to the total passes it executes and the RAM segments it analyzes.
Hard Drive Causes Issues:
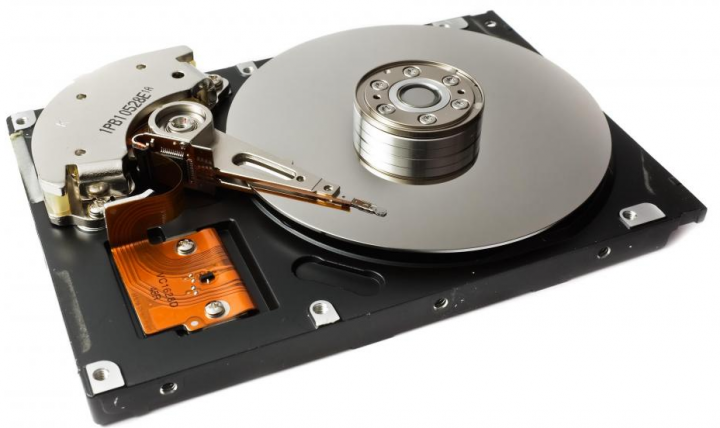
Your RAM or working memory is not the main issue culprit that might precipitate a Windows 7 Error 1079 error. The device’s hard drive also warrants close inspection.
The indication of hard drive error and corruption span:
- System crashes and the Blue Screen of Death (BSoD).
- Performance problems such as excessively slow responses.
- Errors like Error 1079.
Hard drives are very powerful, but they don’t last forever.
You must do three things to diagnose the health of your permanent memory.
- Simply remove the possibility after connecting your drive to another device and looking for the recurrence of the issue. If nothing happens, your drive is perfectly well.
- Collect S.M.A.R.T data after using the WMIC (Windows Management Instrumentation Command-line) in the command prompt. If you want to do this, just input “wmic” into the command prompt and hit Enter. Then follow it up with “diskdrive get status”. The S.M.A.R.T status reading is a reliable sign of the longevity of your drive.
- Resolve what’s corrupt. Let’s suppose you can find that all is not well using your hard drive.
- Head over to the command prompt. Make sure that you are in Admin mode.
- Input “chkdsk C: /F /X /R” and hit “Enter”. Here “C” is the drive letter and “R” recovers data, if possible, from the bad sectors.
- Allow the system to restart when the prompt appears.
- That’s all about it
Also See: How To Fix Runtime Broker Issues
Refresh OS To Remove Persistent Error:
The Windows Refresh is to reinstall your Windows operating system, but without touching your confidential data.
- Head over to the “Settings” of your computer and then tap on “Change Settings”.
- Tap “Update and recovery” and then select “Recovery”.
- Choose “Keep my files”. This eliminates apps and settings but allows your personal files to live on.
- You’ll then receive some warning messages about the apps that will be uninstalled. If you are moving through a recent OS upgrade, then the Refresh process makes it so that you can’t move back to your earlier OS version.
- Tap the “Refresh” button.
In case, if you are using an older variant of Windows that doesn’t come with the power to “Refresh”?
Maybe it is time to start from scratch.
- Input your BIOS set-up.
- This is where you want to modify your PC’s boot order. Make it so that the boot happens not from the existing system files, but from the CD/DVD Drive.
- Then add the original Windows disk to the CD/DVD drive.
- Enable or restart the device.
- Select where you would like the system files to be installed.
- Your computer will restart many times when the process executes its course.
That’s all about it!
Conclusion:
That’s all about it. Here I have mentioned the solutions to fix Windows 7 Error 1079. If you have any sort of suggestions, queries, or questions then let us know in the below comment section.
Also Read:


