Beginning Dump of Physical Memory is actually a Blue Screen Of Death (BSOD) Error that is a Stop error. That means you guys won’t be able to access your system. Each and every time your restart your PC you will be in this BSOD error loop and the main problem is that you guys won’t be able to access any data or files present on the system. In this article, we are article, we are going to talk about Dumping Physical Memory to Disk Error. Let’s begin!
Physical Memory Dump Error basically looks something like this:
Beginning dump of physical memory
Physical memory dump complete.
Contact your system administrator or technical support group for further
assistance.

OR

Collecting data for crash dump
Initializing disk for crash dump
Beginning dump of physical memory
Dumping physical memory to disk: 5
A memory dump is basically a process in which the contents of memory are displayed and also saved in case of an application as well as system crash. Well, these are the possible reasons for Physical Memory Dump error: corrupted system files, damaged hard disk, corrupted RAM, compatibility of hardware and software as well.
Dumping Physical Memory to Disk Error
Run System File Checker (SFC) and Check Disk (CHKDSK)
- Just head to the command prompt, and then tap on the command prompt in the Advanced options screen.
- Then type the following command in cmd and then click on enter after each one:
sfc /scannow /offbootdir=c:\ /offwindir=c:\windows
chkdsk c: /r
Note: Make sure you guys use the drive letter where Windows is currently installed
- Now exit the command prompt and then restart your PC.
Run Windows Diagnostics
You have to run Windows Diagnostic in order to make sure that you’re hardware isn’t faulty. There is also a chance that your hard disk might be damaged as well as corrupted. And if that’s the case then you have to replace your previous HDD or SSD along with a new one and install Windows again. However, before running to any conclusion, you guys must run a Diagnostic tool in order to check if you really need to replace HDD/SSD actually.
In order to run Diagnostics restart your PC and as the computer starts (before the boot screen). Tap on the F12 key and whenever the Boot menu appears, just highlight the Boot to Utility Partition option. As well as the Diagnostics option and click on enter to start the Diagnostics. This will automatically check all the hardware of your system and will also report back if any issue is found.
Run Startup/Automatic Repair | dumping physical memory to disk
- Just insert the Windows 10 bootable installation DVD and now restart your PC.
- Whenever prompted to click any key in order to boot from CD or DVD,tap on any key to continue.
- Choose your language preferences, and then tap on Next. Click Repair your PC in the bottom-left as well.
- To choose an option screen, just tap on Troubleshoot.
- On Troubleshoot screen, you need to click on the Advanced option.
- On the Advanced options screen, just tap on Automatic Repair or Startup Repair.
- Now, wait until the Windows Automatic/Startup Repairs are complete.
- Just restart and you have successfully Fix Physical Memory Dump Error, if not, then continue.
Run CCleaner to fix Registry errors
- You have to download and install CCleaner.
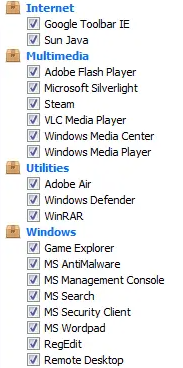
- Now just run CCleaner and in the “Cleaner” section, that is under the Windows tab, we suggest checking the following selections to be cleaned as well:
- When you guys have made certain the proper points are checked, then just simply tap on Run Cleaner, and let CCleaner run its course.
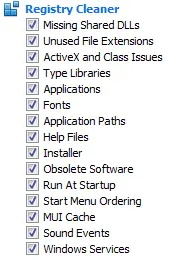
- In order to clean your system further, just choose the Registry tab and make sure you guys check the following:
- Choose Scan for Issue and permit CCleaner to scan, and then click on Fix Selected Issues.
- Whenever CCleaner asks “Do you want backup changes to the registry?” then chooseYes.
- When your backup has completed, then choose Fix All Selected Issues.
- Now restart your PC and you guys may be able to Fix the Physical Memory Dump Error.
Run Memtest86+ | dumping physical memory to disk
Now just run the Memtest86+ that is a 3rd party software, however, it eliminates all the possible exceptions of memory errors. Like it runs outside of the Windows environment as well.
Note: Before starting, make sure you guys have access to another computer since you will have to download and burn the software to the disc as well as a USB flash drive. It’s best to leave the computer overnight whenever running Memtest as it is sure is likely to take some time.
- You can just connect a USB flash drive to your system.
- Just download and install Windows Memtest86 Auto-installer for USB Key as well.
- Then right-click on the image file which you guys just downloaded and choose the “Extract here” option.
- When extracted, open the folder and then run the Memtest86+ USB Installer.
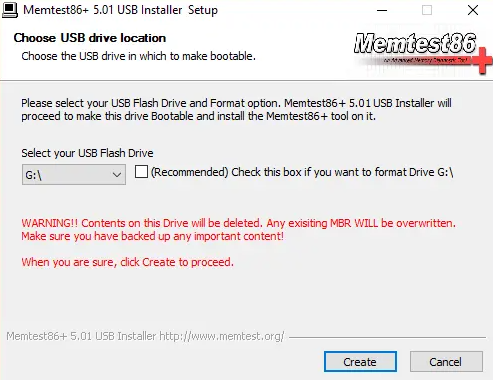
- Select your plugged-in USB drive in order to burn the MemTest86 software (This will basically format your USB drive).
- When the above process is finish, just insert the USB to the PC which is providing the Physical Memory Dump Error.
- Just restart your PC and make sure that boots from the USB flash drive you select as well.
- Memtest86 will now begin testing for memory corruption in your system actually.
- If you guys have passed all the tests then you can make sure that your memory is working correctly.
- Also, if some of the steps were unsuccessful and then Memtest86 will find memory corruption. That means that your Physical Memory Dump Error blue screen of death error is due to bad/corrupt memory.
- In order to Fix the Physical Memory Dump Error, you will have to replace your RAM if bad memory sectors are found actually.
Repair Install Windows 10
This method is basically the last resort because if nothing works out then this method will surely repair all problems along with your PC. Repair Install just using an in-place upgrade in order to repair issues along with the system without deleting user data present on the system.
Conclusion
Alright, That was all Folks! I hope you guys like this article and also find it helpful to you. Give us your feedback on it. Also if you guys have further queries and issues related to this article. Then let us know in the comments section below. We will get back to you shortly.
Have a Great Day!
Also See: How to Download BLOB Video – User Guide