Well, 0xc00007b “the application was unable to start correctly”. This error code basically represents that there is something corrupted within your Windows files or a DLL file from your application files is missing as well. This error is really common if you guys are downloading something from an unauthorized source. A lot of Anti-virus engines also delete the DLLs and block the app from running if they detect something suspicious as well. In this article, we are going to take about How to Fix Application Error 0xc000007b – User Guide. Let’s begin!
This error code can also be triggered if guys don’t have the correct redistributables installed on your PC. This can be really confusing as if you are trying to run a 32-bit application and also you don’t have 32-bit DLLs. Then you will have problems running that application. In that case, you guys will have to install all the VC runtimes.
In this article, we will also show you some solutions that you can try in order to fix the 0xc00007b error code yourself. We have tried our best to collect the best working methods for you and placed them in a really simpler manner. All the Methods start from simple to advanced actually.
Contents
- 1 How to Fix Application Error 0xc000007b – User Guide
- 1.1 Run The Program As Administrator
- 1.2 Run the application in Compatibility mode
- 1.3 Reinstall your application
- 1.4 Update .NET Framework
- 1.5 Reinstall DirectX | 0xc000007b
- 1.6 Hard Disk Error Checking
- 1.7 Reinstall the affected application | 0xc000007b
- 1.8 Replace 32-bit xinput1_3.dll with an appropriate version
- 1.9 Reinstall the Microsoft Visual C++ Redistributable
- 1.10 Update Windows | 0xc000007b
- 1.11 Conclusion
How to Fix Application Error 0xc000007b – User Guide
Before making any changes to the system, you have to make sure to create a restore point, just in case something goes wrong.
Run The Program As Administrator
Right-click on your application and then select “Run as administrator“. Sometimes giving administrative privileges to the application might also solve this problem. If giving administrative privileges solves this problem then you might always consider running your application along with it.
To do this, just right-click on the application icon and then tap on Properties. Choose the Compatibility tab, and then check “Run this program as an administrator.“
Run the application in Compatibility mode
Many times running the application in compatibility mode can fix Application Error 0xc000007b as it might be possible. That the application is not compatible along with the newer version of windows. Let’s see how you can do this:
- Right-tap on the application icon and then tap on Properties.
- Just choose the Compatibility tab and then tap on “Run compatibility troubleshooter.“
- And then click on “Try recommended settings” after which you guys can either test your application or just hit next.
- And if the above didn’t work out for you then you guys could manually select compatibility mode and from the drop-down select “Windows XP.“
Reinstall your application
Uninstall the application and then again install it, however, before that, you must follow this:
- Install the application to the system partition (C:) as the application may return an error if installed on a logical partition as well.
- You have to make sure to turn off your antivirus program before the installation. [Note: Scan your program file before turning off your antivirus as well]
Update .NET Framework
.NET Framework can also be the cause of this error message in just a number of cases. So, updating the .NET Framework to the latest version might also wipe out the error.
In order to install .NET Framework, just head to Control Panel > Programs and Features and then tap on Turn Windows features on or off. It will open a new window along with a list of Windows features. Tap on the .NET Framework 3.5 and click on OK. It will then start the download and after the installation, and your PC would restart along with the error fixed up.
Reinstall DirectX | 0xc000007b
In order to prevent 0xc000007b Application Error, you guys should always make sure to update your DirectX. The best way in order to make sure you guys have the latest version installed is to download DirectX Runtime Web Installer from Microsoft’s official website as well.
Hard Disk Error Checking
Well, if none of the solutions listed and described above work for you. Then you guys might want to try running CHKDSK in order to scan your computer’s Hard Drive for problems. You guys can fix any that are found since Hard Drive issues can also cause this problem. In order to run CHKDSK, you guys have to:
To Fix Application Error 0xc000007b you should just regularly check your hard disk for errors. All you have to do is just follow these steps:
- Right-tap on the start button and then choose “Command prompt (Admin).“
- Then type chkdsk c: /f /r and click on enter.
- It will ask then you to schedule the scan as the C drive is in use, now type Y to schedule the scan, and click on enter.
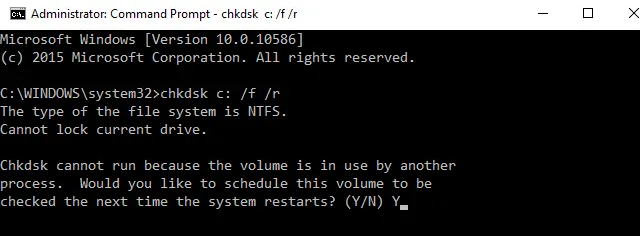
Now, whenever you restart the windows it will then check the disk during system restart and this will surely Fix Application Error 0xc000007b as well.
Reinstall the affected application | 0xc000007b
There is actually a slight chance that you are suffering from this problem. Since something went wrong during the installation of the affected application and it was not installed successfully. If that’s what happened, your only shot at fixing the problem is just reinstalling the affected application, and in order to do that, you guys need to:
- You can navigate to Control Panel > Programs > Programs and Features > Uninstall a program
- Then locate and right-click on the affected application, and then tap on Uninstall.
- Just head through the uninstallation wizard to uninstall the application.
- When the application has been uninstalled, just restart your computer.
- Whenever your computer boots up, then just reinstall the affected application.
- Also, when the affected application has been successfully reinstalled, then try to run to check whether or not the problem has been fixed too.
Replace 32-bit xinput1_3.dll with an appropriate version
0xc000007b Application Error occurs whenever the xinput1_3.dll file actually becomes corrupted as well as overwritten with another version that happens to be incompatible. In order to replace 32-bit xinput1_3.dll with an appropriate version, just follow these steps:
- You can download the 32-bit xinput1_3.dll file and extract it.
NOTE: Before doing anything, you guys should first backup your original xinput1_3.dll file. (That should be located here: C:\Windows\SysWOW64) and if something didn’t go as planned, then you can always restore it back.
- You can just copy the extracted xinput1_3.dll file then go to C:\Windows\SysWOW64 and then paste the file there.
- If prompted, then the option copy and replace.
Reinstall the Microsoft Visual C++ Redistributable
As stated before, this issue is mostly caused via a problem along with Microsoft Visual C++. If an issue with Microsoft Visual C++ is actually the culprit in your case. Then simply uninstalling the Microsoft Visual C++ Redistributable installed on your PC and then reinstalling it should get rid of the problem. In order to do that, you have to:
- First, just navigate to Control Panel > Programs > Programs and Features > Uninstall a program
- Then locate and right-click on the Microsoft Visual C++ Redistributable – x86 (if your PC has a 32-bit Operating System) as well as the Microsoft Visual C++ Redistributable – x64 (if your computer has a 64-bit Operating System), and then tap on Uninstall.
- Head through the uninstallation wizard in order to uninstall the redistributable(s).
- When the redistributable(s) have been uninstalled, now just restart your computer.
- You can download the installer for the Microsoft Visual C++ Redistributable – x86 from here. (if your PC has a 32-bit Operating System) as well as the installer for the Microsoft Visual C++ Redistributable – x64 from here (if your PC actually has a 64-bit Operating System).
Note: If you guys uninstalled both versions of the Redistributable from your computer, then just download the installers for both of them. - When the installer has been downloaded, then run it and go through it to install either version of the Redistributable. If you guys had to download the installer for both the Redistributables, just run both of them one by one.
When done, then just restart your computer and, when it boots up, check to see if or not the issue still persists.
Update Windows | 0xc000007b
In many cases, updating Windows to the latest version might fix this issue. Thus, in this step, we are checking for updates. For that:
- Tap on the “Windows” + “I” buttons simultaneously in order to open settings.
- In settings, you have to click on the “Update and Security” options and choose “Windows Update” from the left pane.
- Tap on the “Check for Updates” option and then let windows check and download any updates.
- When the updates are downloaded, then just tap on the “Install” option in order to install them on your computer.
- After this, you can also check to see if the issue persists.
Conclusion
Alright, That was all Folks! I hope you guys like this article and also find it helpful to you. Give us your feedback on it. Also if you guys have further queries and issues related to this article. Then let us know in the comments section below. We will get back to you shortly.
Have a Great Day!
Also See: How to Fix A Required Privilege is Not Held by the Client Error