Partition types, or as Apple refers to them, partition schemes, define how the partition map is actually organized on a hard drive. Apple directly supports three different partition schemes: Apple File System (APFS), Mac OS Extended, and also MS-DOS (FAT)\ExFAT. With all the three different partition maps available, that one should you use when you format or partition a hard drive? In this article, we are going to talk about Guid Partition Map – Apple Partition Types. Let’s begin!
Contents
What Is a Partition?
The fixed-sized subset of a disk drive treated as an individual unit by the operating system (in our case macOS) is actually defined as a partition. On each and every drive, there are multiple partitions, and for this, you will need a partition table or partition map. That is maintained by the operating system to detail the status of the partitions as well.
GUID Partition Map
This is actually a standard for the layout of the partition table on a storage disk through using globally unique identifiers (GUIDs). As a part of the Unified Extensible Firmware Interface (UEFI) standard, GUID is actually a bootable standard for systems with EFI firmware. Such as macOS. Non-Intel Macs won’t support this bootable standard, thus the only option available to them is the Apple Partition Map (APM) actually.
Apple Partition Map
Used on disks formatted for use with 68k and PowerPC Macs, the Apple Partition Map is actually the scheme that defines how the data is organize. Starting with OS X Tiger, both APM and GUID partitions we can use to access volumes. However, PowerPC-based Macs can only boot from APM disks. While Intel-based Macs generally boot from a GUID Partition Table as well. They are all able to start the operating system from APM and also Master Boot Record (MBR) through using the BIOS-Emulation called EFI-CSM.
Understanding Partition Schemes | guid partition map
Apple File System (APFS): The primary file system used by macOS 10.13 or later also. It is actually the default file system for macOS. There are many types of APFS.
- APFS: Uses the APFS format.
- APFS (Encrypted): Uses the APFS format and also encrypts the partition.
- APFS (Case-sensitive): Uses APFS format and also has case-sensitive folders and filenames.
- APFS (Case-sensitive, Encrypted): Uses APFS format, has case-sensitive folders and files names, and encrypts the partition as well.
Mac OS Extended: This file system is used by macOS 10.12 or earlier also. Within Disk Utility, it has also 4 different modes as well.
- Mac OS Extended (Journaled): Uses the Mac format Journaled HFS Plus to safeguard the integrity of the hierarchical file system (HFS) as well.
- Mac OS Extended (Journaled, Encrypted): Uses the Mac format, encrypts the partition, and needs a password.
- Mac OS Extended (Case-sensitive, Journaled): Uses the Mac format and also has case-sensitive folders.
- Mac OS Extended (Case-sensitive, Journaled, Encrypted): Uses the Mac format, has case-sensitive folders, encrypts the partition, and needs a password as well.
MS-DOS (FAT) and ExFAT: These are file systems use along with Microsoft Windows.
- ExFAT: This is used for Windows volumes that are 32 GB or less in size as well.
- MS-DOS (FAT): This is used for Windows volumes that are more than 32 GB in size.
Selecting and Changing the Partition Scheme | guid partition map
- Open the Disk Utilities, located at Go > Utilities.
- In the list of devices, choose the hard drive or device whose partition scheme you want to change. Make sure to select the device and not any of the underlying partitions that may be listed.
- Choose Partition. Disk Utility will show the volume scheme currently in use.
- Choose the + (Plus sign) that is under the volume graphic.
- Select Format in order to select one of the available schemes.
- Then enter a name for your new partition in the Name field.
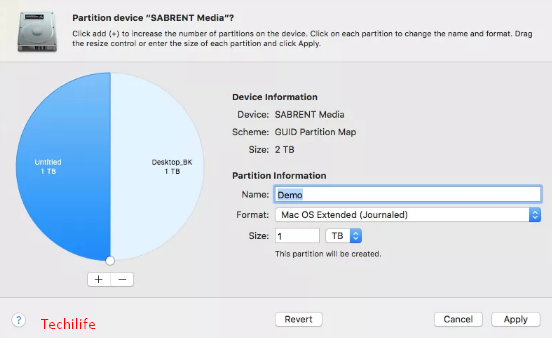
- Select a size for your new partition by either entering a number in Size or through moving the resize control on the graphical picture as well.
- Choose Apply when you are satisfied with your settings.
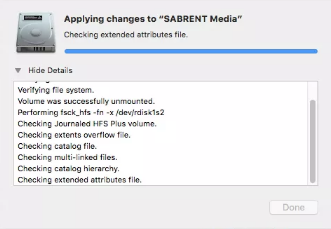
- At the confirmation screen, then choose Partition.
- Disk Utility will then begin the partitioning process. If you wish to see what it’s actually doing, then select Show Details.
- It will then ask you if you want to use the partition for a Time Machine or not. You can Decide Later, Use as a Backup Disk, or also if you have another use, then choose Don’t Use.
- Then select Done to finish.
Conclusion
Alright, That was all Folks! I hope you guys like this guid partition map article and also find it helpful to you. Give us your feedback on it. Also if you guys have further queries and issues related to this article. Then let us know in the comments section below. We will get back to you shortly.
Have a Great Day!
Also See: How to Factory Reset Xbox 360 – Tutorial