Long before routers were actually the default way in order to connect to the internet. When we had dial-up modems that were really louder than car alarms, and wireless connectivity just was not something that your system had. Because it was a tower PC, we had the choice to choose which connection, of those available, Windows should connect with as well. In this article, we are going to talk about How to Change from Wireless to Wired Connection Windows 10. Let’s begin!
On Windows 10, if you guys have a device with more than one network adapter (for example Ethernet and Wi-Fi). Then every interface receives a priority value automatically based on its network metric. That defines the primary connection that your device will use in order to send and receive networking traffic as well.
However, for the most part, Windows 10 does a really good job choosing an optimal connection in order to access the network. Most of the time you may need to configure the order of the network adapters manually. Such as, if you need to use a Wi-Fi over an Ethernet interface when both adapters are connected to the network actually.
You can also disable those adapters that you don’t use, however, it may not be the best solution as you may need them as backups. Rather, a more straightforward solution is that you have to adjust the interface metric. In order to specify that in which order your device should use each and every network adapter, you can do that via Control Panel and PowerShell as well.
Contents
How to change network adapter priorities via Control Panel | wireless to wired connection
If you guys want to change the order in which Windows 10 uses network adapters, then you have to do the following:
- First, open Settings.
- Tap on Network & Internet.
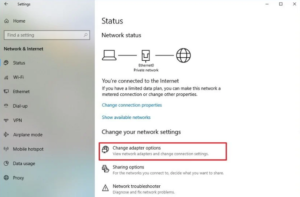
- Then tap on Status.
- Press the Change Adapter options item.
- Right-click the network adapter that you want to prioritize, and choose Properties.
- Choose the Internet Protocol Version 4 (TCP/IPv4) item.
- Tap on the Properties button.
- Now in the “General” tab, you have to tap the Advanced button.
- Then clear the Automatic metric option.
- In the “Interface metric” field basically, assign a priority value for the adapter.
- Tap on the OK button.
- Press the OK button again.
- Then click the Close button.
When you have completed all the steps, then Windows 10 will prioritize the network traffic relying on your configuration.
The only warning via the Control Panel experience is that relying on your network setup. You may also have to adjust the metric for Internet Protocol Version 6 (TCP/IPv6) as well. If that’s the protocol that you are using. (Mostly, you will be using the TCP/IPv4 protocol actually.)
At any time, you can also return the changes via the same instructions. However, on step No. 9, make sure to check the Automatic metric option as well.
How to change network adapter priorities via PowerShell | wireless to wired connection
Just like that, you can also change network adapters priorities on a device along with multiple interfaces via PowerShell with these simple steps:
- First, open Start.
- Then you have to search for Windows PowerShell, right-tap on the top result a choose Run as administrator.
- Type the following command in order to identify the current interface metric and interface index number and tap on Enter:
Get-NetIPInterface

- Then type the following command in order to change the priority order of the network adapter and then press Enter:
Set-NetIPInterface -InterfaceIndex 21 -InterfaceMetric 10
In this command, make sure to change the -InterfaceIndex value in order to reflect the network adapter that you want to prioritize and also change the -InterfaceMetric value in order to assign a priority. Also, keep in mind that a lower metric number means higher priority, and a higher metric number means lower priority actually.
- You have to type the following command to see the new metric applied to the network adapter and press Enter:
Get-NetIPInterface
Further | wireless to the wired connection
After you complete the steps, Windows 10 will prioritize the network traffic relying on your configuration when multiple network adapters are connected to the network as well.
At any time, you can also go back to the previous behavior that allows Windows 10. In order to decide the network adapter priority via these simple steps:
- First, you have to open Start.
- Search for Windows PowerShell, then right-click on the top result a select Run as administrator.
- Then type the following command to identify the current interface metric and also interface index number and click Enter:
Set-NetIPInterface -InterfaceIndex 21 -AutomaticMetric enabled
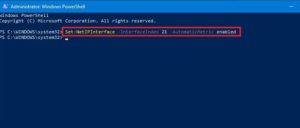
- Now in the command, you have to make sure to change the -InterfaceIndex value along with the correct number of the network adapter that you want to apply an automatic metric as well.
Conclusion
Alright, That was all Folks! I hope you guys like this “wireless to wired connection” article and also find it helpful to you. Give us your feedback on it. Also if you guys have further queries and issues related to this article. Then let us know in the comments section below. We will get back to you shortly.
Have a Great Day!
Also See: Windows 10 File Explorer Not Showing Network Computers


