Most of the time Windows network troubleshooter detects DNS server isn’t responding to windows 10 error rather than resolving the network issue. It really irritating when a user tries to resolve an issue and get to know about other issues actually. In this article, we are going to talk about The DNS Server Isn’t Responding to Windows 10. Let’s begin!
The information has also become an important part of today’s era. Accessing any information needs internet access. The Internet is all about connected Pcs worldwide, which is known as Networking. Every PC has its unique IP address which needs a domain name in order to establish a communication.
As it is easier to remember www.xyz.com than IP address “255.64.224.50”. DNS is just like a translator between the Hostname and the IP address i.e. human-understandable language to computer understandable form in order to establish a network communication actually.
Contents
- 1 The DNS Server Isn’t Responding Windows 10
- 1.0.1 Internet is Working on Other Devices or not
- 1.0.2 Restart Your Computer
- 1.0.3 Use Another Browser | the DNS server isn’t responding
- 1.0.4 Verify Hosts File If a Few Websites are not Working
- 1.0.5 Restart Your Router | the DNS server isn’t responding
- 1.0.6 Run Windows Internet Diagnostics Tool
- 1.0.7 Turn off and on Network Adapter | the DNS server isn’t responding
- 1.0.8 Clear DNS Cache
- 1.0.9 Change the DNS Server | the DNS server isn’t responding
- 1.0.10 Turn off All Other Network Adapters
- 1.0.11 Apply Mac Address Manually | the DNS server isn’t responding
- 1.0.12 Reinstall Network Drivers
- 1.0.13 Conclusion
The DNS Server Isn’t Responding Windows 10
Internet is Working on Other Devices or not
Before you do anything, connect your other devices such as mobile phones and laptops to the same network and see if you guys can access the Internet from those devices. If you can access the Internet from those devices, then the problem is with your PC. If you guys cannot access the Internet from those other devices too, then the problem might be with the DNS server, router, or your ISP actually. In those situations, you can skip most of the fixes below actually.
Restart Your Computer
The first and foremost thing that you should do is restart your system. Well, restarting your system fixes and a lot of issues automatically. So, right-tap on the start menu and choose the “Shutdown or sign out -> Restart” option. After you restart, try again and see if the DNS not responding error is fixed or not. If not, then just go to the next step.
Use Another Browser | the DNS server isn’t responding
Frequently, no matter what browser you are using, it might act funny and avoid you to access the Internet. So, just to make sure, just use another browser and see if you can access the Internet without DNS not responding error. Don’t forget to do this step after you restart your system. Just like that, you can ping google.com from the cmd. If the other browser is working fine, then it’s just the browser that basically has a DNS issue. Reinstall it and that should fix the issue as well.
Verify Hosts File If a Few Websites are not Working
It is also possible that only some websites are not working on your system. One of the reasons might be that the website is blocked in the host’s file. You just have to make sure, it is good to check if the website that you are trying to access isn’t blocked in the hosts file.
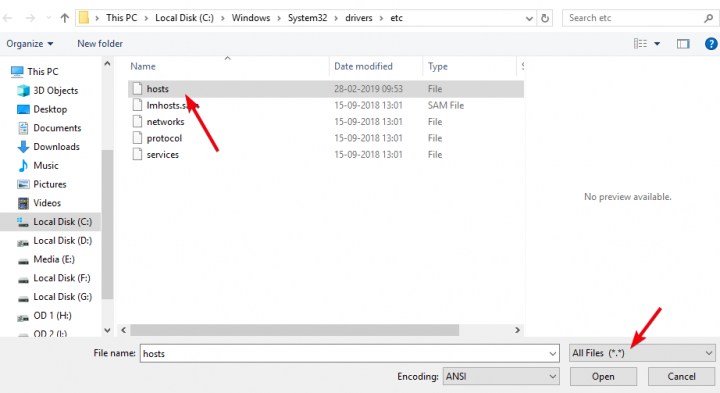
Search for Notepad in the start menu, right-tap on it, and then choose “Run as Administrator”. Then, you have to tap on the “File -> Open” option. Now head to ” C:\Windows\System32\drivers\etc”, choose “All files” from the drop-down menu, and choose “hosts” file, and tap on the “Open” button.
Restart Your Router | the DNS server isn’t responding
Well, routers, for any number of reasons, actually act funny from time to time and avoid you from accessing the internet even though there is no problem with your ISP actually. I’ve seen it happen many times. The good thing is, restarting the router will fix the issue actually. So, log in to your router admin page and then you have to reboot it. If you have a hardware button in order to reboot, then you can use that too.
Run Windows Internet Diagnostics Tool
Windows has basically all sorts of easy-to-use diagnostic tools that find and fix all sorts of issues. One such tool is the Internet Connections Diagnostic Tool actually. This tool basically scans your system and tries to fix the issues it finds.
In order to run the diagnostics tools, just open the Settings app and head to “Update and Security -> Troubleshoot”. On the right-panel, just tap on the “Internet Connections” button. Next, tap on the “Run the troubleshooter” button as well.

Turn off and on Network Adapter | the DNS server isn’t responding
If you guys have recently installed any software or driver, it might be in conflict along with your network adapter. In those situations, you guys can fix it through simply disabling and enabling the network adapter actually.
- Just open the control panel and head to “Networking and Sharing Center”. On the left panel, you need to tap on the “Change adapter settings” link.
- Right-tap on your current network adapter and choose the option “Disable”.
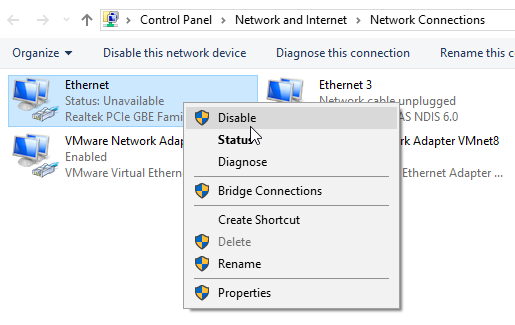
- This action will then turn off the network adapter.
- Right-tap on the disabled network adapter again and choose the “Enable” option.
- When you turn on that, see if you can access the internet or not.
Clear DNS Cache
Windows basically caches all the DNS requests so that you can connect to the websites faster. But, if the DNS cache is corrupted and not flushed out, then you might face the DNS not responding error. You can easily solve this via clearing the DNS cache.
In order to do that, just search for “command prompt” in the start menu and open it. Now, execute the below command and Windows will then clear the DNS cache.
Ipconfig /flushdns
Change the DNS Server | the DNS server isn’t responding
More often than not, whenever you sign up with your ISP, they will basically configure your Internet settings to use their own DNS servers. Compared to other public DNS services such as Google or Cloudflare, most probably, your ISP DNS server is really lackluster and error-prone. So, when you are facing DNS problems, then you can try switching to other public DNS services.
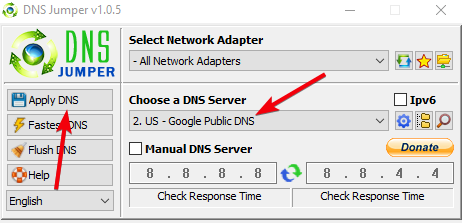
Generally, you can also change the DNS server manually from the network adapter options. But, there is an easier way to change the DNS server. That is through using free software called DNS Jumper. This software permits you to hop between many DNS services and check which works the best.
So, just download the DNS Jumper, open the application, choose “Google Public DNS” from the “Choose a DNS Server” dropdown menu, and tap on the “Apply DNS” button.
After you change the DNS server, try to visit the website of your choice actually. If you guys want to, you can follow the previous step and then clear the DNS cache again.
Turn off All Other Network Adapters
I’ve seen this mostly enough that I have to list it as a possible solution. Whenever you have multiple network adapters, they might be in conflict along with your main network adapter and cause problems. This especially happens whenever you guys have just installed a network driver or a network adapter. So, turning off all the other network adapters other than the one that you are using might sometimes fix the issue.
In order to disable network adapters, open the control panel and head to “Networking and Sharing Center” -> “Change adapter settings”. Now, except for your main network adapter, right-tap on each adapter and choose “Disable”.
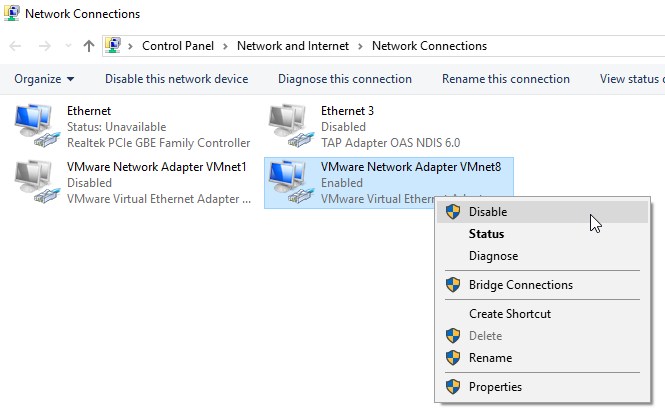
When you have disabled all the network adapter except your main one. See if the DNS not responding problem still persists or not.
Apply Mac Address Manually | the DNS server isn’t responding
Well, Windows is pretty good at detecting and applying the MAC address to the network adapter. But, there are many situations where this process goes haywire and cause problems actually. In those cases, you guys can try to add the mac address manually to the network adapter.
First, we have to find the MAC address of the adapter. In order to do that, open the command prompt and execute the below command.
Ipconfig /all
You guys will see the mac address of your network adapter right next to “Physical Address”. Note it down in a text file actually. Now, open the control panel and head to “Network and Sharing Center” -> “Change adapter settings”. Right-click on your network adapter and then just choose “Properties”.
In the properties window, tap on the “Configure” button.
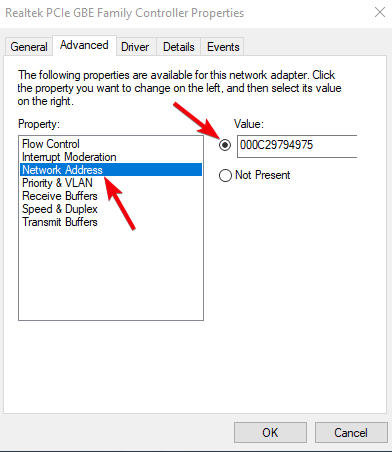
Next, head to the “Advanced” tab and choose the “Network Address” option. Now, choose the radio option next to the blank field, and type in the MAC address that you just copied earlier without any dashes. Then tap on the “Ok” button in order to save changes. Now reboot your PC and see if it fixes the issues or not.
Reinstall Network Drivers
Well, corrupted network drivers can also cause all sorts of problems. By simply updating or reinstalling the drive, you guys might be able to fix DNS not responding error. You can also download the latest network drivers from your motherboard manufacturer website as well. So, find a device that has access to the internet, such as your mobile phone, and then download the latest network driver from your motherboard manufacturer website.
When you have the driver, copy it to your PC. Next, search for “Device Manager” in the start menu and then open it. There, expand the Network Adapter section, right-click on your network adapter, and choose “Uninstall device”.
Now reboot Windows.
After you restart, install the downloaded driver like any other Windows software and then reboot Windows to apply the driver.
Conclusion
Alright, That was all Folks! I hope you guys like this “the DNS server isn’t responding” article and also find it helpful to you. Give us your feedback on it. Also if you guys have further queries and issues related to this article. Then let us know in the comments section below. We will get back to you shortly.
Have a Great Day!


